Reference Guide
- Forma LMS Basics
- Configuration
- System Configuration
- Plugin Management
- Time Periods (Course credits)
- Codes
- Event Manager
- I/O Tasks Connectors
- Question Category
- Additional Fields
- Privacy Policies
- Manage Menu
- Language Management
- User Management
- Course Administration (Backend)
- Course Management
- Creating and editing a course
- Editions
- Subscription management
- Catalogs
- Certificates
- Enrolment Rules
- Reservations
- Course Features (FrontEnd)
- Announcements
- Report Card
- Newsletter (Course)
- Manage Menu
- Course Forum
- Gradebook
- Course Stats
- User/Objects Grid
- Course Info
- Course Report
- Course Final Score
- Learning Objects
- Learning Materials Management
- File Upload
- HTML Pages
- SCORM
- Test
- Assignment
- File Name Handling for SCORM Packages
- Contents and Communication
- Reports
- Layout & Templates
Forma LMS Basics
Technical information for system setup and maintenance
Requirements
Server Specifications
- Server type: Linux, Windows, MacOs, Unix, Sun
- Apache 2.2.x or above (on Windows also IIS can be used)
- PHP version:
- Forma 2.x: PHP 5.4.x to 7.0.x
- Forma 3.x: PHP 7.4.x
- Forma 4.0 to 4.1.18: PHP 7.4 to 8.1
- Forma 4.1.30 or higher: PHP 7.4 to 8.2
- Forma 4.2.x: PHP 8.2
- PHP settings:
- Fileinfo support : ON
- Openssl support: on
- Multibyte Support: ON
- mime_content_type() support: ON
- magic_quotes_gpc : OFF
- register_global : OFF
- allow_url_fopen : ON
- allow_url_include : OFF
- upload_max_filsize : 8M or higher
- post_max_size : 8M or higher
- max_execution_time : 30s or higher
- memory_limit = 256M or higher (advised 512 MB fore large files management)
Database
- Forma 1.x - 2.x: Mysql 5.0 or higher, mariadb 5.5 or higher.
- Forma 3.x : MySql 5.6 or higher, MariaDB 10.0, 10.1
- Forma 4.x: min versions MySql 5.7, MariaDB 10.3. Currently tested until MySql 8.4 or MariaDB 11.x
Note: db server engine must have transaction support (innodb recommended) - Database Driver: MySQLi
- Sql encoding: utf8
WARNING - MySQL Strict Mode
Until version 2.4.2 Forma LMS requires MySql strict mode set to OFF.
Please make sure your hosting provider allows this configuration
This restriction has been removed since version 2.4.3
WARNING - MySQL 5.7 Settings
Using MySQL version 5.7 requires some specific configuration. Check this thread for details
Installation and Upgrade
INSTALL PROCEDURE
- Create the database on your dbserver:
- If the db user has permissions, the installer can create the database for you
- You can use any db admin tool, such as phpmyadmin
If you use a prepackaged webserver on your PC, the default db admin link is http://localhost/mysql/ or http://localhost/phpmyadmin - Be sure you have your database parameters available (host, user, password, dbname)
- The database must be defined with UTF-8 encoding
- Upload all the files in your root directory or subfolder.
- If you want use at runtime FTP upload features, be sure you have your ftp parameters (host, user, password)
- forma.lms web is protected with apache.htaccess files from unauthorized use. Often, dot-files are hidden from view. Check your environment and be sure that these files are also uploaded
- Launch http://www.yoursite.com/install/ (of course you should type your domain, not “yoursite.com”)
- Follow installation instructions. Note: during installation, a config file is created in the application root directory. In case your root is missing writing permissions, you can download it from the link provided on the last installation step, and upload it manually.
- To secure your installation, at the end of install, remove or rename the install and upgrade folders
Note:
During the install procedure, the system will load XML file languages.
Depending on number of language chosen, this operation can take some time in order to complete
UPGRADE PROCEDURE
- Make a full backup of db and files, and make sure that you have a full backup that you can trust and recover if needed
- Export the language files (if you did any customization), to import them again after the upgrade
- Delete all files and directories excluding
- the/files folder and all its subfolders and files
- the customscripts folder
- your own templates in templates/<yourowntemplate> (if you have any)
- the config.php file in root folder
- Upload the new files
- The upgrade procedure needs resources under install folder, so make sure to also upload this one
- Forma.lms web is protected with apache.htaccess files from unauthorized use. Often dot-files
are hidden from view. Check your environment and be sure that also these files are uploaded
- Launch http://www.yourwebsite.com/upgrade (of course you should type your domain, not “yourwebsite.com”)
- Follow upgrade instructions.
- As a final step of the upgrade, the procedure imports and updates all languages previously defined with the standard translations.
- At the end of the upgrade, go to the “Administration panel/Language” to import your own language files
- To secure your installation, at the end of upgrade, remove or rename the install and upgrade folders.
The procedure may change the config.php file for you, or it may ask you to download it and upload to the web root folder, if not writable.
Upgrade to version 4.x
Forma 4 introduces a completely rewritten install and upgrade component based on the Doctrine ORM.
Since it is a migration, upgrading to Forma 4 will be only possible starting from version 3.3.25. Upgrading from previous versions you’ll need to upgrade to version 3.3.25 first, and then to Forma 4. An external legacy upgrade component is planned to be released to manage direct upgrades from previous versions.
Upgrade from version 2.xx
During upgrade from forma.lms 2.x to forma.lms 2.2 and later, pay attention to
a) Template
Template 2.0 and 2.1 are not compatible with 2.2
During the upgrade, the site template is updated to “standard”.
Minimum template version required (see release notes)
Upgrade from version 1.xx
During upgrade from forma.lms 1.x to forma.lms 2.xx, pay attention to
a) Database
after upgrade the DB are not full compatible with forma.lms 1.xx, and there is no path to go back.
Made a backup before upgrade
b) Template
Template 1.xx are not compatible with 2.xx
During the upgrade, the site template is updated to “standard”
c) Dropped feature
d) Customscripts
All customization made through customscripts/ must be reviewed and ported to the 2.0 current
version. forma.lms does not check base version file with your customized version in customscripts
folder. There is no version check support for customscripts files
e) The update detects the use of the mysql / mysqli driver and changes the configuration appropriately
At the end of the upgrade process, check all the system configuration settings to validate your needs. The update procedure tries to keep the settings, but new options have been added and others have been removed
Please, double-check the above release notes before upgrading
Upgrade from docebo ce 3.x, docebo ce 4.x
You can directly upgrade your old docebo (either series 3.6.x and 4.x) installations to forma.lms 2.x
The config.php file is completely changed from D36 and with more config options since D4.x
The upgrade procedure changes the config.php for you and writes it (if writable), or requires you to download it and upload to the web root folder.
Coming from D36, review the config.php and add your own settings, if needed.
General architecture and definitions
Login and Registration
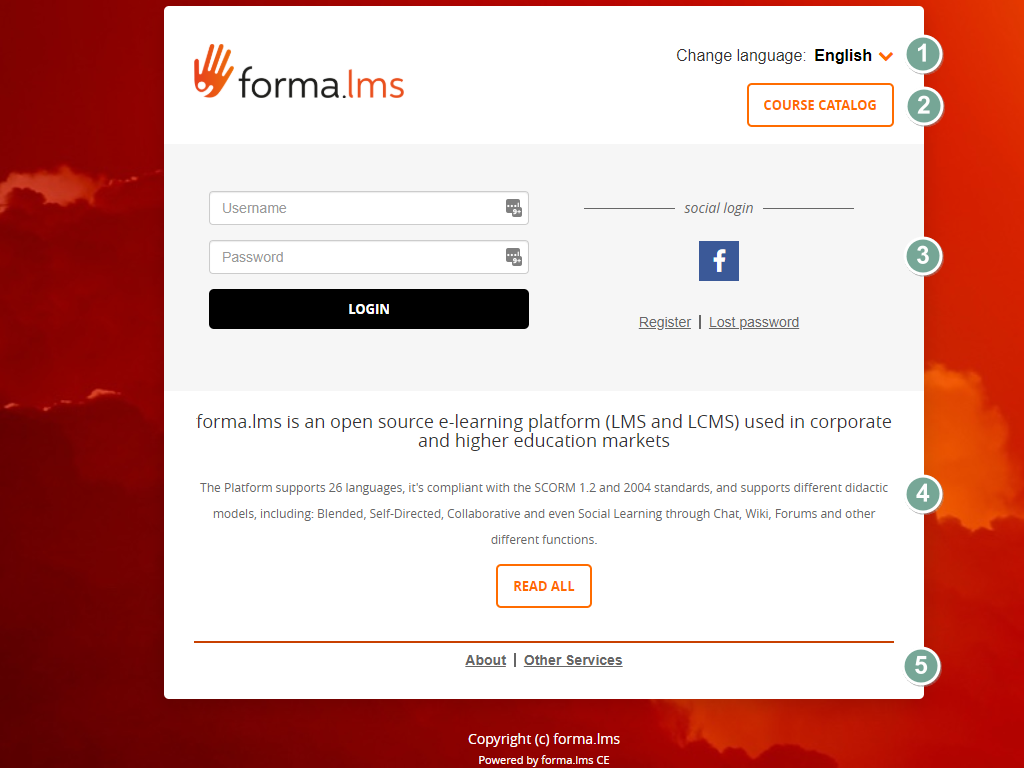
Main Layout Elements
- Language Selector
Change language for the login and registration page. This automatically detects the user browser language. Upon login, language will be set to the user profile language. - Course Catalog
Opens the catalog of courses. Feature must be enabled from System Configuration elearning settings. - Login and social login
Standard login form. Social login features can be activated from the plugin manager. - Privacy Policy
Default privacy policy text can be edited in admin settings
LMS Frontend & User Panel
The frontend of the application hosts all the learning related features for both students and teachers.

Main Layout elements
- MyCourses: in this section the user will find all the courses, coursepaths and training activities he is directly enrolled to.
- Catalog: if enabled, this section will show the course catalog(s), with courses he can subscribe to
- Community: general platform community forums
- Helpdesk: a contact form to send support request to platform administrators
- New Certificates: notification icon and link to alert for new available certificates for download
- Administration: link to backend administration section, only available to administrators and superadministrators
- User Panel: click on the username to open your own user panel
2. MyCourses Tabs: access different areas of the MyCourses section, if enabled
3. Filters panel: here a user can filter and search among the courses he is subscribed to:
- Filter by course category
- Filter by course type
- Filter by year
- Filter by status. The page by default will show all open courses, but you could filter them based on the user status on the course
- Search by word on courses title, description, and category
- Filter by course label: the “label” option must be enabled. Check system configuration
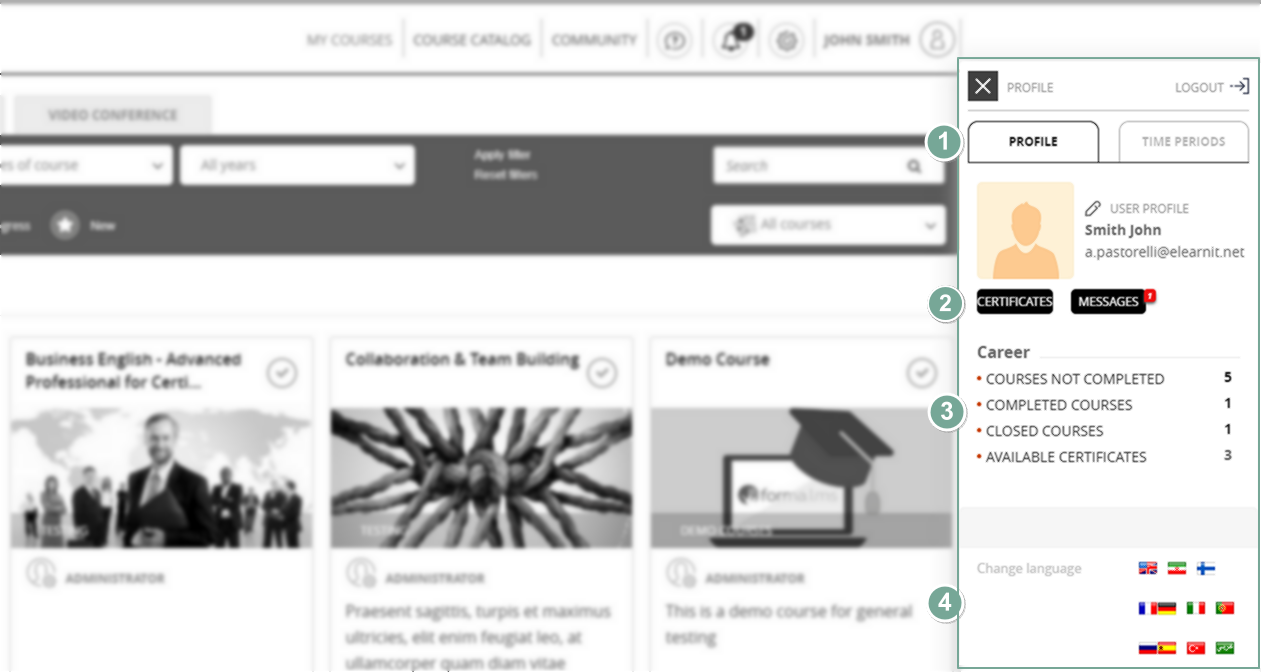
User Panel
This panel displays personal info and features for the user:
1. Profile: if allowed by configuration, user can edit his own profile
2. User features:
- Certificates: go to mycertificate page
- Messages: access the private messages feature
3. Career: some basic stats about user activities
4. Language selector
Backend Administration
This is the area of the application where most of the administrative operations happen, such as user management and course creation.
Terms and Definitions
- USER LEVEL
- it's the main permission level that determines which part of the application a user can access, and his level of permissions. In Forma LMS users might be registered as one of the following levels:
- 1. User
- can only access the frontend
- 2. Administrator
- can access the backend with limited functionalities and permissions over users and courses
- 3. SuperAdmin
- is a "GodAdmin" that can access both the frontend and the backend with full permissions
- User ROLE
- users of any level can be subscribed to courses with different roles, determining what they can do and see within a course based on course menu configuration and their level
- Admin Profile
- the admin profile defines which features an admin can access in the backend menu, and what he can do. The admin profile works together with admin permissions that can be set over specific courses, catalogs, user groups, user nodes, etc.
- Registration
- user is registered to the platform with a specific level
- Subscription
- user is enrolled to a course with a specific role
Configuration
List and description of the main configuration settings and features
System Configuration
Main system configurations are available under:
Admin > System configuration > Settings
From each tab panel, you can access a different configuration section with different groups of options
Most of the options are self-explaining, we will describe the most important and critical.
Main Options
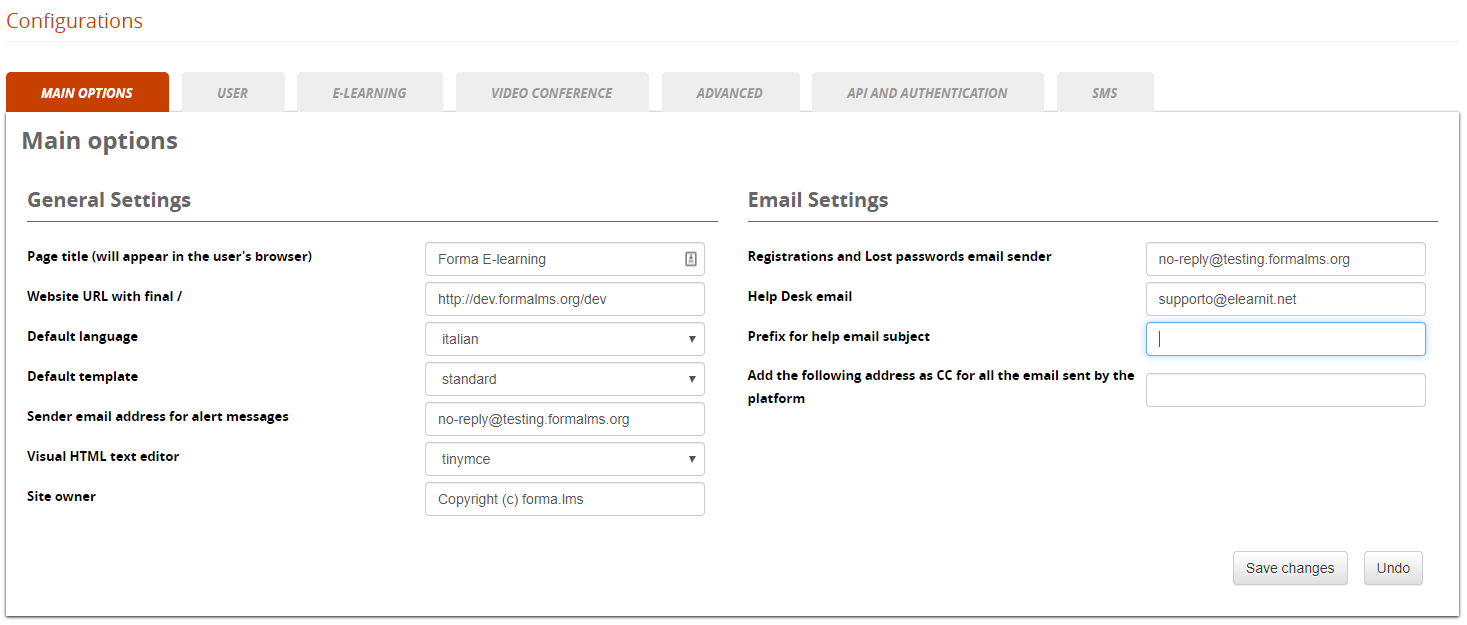
General Settings
This group of options includes the main basic configurations for your Forma LMS installation
Page Title
The name that appears in the user's browser;
Default Template
The default template assigned to the installation;
Website URL
The web address of your platform (must finish with a /)
Default language
The default language for the platform labels, if a user specific language isn't defined
Sender email for alerts
The e-mail address from which notifications are sent to users
Visual HTML Editor
The visual editor used for text formatting
Site Owner
- Text to be shown as custom footer credits in your template
Email Options
Set-ups for the general email settings for the platform
- Prefix for helpdesk
-
- Enter a text to prepend to the helpdesk email subject.
- Add CC or CCN Addresses
All the emails sent by the system will also be sent to these addresses. If you want to use multiple email addresses in those fields, please use a comma (,) followed by a space as a separator.
User
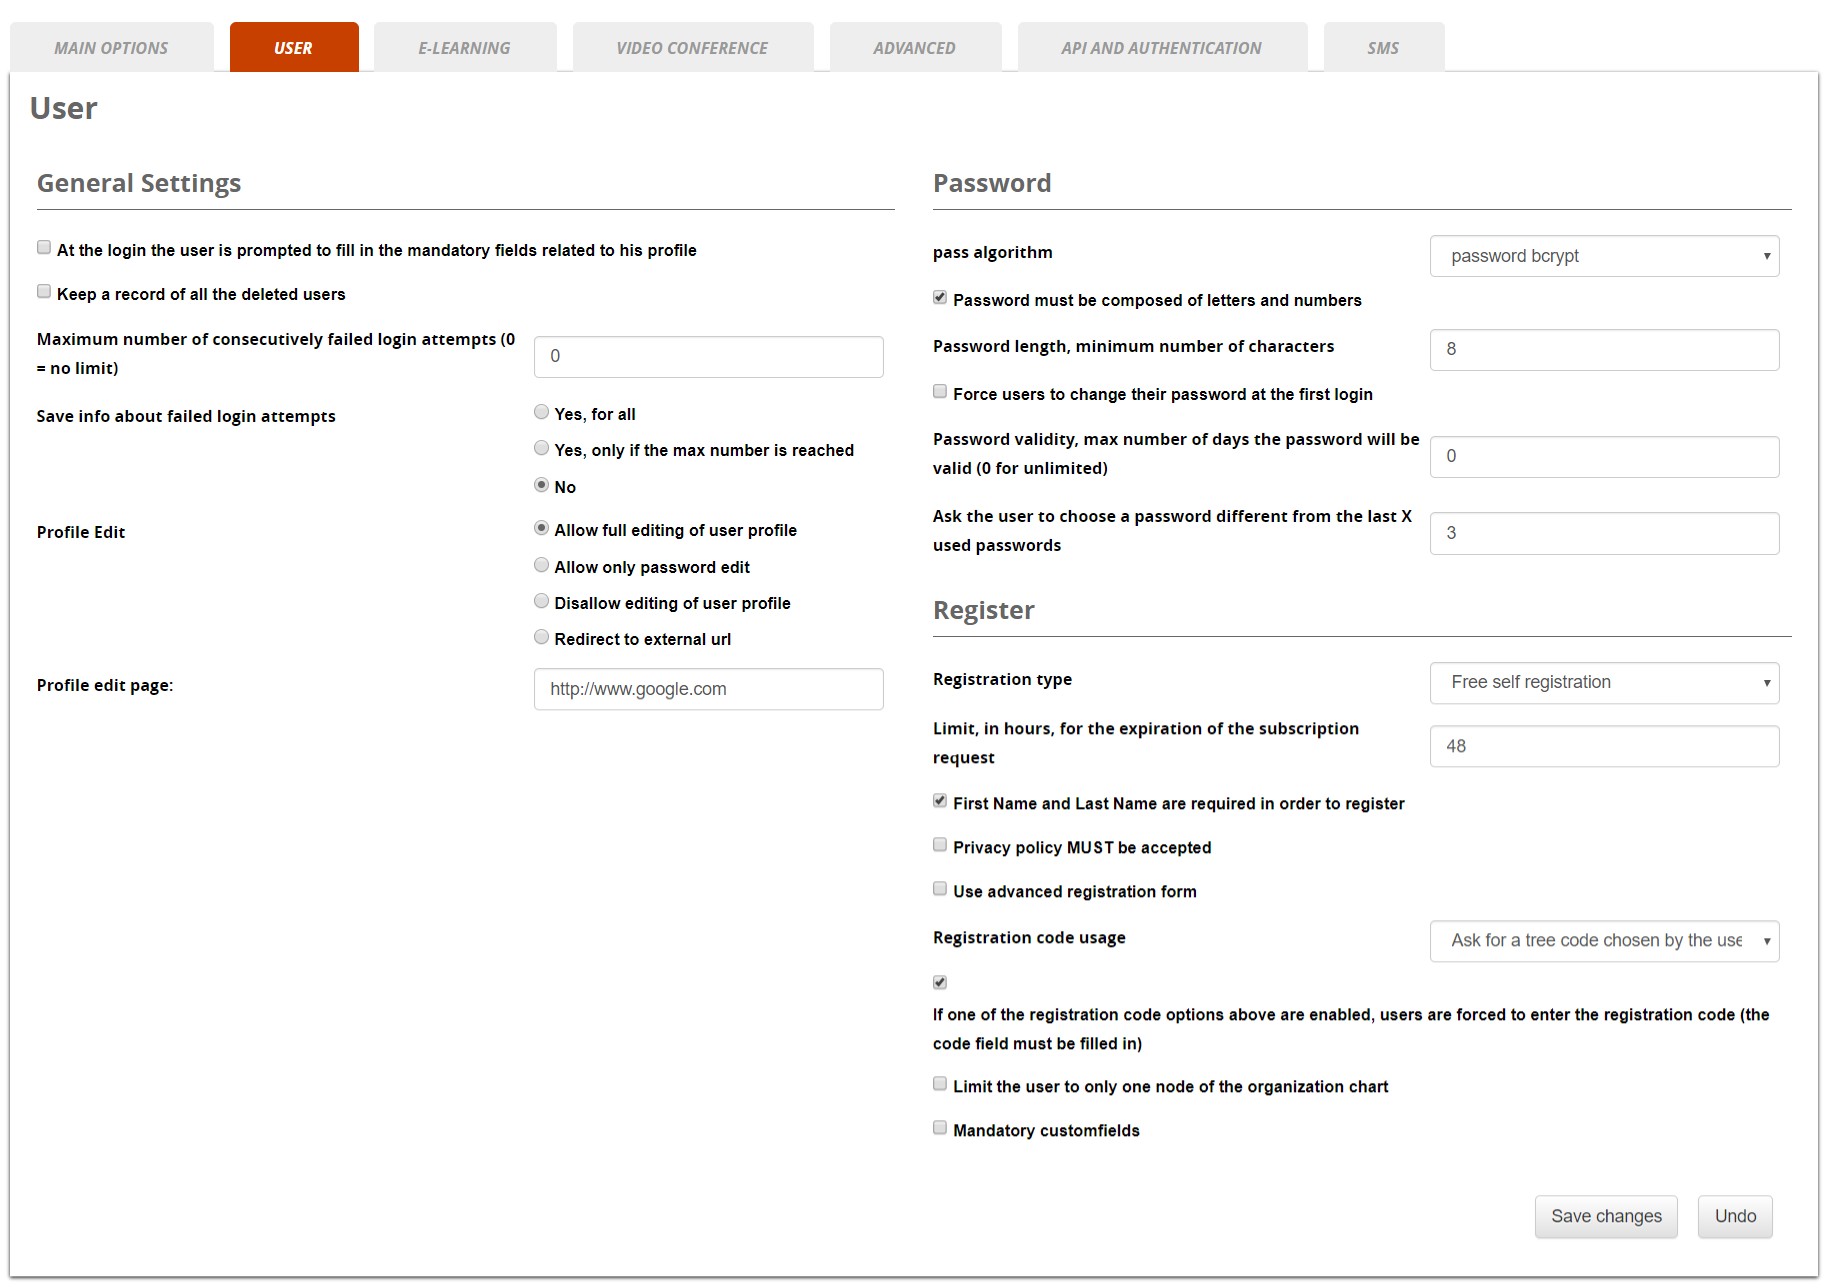
General Settings
Main settings for user related configurations: from this section, it is possible to edit:
Password
Main settings for password related configurations
Register
Settings for platform registration modes and features
Registration Types
- Free self registration
- Users can self-register directly to the platform, receiving just their credentials if a notification event is enabled (Check Event Manager for notification settings)
- Free registration with double OPT-IN
- Users will receive an email with a confirmation link upon self-registration
- Moderated self registration
- User registration must be approved by an administrator
- Only administrators
- Only administrators can register new users. Registration link on login page is disabled
Advanced Registration
Select the option “Use advanced registration form” to:
- Split registration for custom fields: users will be asked first to fill the main registration fields, while all the custom fields will be prompted on a following page
- Enable self registration to Groups: upon registration, users will be prompted with a list of groups and will be automatically added to the selected groups
Registration Code Usage
This feature extends the registration form, asking the user to select or insert a code.
This will:
- automatically insert the user in an orgchart node
- automatically enroll the registering user to some course
- both of the above
Other Options
- Limit the user to only one node
- Select to avoid users to be registered in multiple nodes
- Mandatory customfield
- mandatory customfields will be required also in administration user edit
-
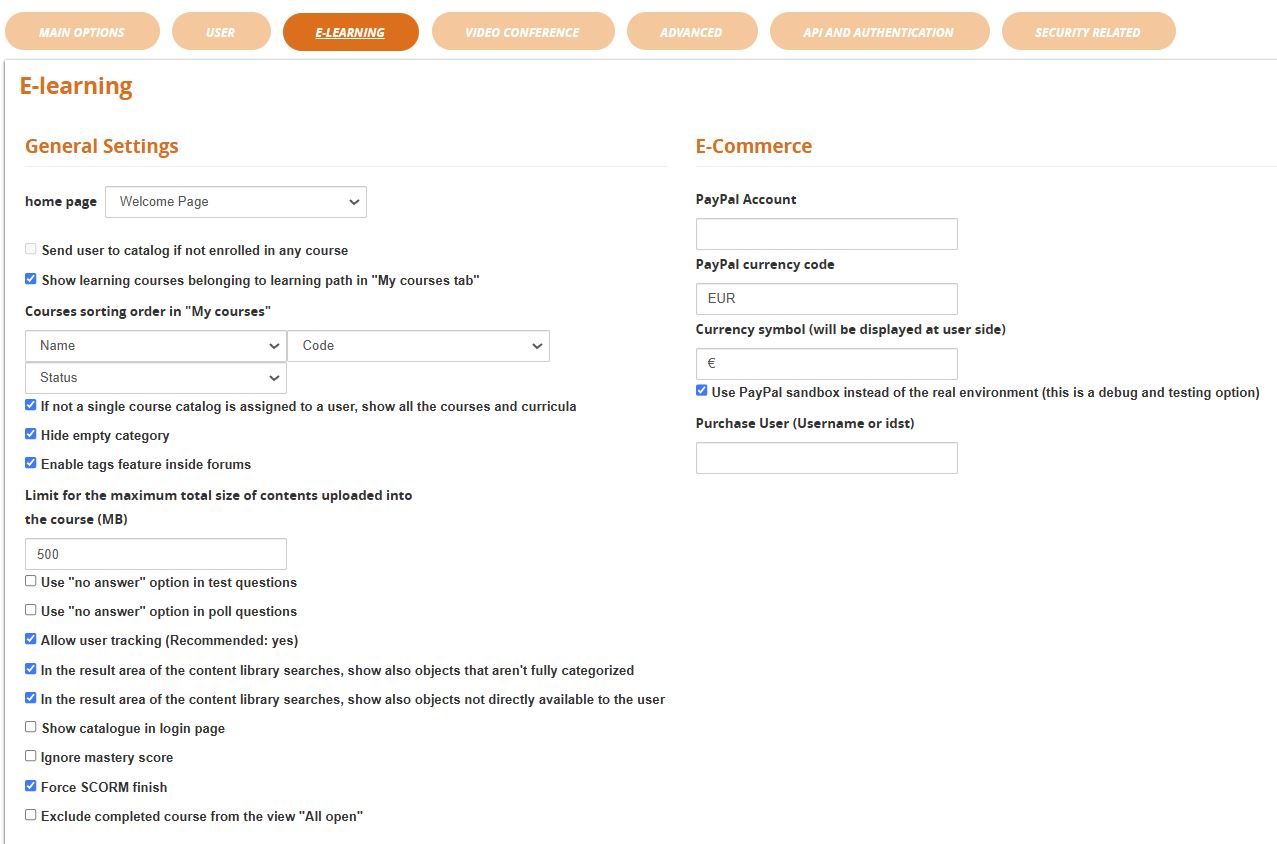
E-Learning
This section includes some configuration options for frontend LMS and courses

General Settings
- Home Page
- Select the page to be shown to users after login
- Send user to catalog if not enrolled
- Redirect user to catalog if MyCourses page is set as home page but is empty
- Hide Empty category
- In the catalog page, empty categories are not listed in the side tree categories listing
- Show login catalog
- A button to the courses catalog will be shown on the login page
- Exclude completed courses from the view "all open": in the MyCourses page, the "All Open" filter will hide course already completed by the users. Useful if you have too many courses and need to filter the completed ones for better bage browsing
Ecommerce
Settings for the ecommerce features. You just need to enter your PayPal account and, if you actually want to sell courses, unflag the “sandbox” option. The sandbox would be used to run tests without actually completing the transaction, obviously when you are ready to sell your courses you don't need a sandbox anymore.
Important: if you want to use the ecommerce functions, you also have to do 2 more things
- enable the course catalog
- flag the “sell course” option when you create or edit your course, and put a price on it.
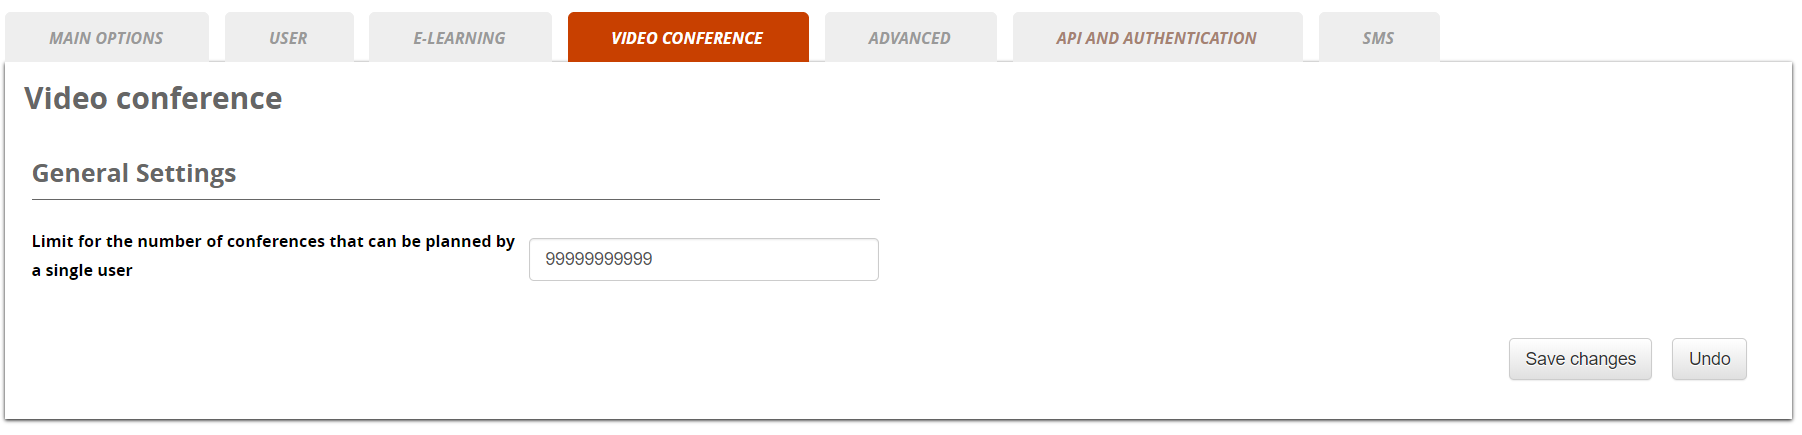
Videoconference
Advanced
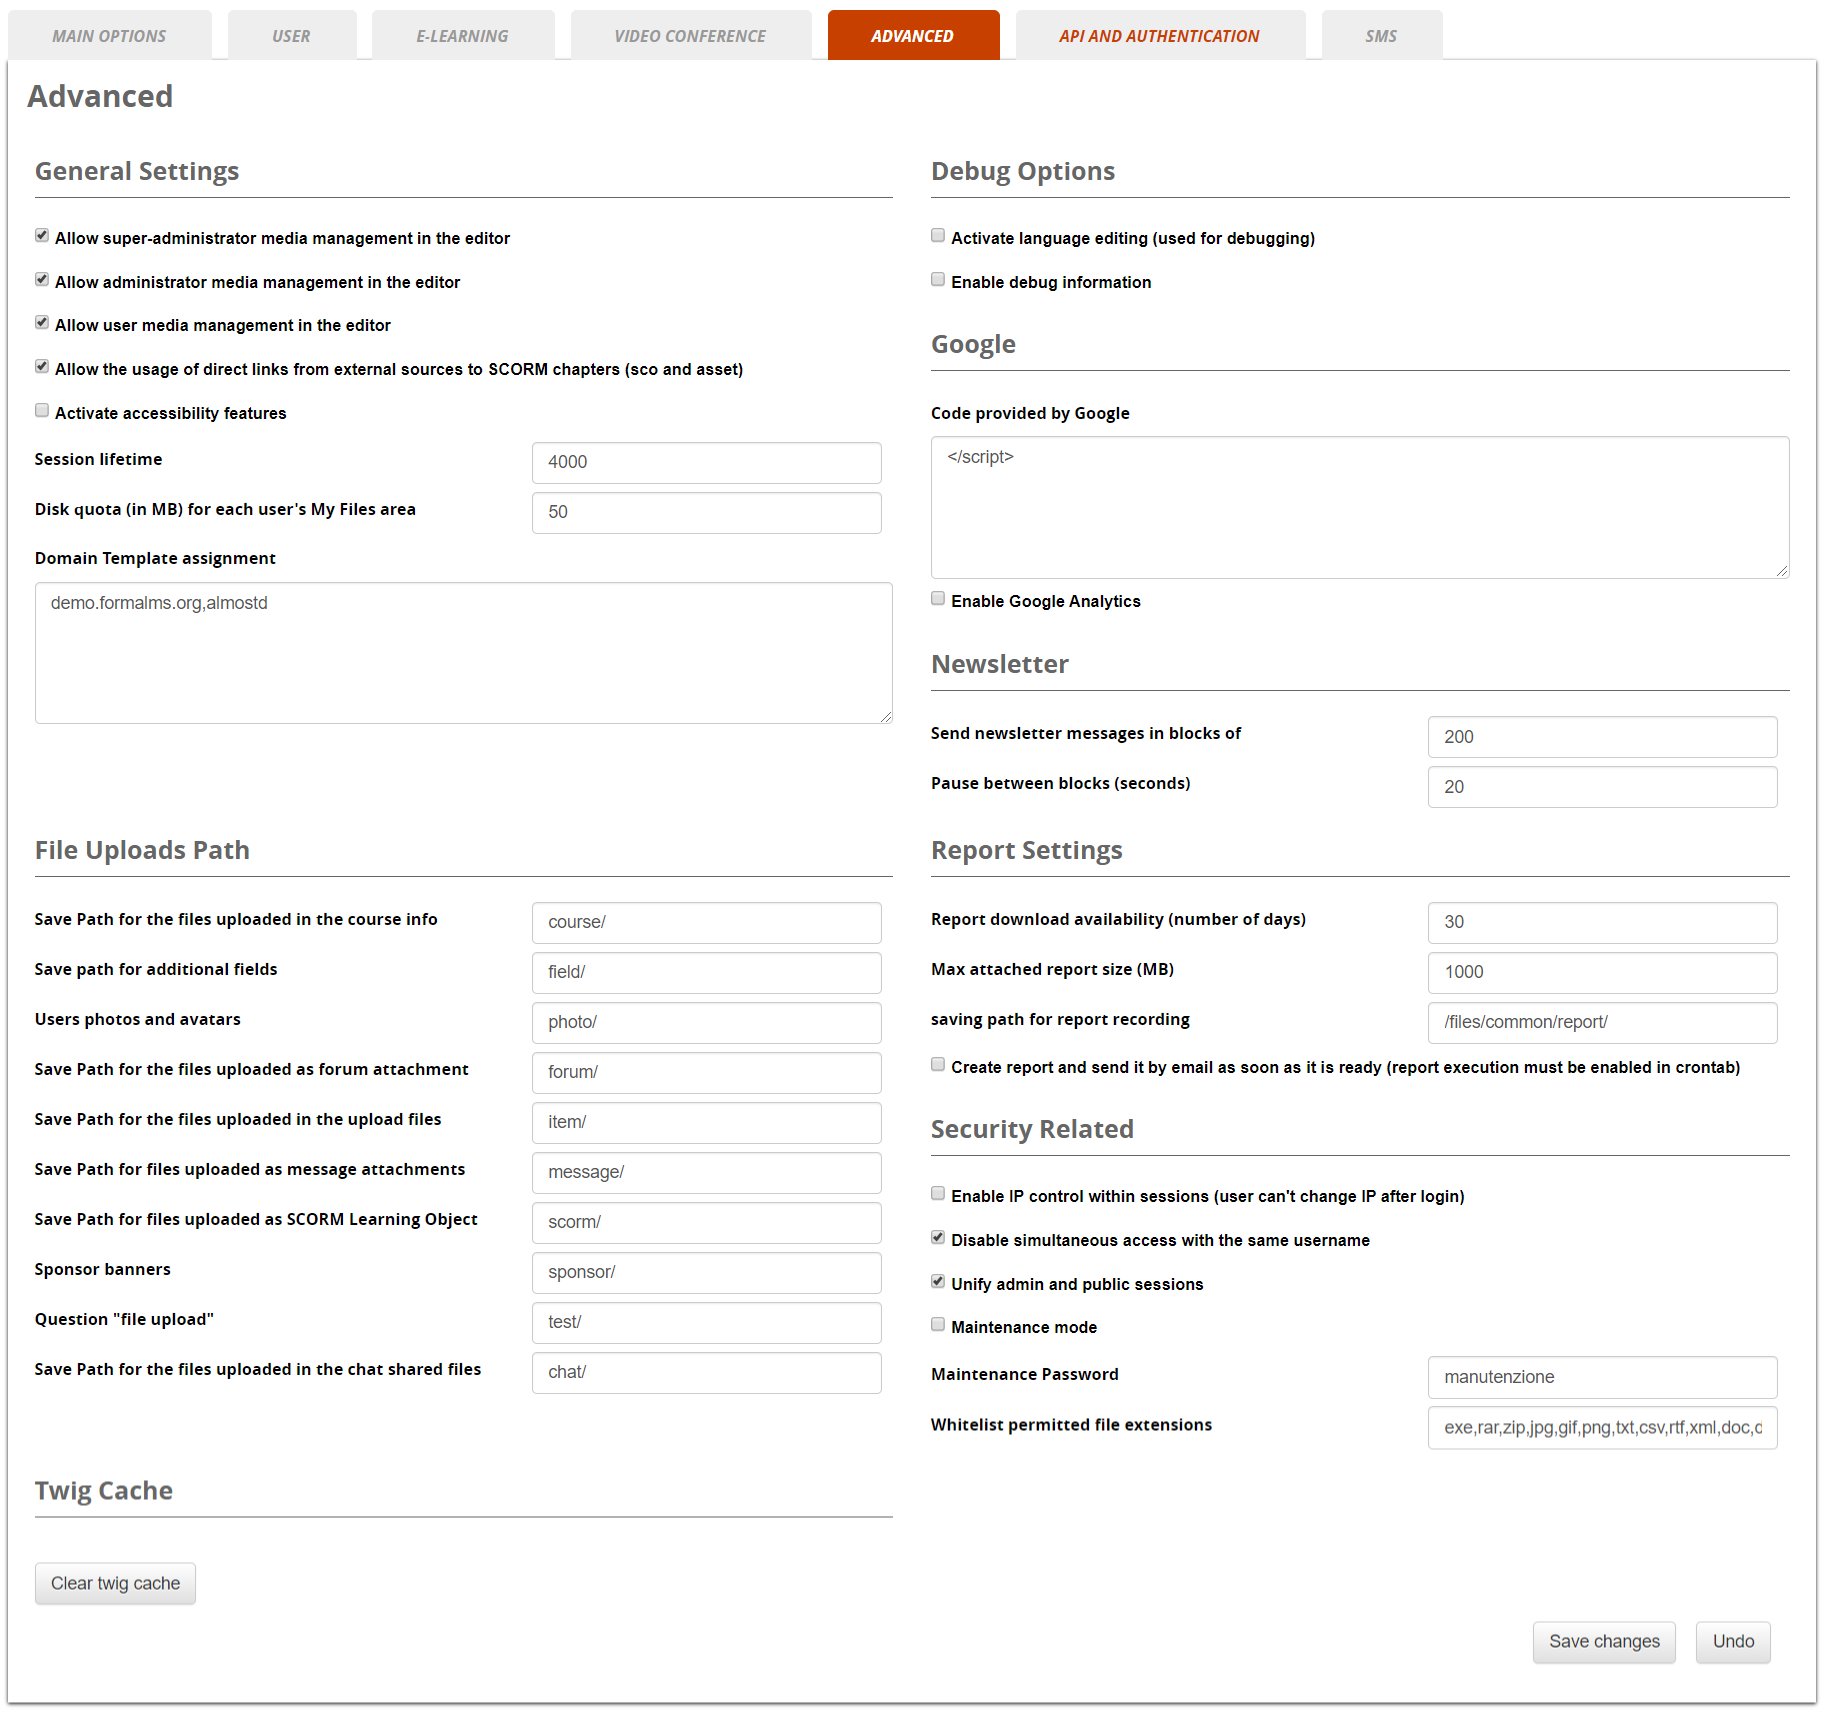
General Settings
- Session
- The period of inactivity, after which a user is disconnected (session length)
- Domain template assignment
- Set the template to be assigned to specific domains. Add one domain per row, like: [www.yourdomain.com],[template]
-
File uploads
Set the default folders for different types of asset.
Caution. Changing these paths may lead to link and display errors.
Twig Cache
Use this button to empty the Twig Cache folder in case of visualization problems after plugin install or template changes.
Debug Options
Options to enable code and language debug features
Google
Settings for Google Analytics integration
Newsletter
Settings to avoid blacklisting and antispam issues when sending emails with the newsletter feature
Report Settings
Use these settings to configure automatic report sending conditions
Security Related
Some security related options:
- IP control
- If this option is selected and the user changes connection during the same login session, he will get an error
- Disable simultaneous access
- The same user cannot be logged from different devices at the same time
-
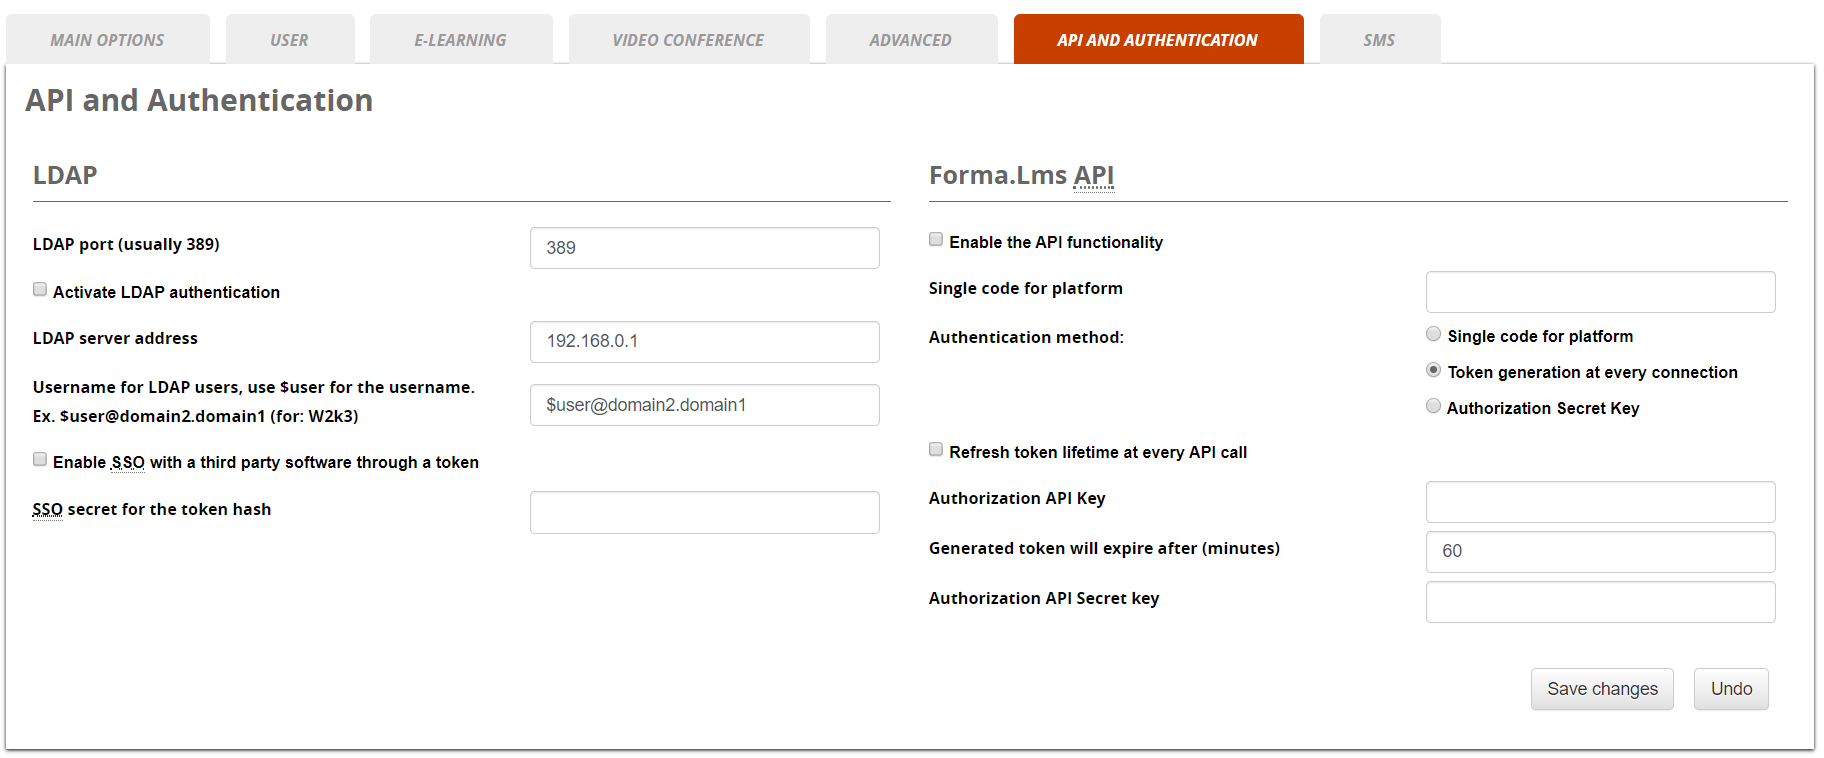
API & Authentication

Check the API & Integration documentation for details
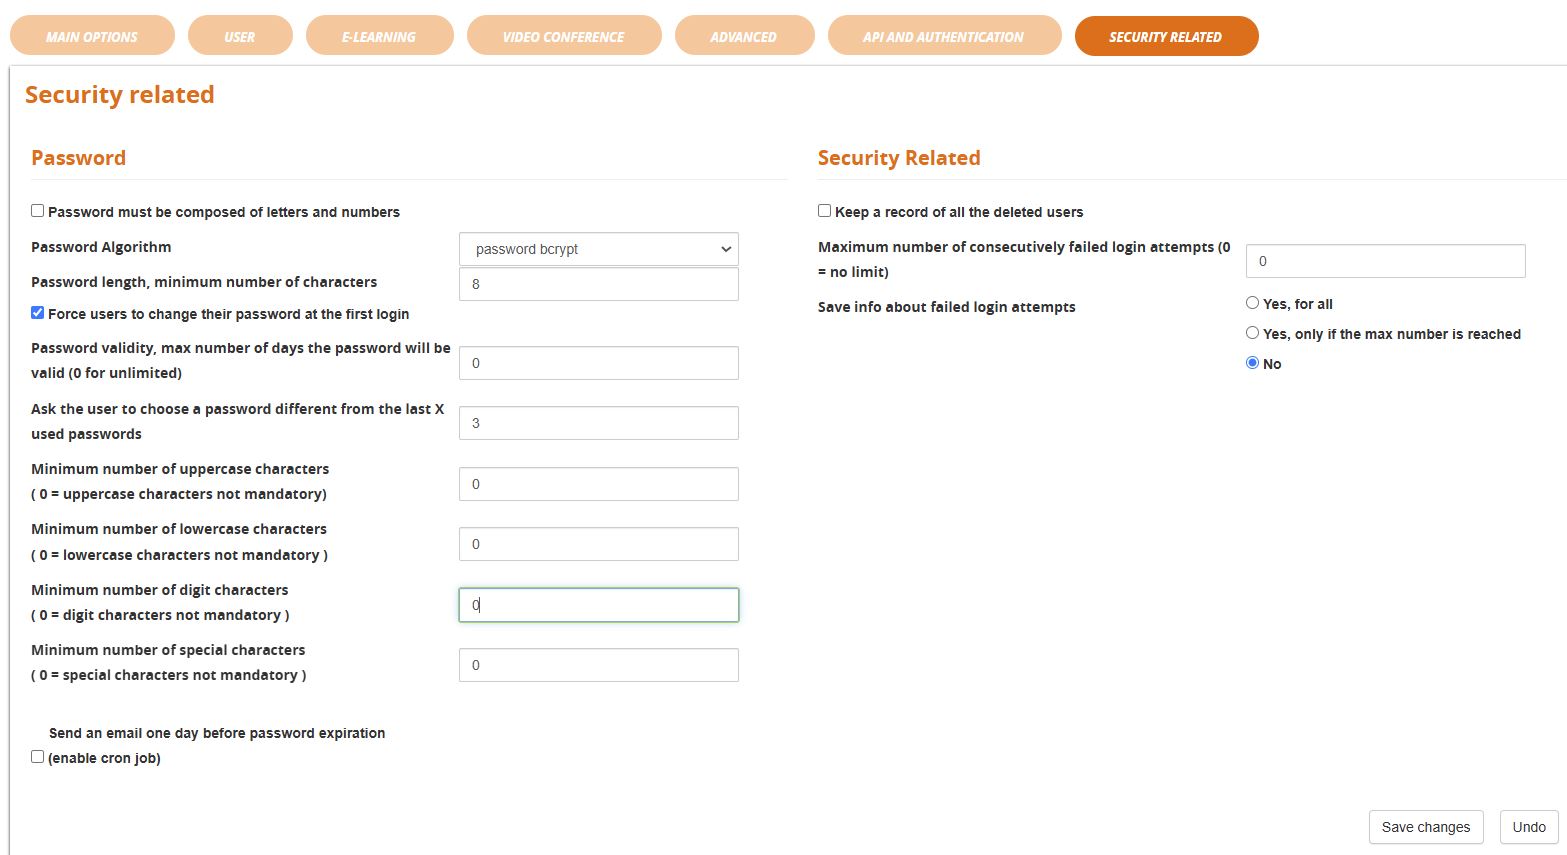
Security Related
This section was introduced with Forma 4.0

The option "Security Related > Keep a list of deleted users" has been removed since Forma 4.2 and will be automatically active
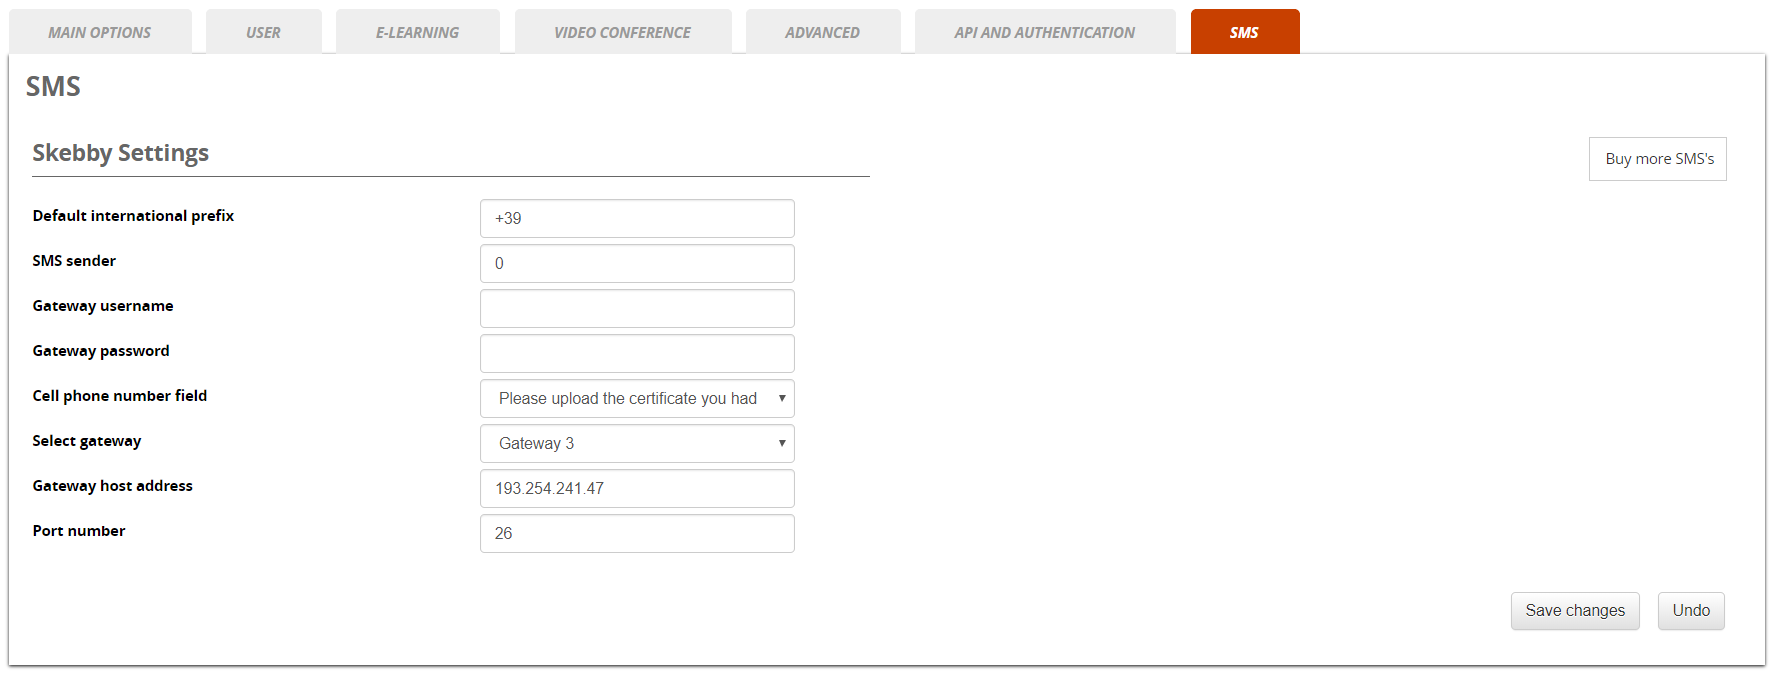
SMS
This feature has been REMOVED SINCE FORMA 4.0
You can also send SMS from Forma. We have an integration with the popular Skebby service. Just create an account with them (click on the button), purchase credit from them and fill the required fields with the account information you will receive from Skebby.
Then you'll be able to send Forma notifications with an SMS instead of an email. Every automatic event can be configured with email or SMS from the event manager. For the manual communications, you can decide what to use from time to time.
Of course, you need to have the mobile phone number of your users in an additional field, and you need to set the correct field for the mobile number in this section.

SMTP settings
SINCE FORMA 4.0 this feature has been MOVED under settings > system configuration >mail settings
If you want to send trusted and authenticated emails with one of your email accounts, remember to set these 2 parameters as “on” during the installation of Forma Lms
$cfg['use_smtp_database'] = 'on'; $cfg['use_smtp'] = 'on';If you select that you will use the SMTP, a new tab will appear in your general settings, and you'll be able to insert your account information in your User Interface (host, port, password, username, security…).

Plugin Management
Plugin Manager
From this page, you can manage available plugins and install new ones
ACTIONS
- Settings
- Edit plugin settings, if available
- Install
- Here you can install or uninstall available plugins
- Purge
- Completely removes the plugin from the installation
- Activate
- While installed, a plugin can be activated or deactivated. When deactivated, plugins will be ignored by the system
- Priority
- In case of conflicts here you can set the load priority for the plugins
-
Install a new plugin
The steps to add new plugins are:
- Upload: upload a plugin package directly from your computer. After upload the new plugin will be added to the available plugin list
- Install: this will actually install the plugin features
- Activate: to make the plugin features really effective
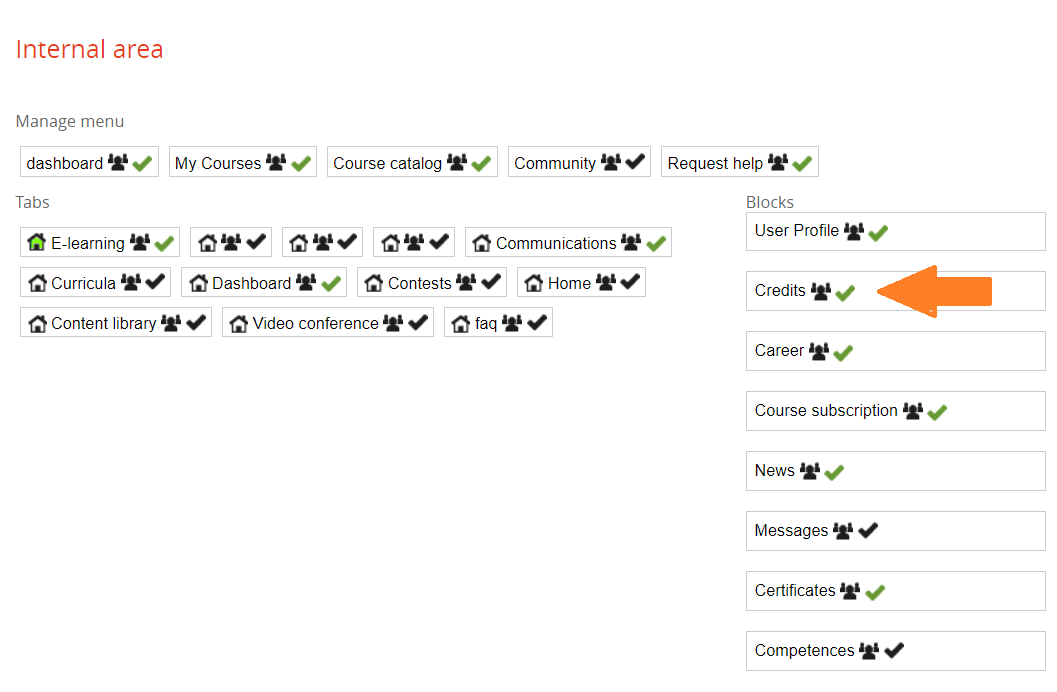
Time Periods (Course credits)
Forma allows the creation of time periods related to course credits:
Admin > Settings > E-Learning Configuration > Time periods
The period is shown in the list:
In order to use time periods, enable Credits
Admin > Settings > E-Learning Configuration > User area in LMS
Click on 'Credits' and be sure that the tick is green:
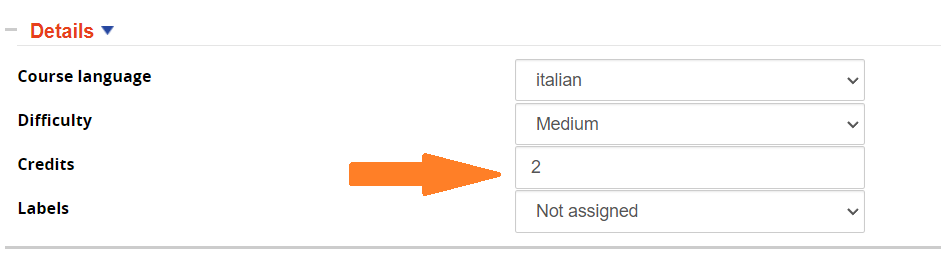
Insert credits in a course:
Elearnig > Courses > Courses > Edit a course
In the section 'Details' you can assign the number of credits
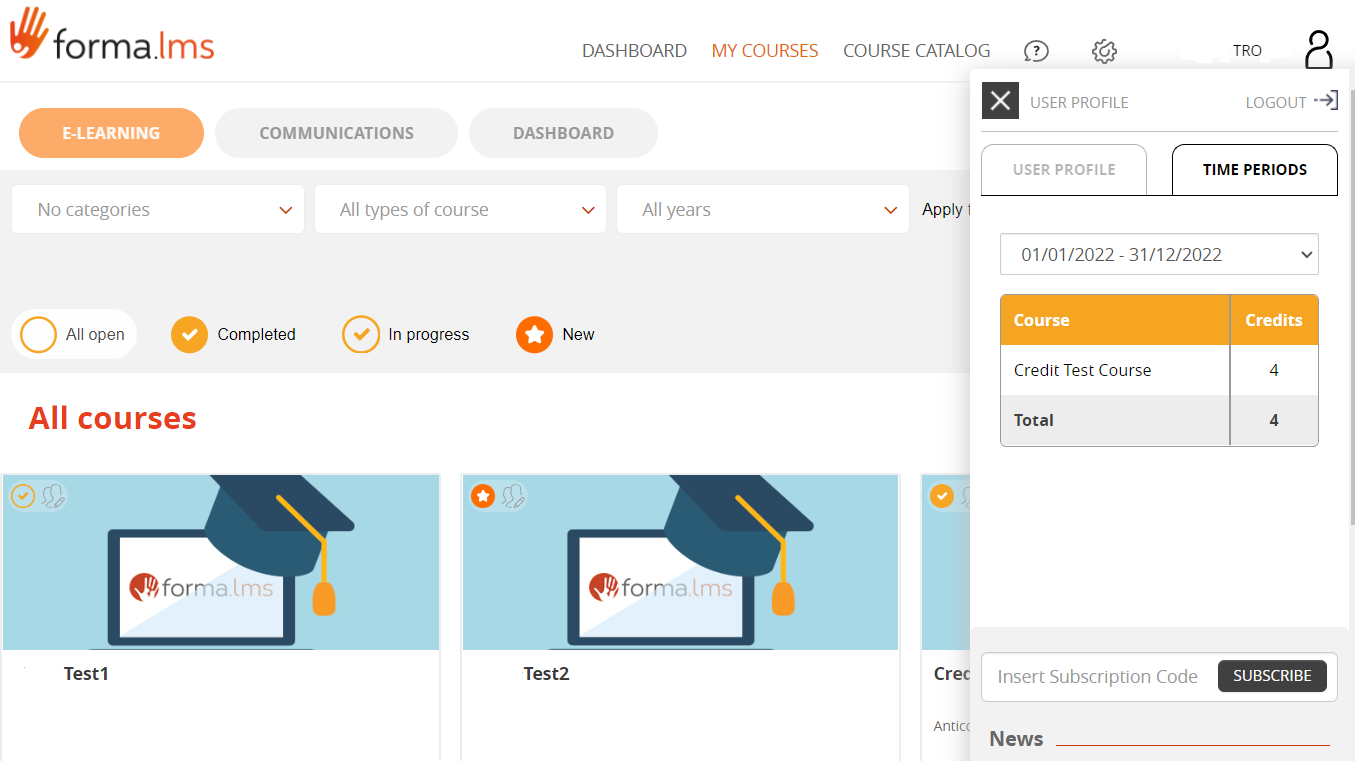
Users can check their credit balance in the log in frame in the tab 'Time Periods'
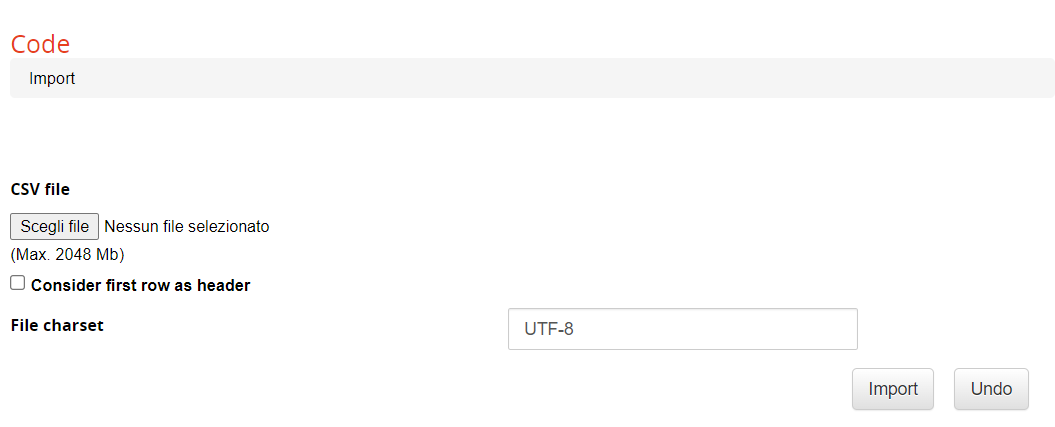
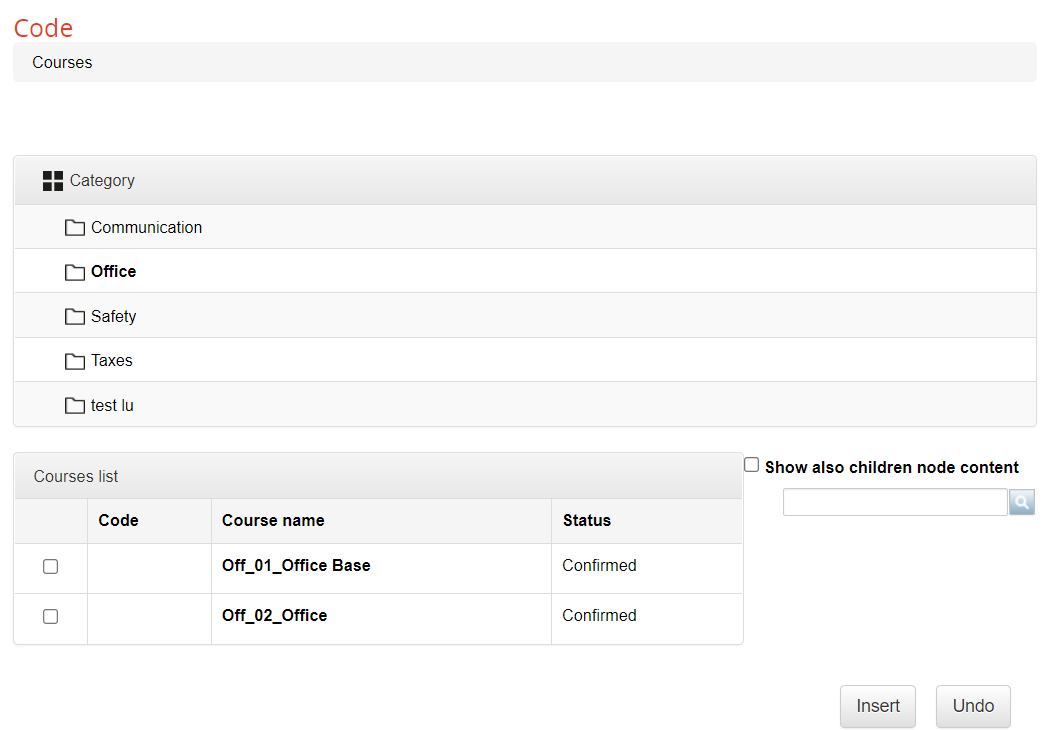
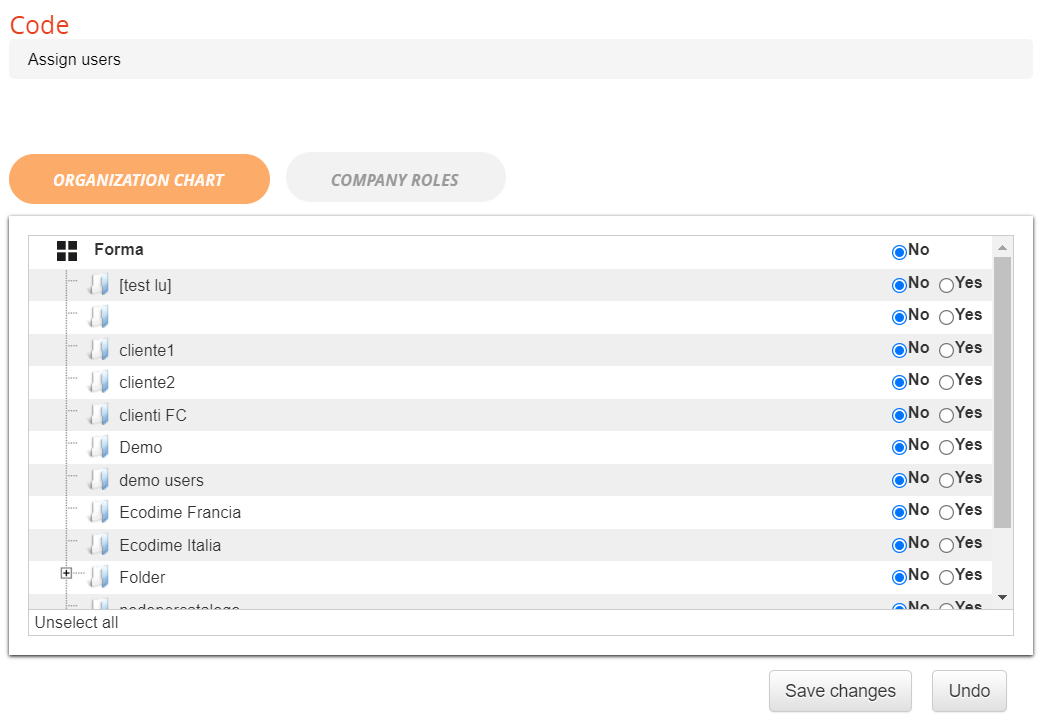
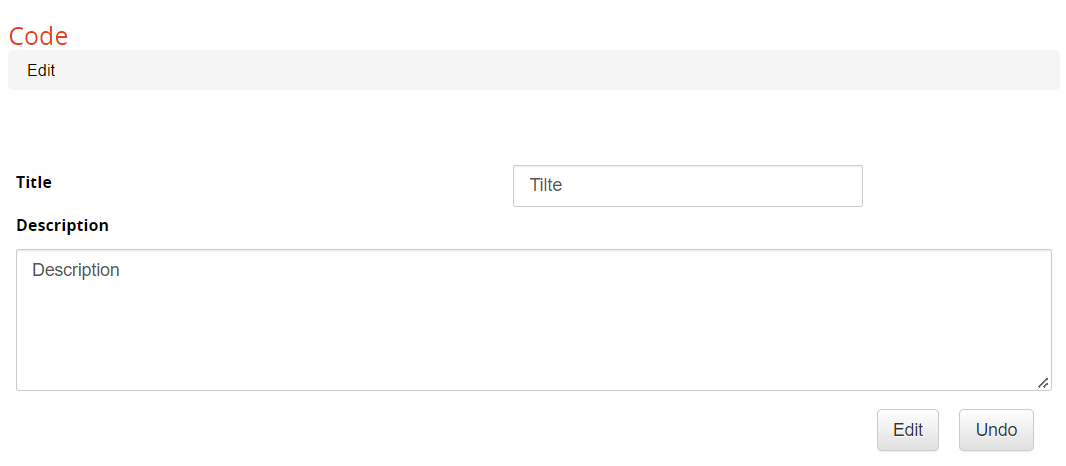
Codes
Forma allows the creation of subscription codes:
Admin > Settings > System configuration > Code
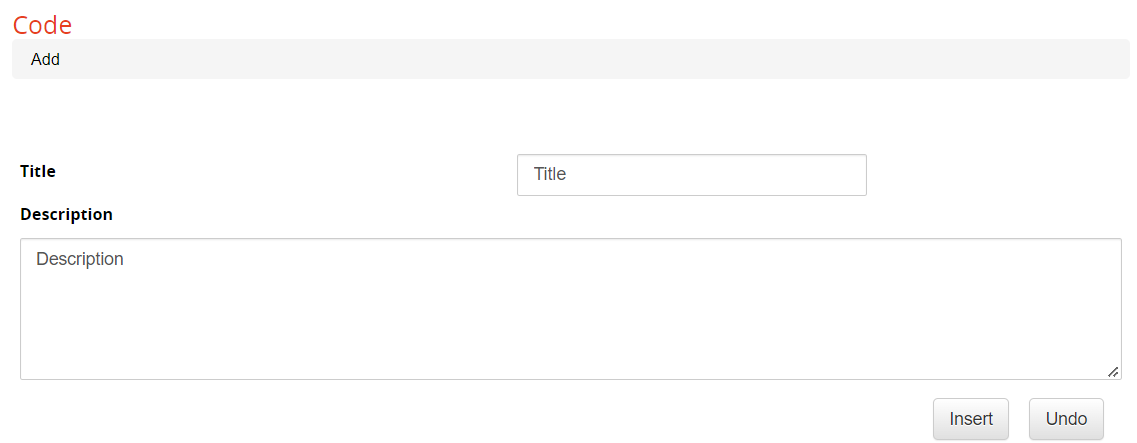
Code features
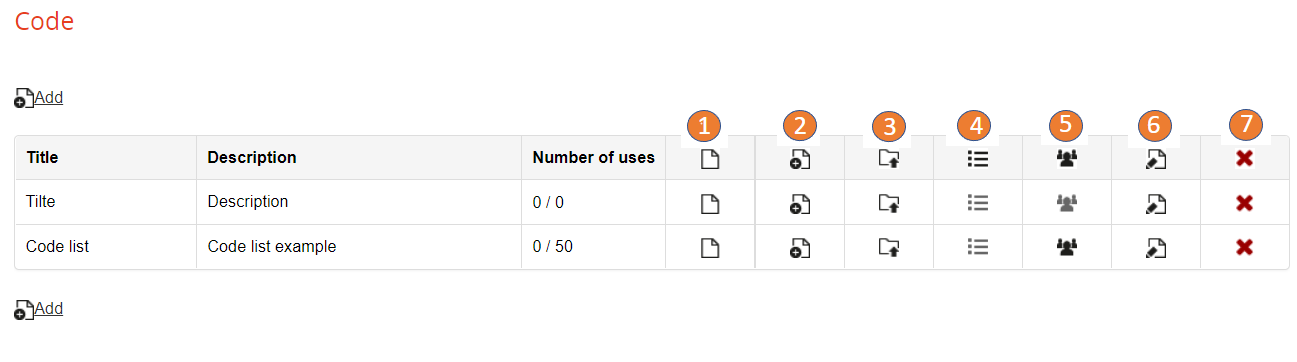
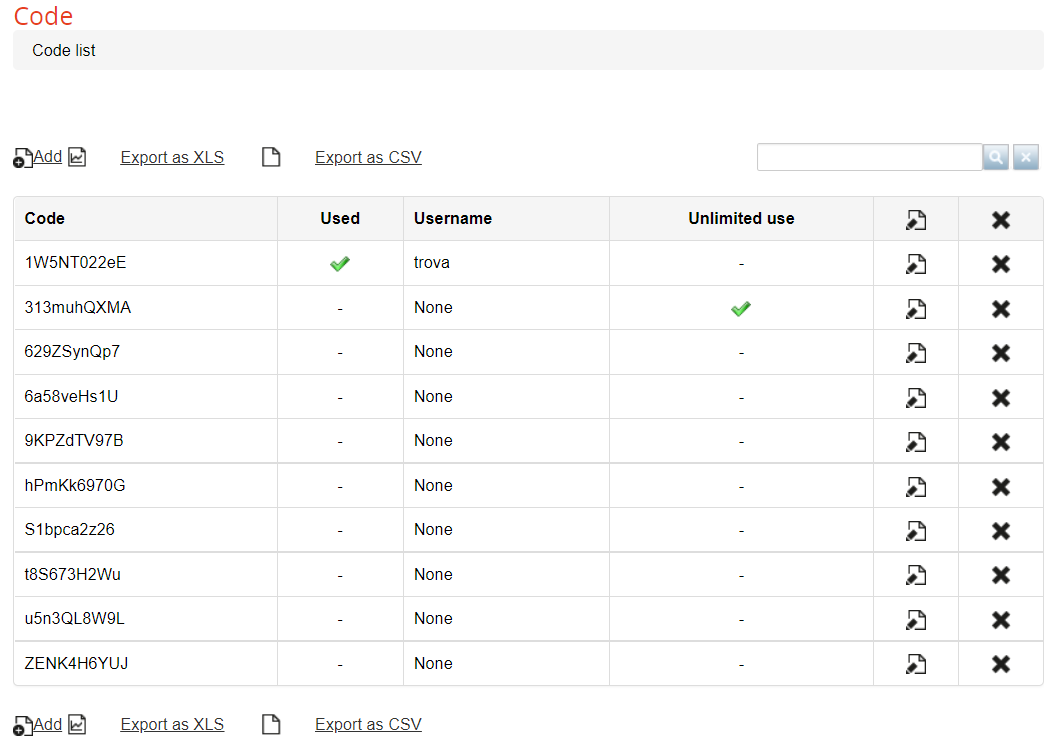
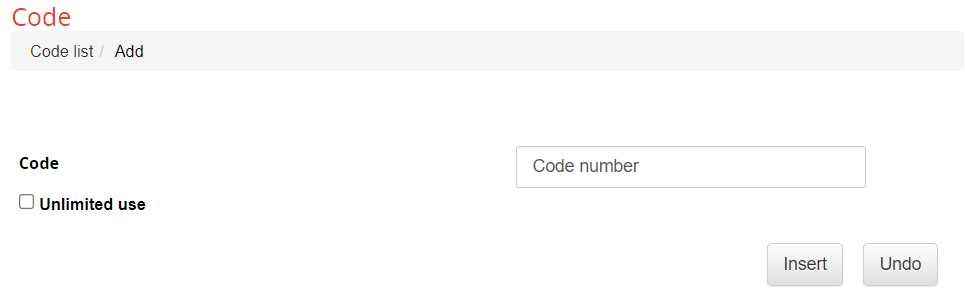
1 - Code list: Administrator can add new codes and set an unlimited use.

Code list shows used codes, username and unlimited use. Used codes cannot be redeemed anymore.
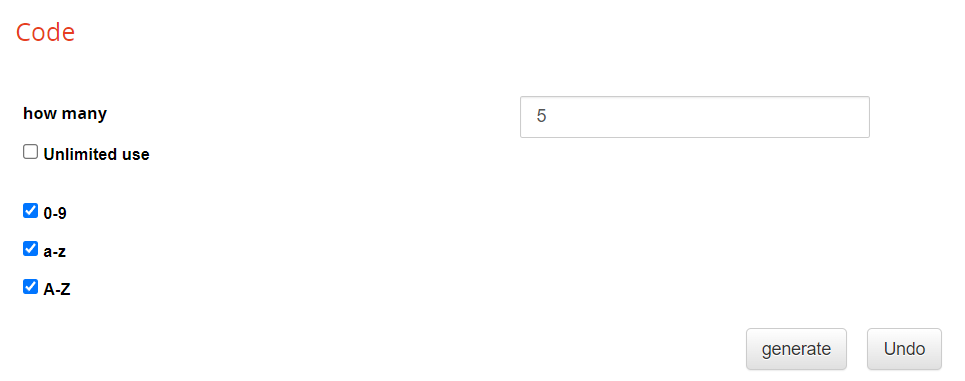
2 - Generate new codes : Administrator can generate new codes, insert the number and selecting unlimited use, 0-9, a-z or A-Z
3 - Import code from a CSV file
4 - Course selection
5 - Code assignment: Administrator can assign code to the users using the organization chart and company roles
6 - Administrator can edit code title and code description
7 - Administrator can delete the codes
Once the code has been created and assign, the user can redeem it from the login frame:
Event Manager
Forma LMS allows notifications to be automatically sent to users.
Notification events can be set from:
Admin > Settings > System Configuration > Event Manager
Notifications Settings
This is the list of available notifications:
- Platform
- Part of the system where the notification is generated
- Name
- Description of the event that will generate a notification
- Not Used
- Notification won't be sent
- Mandatory
- The selected notification will be sent to involved users, based on event type
- Email / SMS
- Define whether the notification should be sent by email and/or SMS.
Note: for SMS to be sent, a dedicated service must be configured. Check SMS configuration
- Recipients
- Description of the type of recipients for each notification
Notification Text
The text of automatic notification events can be modified through the Language Management feature:
Admin > Settings > Language Management
Just search for part of the text you need to edit
I/O Tasks Connectors
The I/O (Input Output) system allows Forma LMS data to be exported to and imported from other applications.
It is available under:
Admin > Settings > System Configuration > I/O Tasks
It provides the functionalities to configure and schedule a set of tasks for reading and writing .csv or .xml files to be exchanged in a shared FTP folder.
Basic workflow for managing import/export of data in automatic mode:
- Activities are scheduled in the administration area using the I/O (input/output) module, which is located in admin/main/configuration/IO task
- .csv files are placed in the files/common/iofiles directory by Forma or third-party applications through FTP access
- Import or export tasks are performed using Cron or a similar scheduler
Examples of usage
- Importing user lists (e.g. filename users_aaaammdd.csv) User ID, Passwords (e.g. “john.doe”, “pippo”). Many other cataloguing fields can be added. If these are to be managed through “drop-down menus” then the fixed fields must be “preloaded” in the LCMS system. If authentication is managed through systems such as LDAP, it is not necessary to import the passwords.
- Importing course lists (e.g. filename courses_aaaammdd.csv) Course code, Course name (e.g. “001”, “Maths”). Other fields can be added to the .csv file, such as: Difficulty, Course status, Subscription policies, Course language, Start date, End date, Course duration and Estimated time.
- Importing a list of users to be enrolled in courses (e.g. filename AAAMMDDusercourses_data.csv) User ID, Course code (e.g. “john.smith”, “001”). An optional field may also be added for the user level in the course. If this is not specified, the user will be listed as a student. 1 Ghost, 2 Guest, 3 Student, 4 Tutor, 5 Mentor, 6 Teacher, 7 Administrator.
- Export a list of users and their status on courses
Tasks configuration
Three steps to create a task and automate some activity:
- Create a CONNECTOR
- Create a CONNECTION
- Create and schedule a TASK
NOTE
Here below a brief general description of the three features, for further details and examples please refer to the Extended Connectors Guide
Connectors
Creating a connector means to activate it and make it operational (there is a file that manages a certain type of data)
There are pre-programmed tasks files that perform the following activities:
- Import/Export organization chart structure (connector.doceboorgchart.php);
- Import/Export organization chart structure from a XML file (connector.xmlorgchart.php);
- Import/Export user-course relation (connector.docebocourseusers.php);
- Import/Export course list (connector.docebocourses.php);
- Import/Export SAP HR-compatible course list (connector.coursesap.php);
- Import/Export course report (connector.docebocoursereport.php);
- Import/Export CSV file (connector.csv.php);
- Import/Export Docebo users(connector.docebousers.php);
- Import/Export users report (connector.userreport.php);
Connections
Creating a connection means to assign a certain task to a connector, namely where to write or retrieve certain data, whether these are read from a file or stored in a DB.
Tasks
To create a task means to associate the source connector to a destination connector and explain where to store (importing or exporting) certain data. For instance, writing data on a CSV file or a database beginning with data in another database or CSV file.
Question Category
You can create an unlimited number of categories that can be used globally to categorize any question in any test or in the question bank.
This feature is available for administrators under:
Admin > Settings > Elearning Configuration > Question Category
Additional Fields
Additional fields can be associated to users, or to other platform entities such as org-chart nodes, courses and learning objects
Additional Fields (Users)
User additional fields can be created and managed under:
Admin > Settings > Additional Fields > Additional Fields
Different field types are available:
- Text Field: create a standard text input field
- Free text Field: create a textarea
- Date: allow inserting a date
- Dropdown: create a list of options the user can choose from
- Upload: user will be able to upload a file upon registration
- Textlabel: add a static description text inside the registration form
- Fiscal Code: text field for Italian fiscal code
- Yes/No: creates a radio button select field
Tip:
You can assign different fields to different orgchart nodes, and create custom registration forms using the advanced registration
Custom Fields (Other items)
Can be configured under:
Admin > Settings > Additional Fields > Custom Fields Manager
Two kinds of field are available:
- Text Field: create a standard text input field
- Dropdown: create a list of options the user can choose from
You can associate custom fields to different platform items to extend their configurations:
- Courses
- Learning Objects
- Organization Chart Nodes
These fields will be then available in reports
Privacy Policies
Default Privacy Policy
By default, users will be required to accept a privacy policy statement both on login and registration.
The default privacy policy text is defined in language management:
Admin > Settings > Language Management
The language key to be edited is: _REG_PRIVACY_POLICY
This option can be disabled from:
Admin > System configuration > Settings > User > Register
Privacy Management
Alternatively, you can set a new Privacy Statement from the Privacy Management:
Admin > Setting > System configuration > Privacy Policy
Edit the default page and flag it as default:
Multiple Policies
It is possible to manage different Privacy statements and assign it to one or more orgchart nodes:
Manage Menu
You can create and manage menu templates from:
Admin > Settings > Elearning Configuration > Manage Menu
It is possible to edit menu configurations also from within each course, affecting only the course specific menu: this will give you maximum flexibility with menu management and customization.
TIP: create just the menu template that you most commonly use to differentiate coure types, i.e. you coud have a menu for elearning and another for classroom courses, and only when needed add further customizations directly in the course
Manage Menus
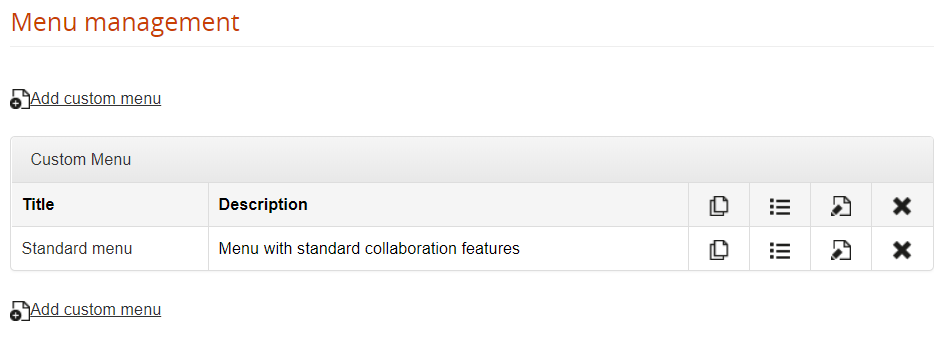
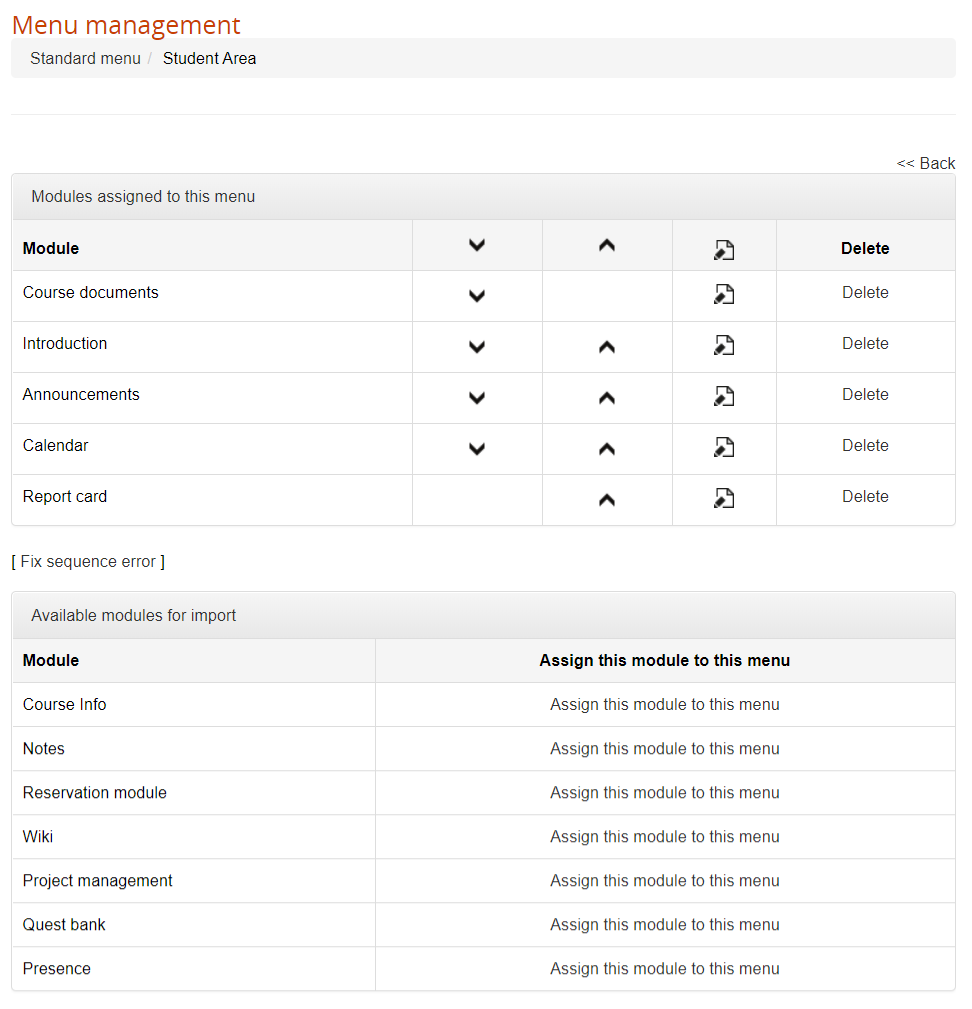
Manage Areas
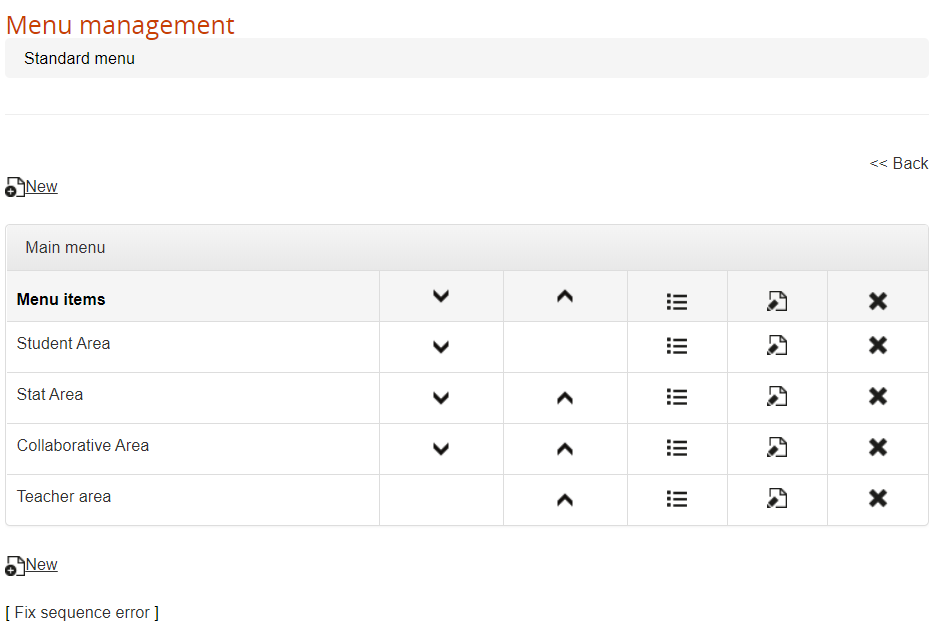
Assign Modules
Within each area, you can assign or remove modules.
At the bottom of the page, you can see the list of available modules to assign to the selected area.
When you delete a module from the menu, it will appear again in the available modules list.
Set role permissions
Click on the edit icon for each module to:
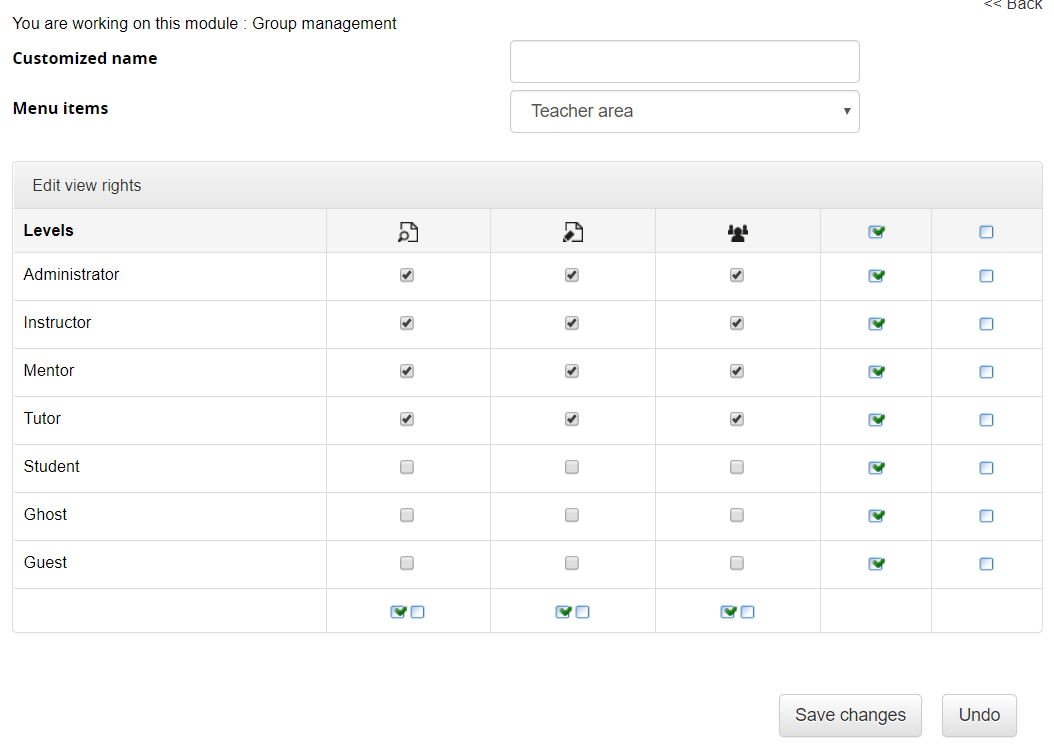
View Permission for administrators
Some modules presenting a list of users have a special “view all” permission checkbox, that applies only for users of level “administrator”:
- Unchecked: the administrator will see only his assigned users
- Checked: the administrator will see all the subscribed users
Superadministrators and standard users will see all users in any case.
Language Management
Language manager
You will find the language management features under:
Admin > Settings > Language Management
Here you will find a list of the available languages in your platform
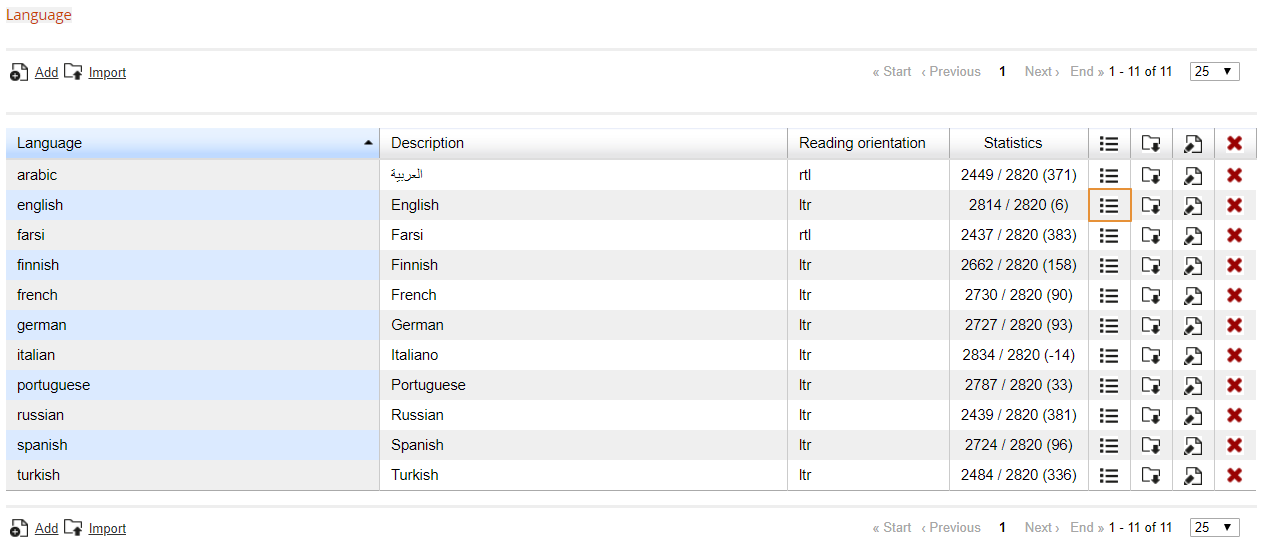
From this panel it will be possible to:
- Edit existing languages
- Import language files
- Add new languages
Edit existing languages
To edit existing language translation keys, click on the highlighted icon in the previous image to get to the language editing page:
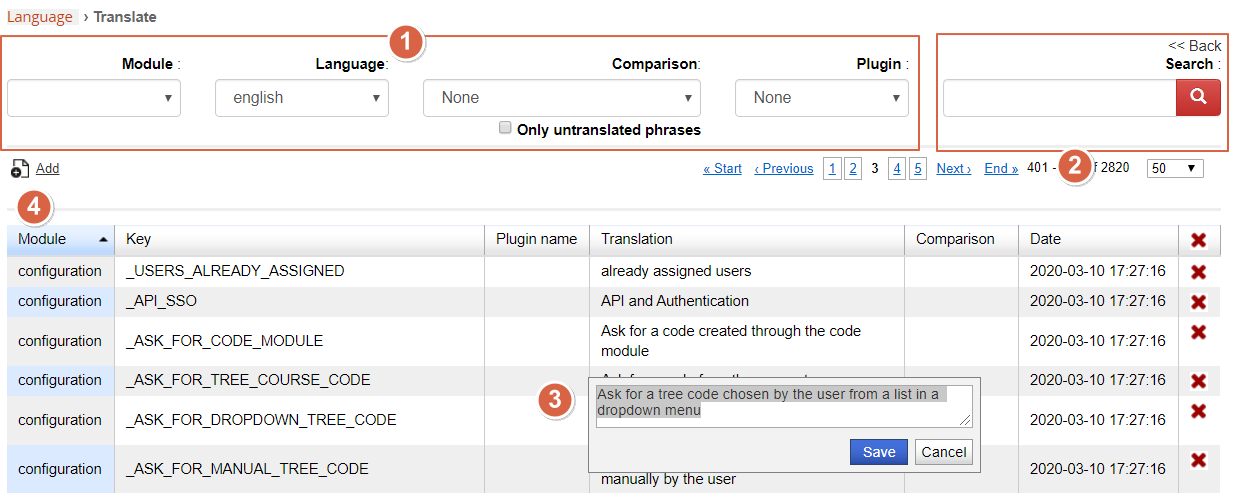
In this page you will find a list of all the available translation keys
1. Filter the language keys:
- Module: the area or feature of the platform where the language key is user
- Key: the code placeholder for the language key to be translated
- Plugin: select the language keys created by a specific plugin
- Only untranslated: shows only keys without local translation
2. Search language translations: search any text in all the listed key translations (doesn't search in key names)
3. Edit any translation, just by clicking on the translation text
4. Add a new translation key for all the available languages
Import language files
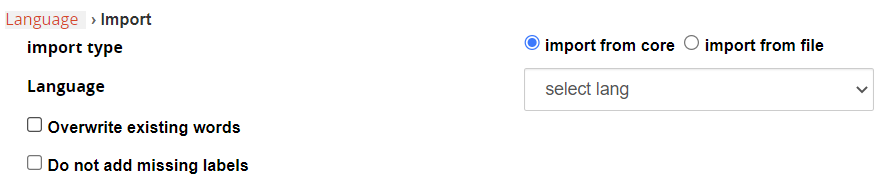
Import Modes:
- Import from core: select from a list of the available languages
- Import from file: import an XML language file exported from another format installation
Options:
- Overwrite existing words: if the language is already installed in the system, it will override all the customizations
- Do not add missing labels: if the language is already installed in the system and some translation key is missing, it will leave it empty
Add a new language
Create an empty new language
User Management
Features for user creation and management: organization chart, groups, administrators, custom fields, roles, competences,...
Users and organization chart
Overview
The user management page is split into two main parts:
- Organization Chart: this tree-like structure of folders (nodes) represents the core logic for user's organization, and will be used by most of the other features of the LMS. To simplify user's selection and automate massive operations.
- User List: this is the list of the users in the selected folder. Select the root folder to list all the registered users.
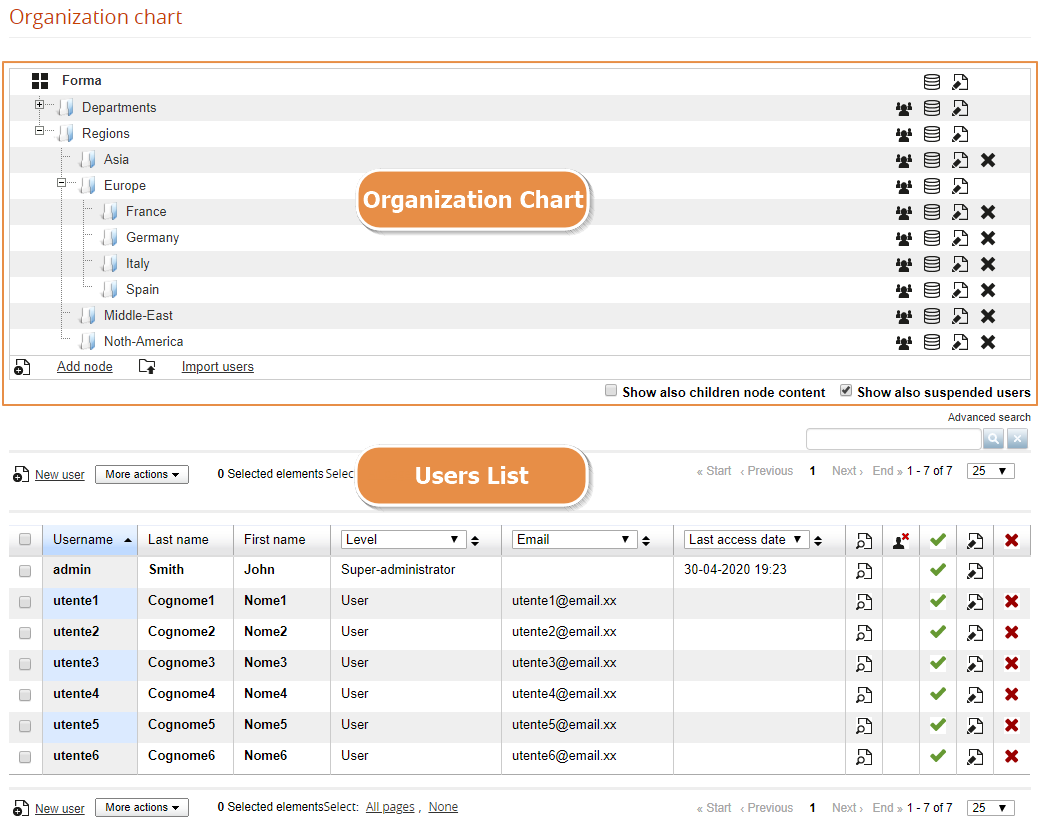
Organization Chart
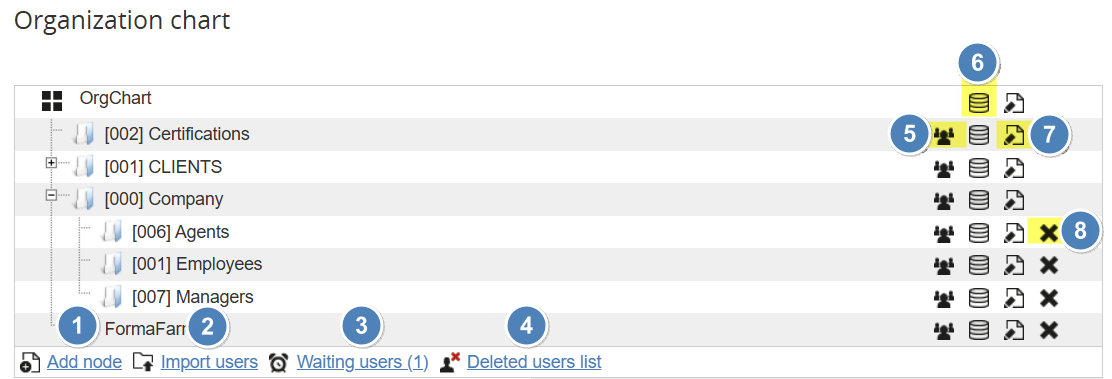
- Add node to the organization chart
- Import Users
- Waiting Users
- Deleted Users
- Assign Users
- Assign Fields
- Edit Node
- Delete Node
Add Node
Click on this link to add a new folder:
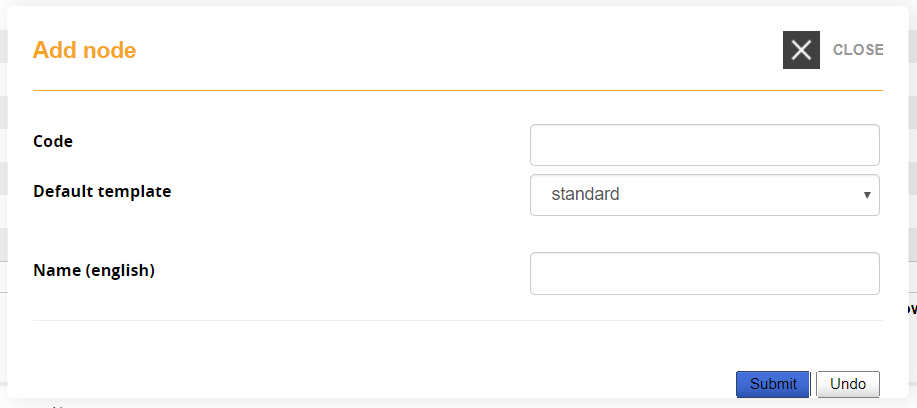
Code: Add an alphanumeric code that can be used by other features like registration with code or I/O task
Default Template: assign a specific template for the users in this node
Name (language): Name for this node, a different field for each language will be shown
Import Users
This feature lets you import a list of users from a .CSV file.
Check the user import guide page for details
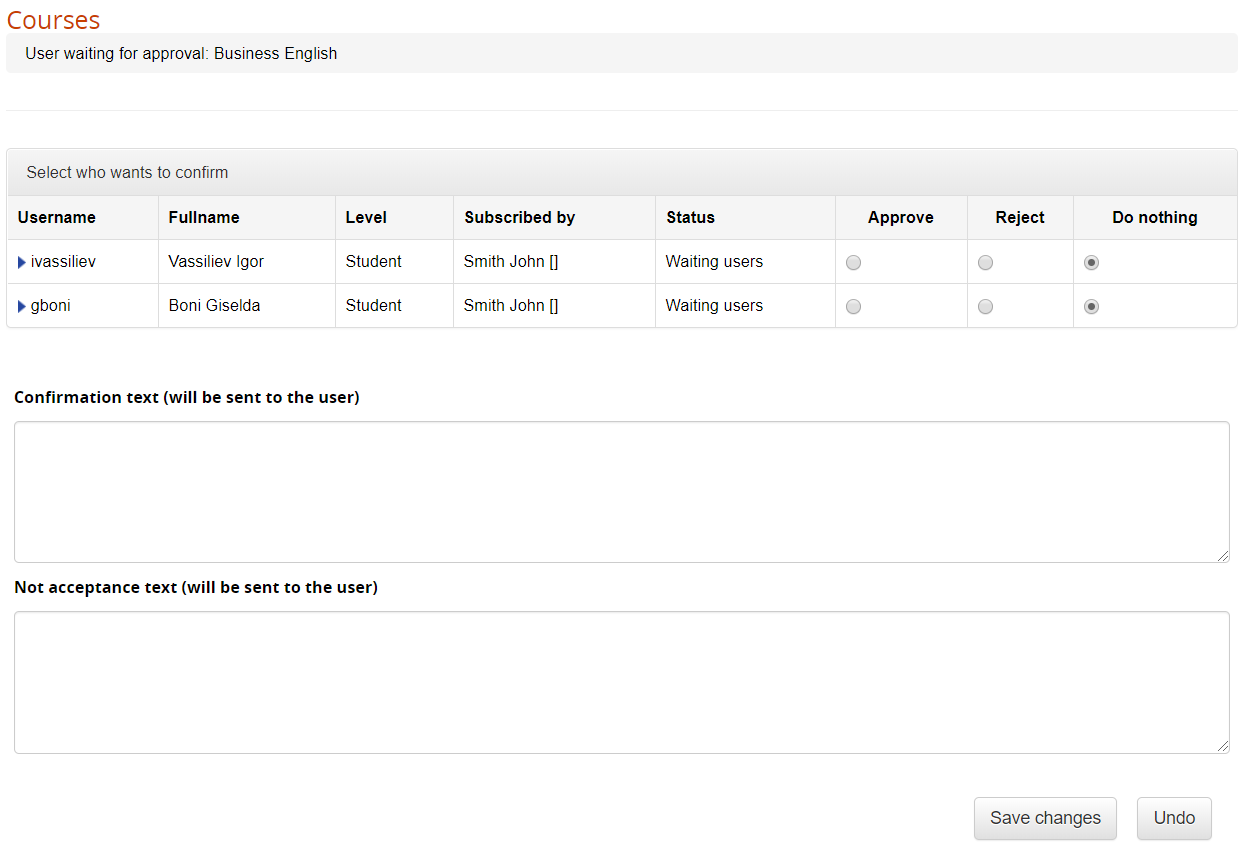
Waiting Users
This link will be visible if platform registration is set as "Moderated Self Registration" or "Double Optin".
It will display a list of users that either:
- Are waiting for admin confirmation
- Have not yet clicked on the confirmation link
You will then be able to approve or delete the user

Deleted Users
Access a list of deleted users.
Forma < 4.1.x:
In Forma LMS until version 4.1.x, activate this feature to keep a list of deleted users, find this setting under:
[Settings > System Configuration > Settings > Security]
The list is just a plain log and it won't be possible to recover deleted user

In Forma 4.2 or later
In Forma 4.2 this feature have been completely refactored and acts as "Trash" area for the deleted users.

The system will automatically store deleted users as trashed, and it is now possible to:
- Restore a trashed user: this will keep all the user's trackings. Plus you can decide wether to restore user in active or suspended state
- Delete a trashed user: the user and all its trackings will be removed from the database. Can't be undone.
- Massive delete/restore users
If you are upgrading from a Forma version prior to 4.2 and the deleted user list was active, all the deleted users will be reported in the new "trash" area adding a ".deleted" suffix to the username, and it will be then possible to completely remove them from the database
Assign users to a node
Click this icon to select users that you want to assign to this node
By default, users can be assigned only to a single node. It is possible to assign users to multiple nodes, although this is strongly discouraged to avoid possible undesirable or unpredictable behaviors in other platform areas (i.e., reports, administrators assignments, or other). To enable multi-node user assignment, check the relative option under advanced configuration
Assign Field to node
This feature lets you define which custom fields must be assigned for users in this node:
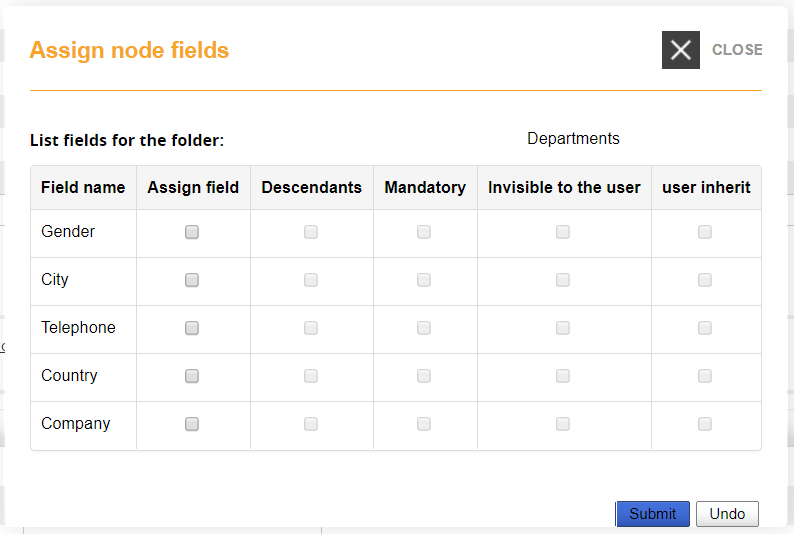
Assign Field: the selected fields will be available in the profile of users in this node
Descendants: the selected fields will be available in the profile of users in the subnodes of this folder
Mandatory: filling this field will be mandatory in the user registration form
Invisible to user: the selected field will be hidden on user registration form
User Inherit: all users of this node will get the same value. If you change the value for a user, it will be sett for all the others.
Users' List
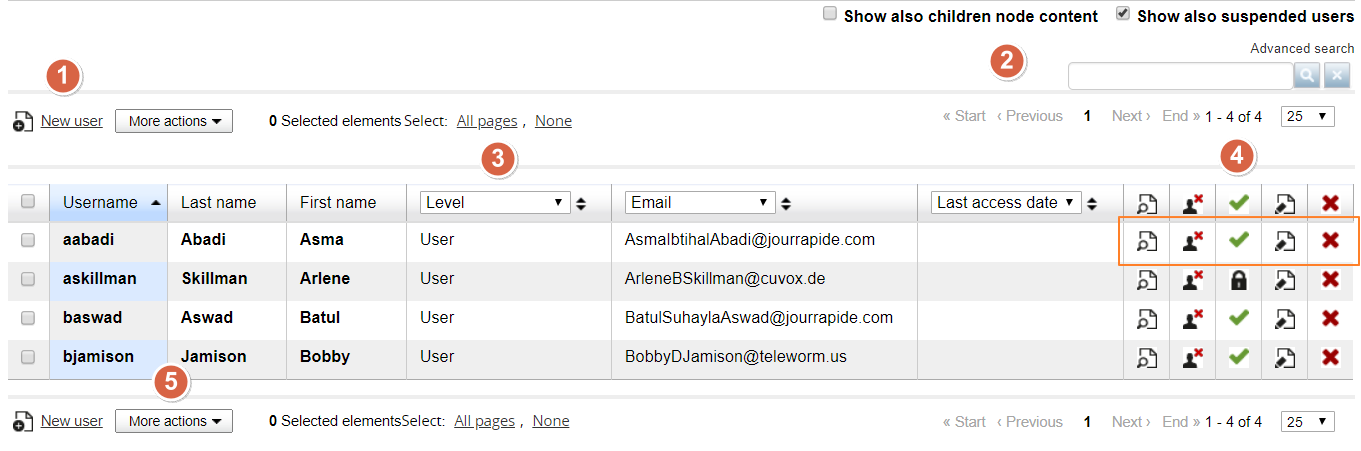
Add new user
Click to insert a new user in the selected node.
- Details Tab: fill user fields
- Organization chart Tab: select the nodes to assign the user to
Search Users
Show also child nodes content: the list will show also the users from subnodes of the selected node. If you are displaying the root node, all users will be displayed.
Show also suspended users: show or hide suspended users from the list
Search: will search on any of the visible field in the user list below
Advanced Search: will display an advanced search form with possibility to add search over specific fields and conditions:
Dynamic columns
Select from the dropdown which data field to show in the correspondent columns, and sort for the displayed data.
The search engine will search over the displayed data.
User Actions
Actions you can take over each user:
View user profile: opens a pop-up window with user information
Remove from node: user will be removed from the selected node, but remain registered to the platform
Activate/Suspend: lets you suspend or reactivate users. Suspended users will be still visible in reports if needed, but can't access the platform
Delete: user will be deleted from the platform. This action can't be recovered
Massive Actions
Lets you massively apply actions over all the users selected in the list.
- Export the selected users in a CSV file
- Massively suspend, activate, delete
- Massively edit:
Import Users
Use this feature to easily import a list of users with custom fields from a CSV file.
The CSV file doesn't require a specific structure, the import schema can be set manually for each file upon import.
File Options
Import Options

Send new login credentials to users
If flagged, the registration email with user credentials is sent to each imported user
Node
All the imported users will be added to the selected node. You can still import users to different nodes at a time, check the schema options below.
Action on users
Define what to do if a user is already present or not: create new and update existing, just create new users ignoring existing ones, just update existing while ignoring the new ones.
Require password change upon next login
Define if the user should be prompted to change password on next login. They will need anyway to know a default password.
Set password
Choose if you want to load the password from the imported file, or set it with the following method (automatic or manual).
Note: If “load from file” is chosen and the password field in the imported file is left empty, the password creation method will be used instead
Password create
Automatically sets a different random password for each user,
Manual password: this will be the default password for all users
Import Schema
Select the forma field in which import each file column
Folder Name: you can use this value in the import schema to insert users in different org-chart nodes. Add a column to your import file to specify the folder wher you want the user to be inserted. Field values must correspond to existing org-chart node names
Language: You can set the language for each imported user by mapping a column to the Language field. The value must be the language name written in full (e.g., italian, english). Do not use language codes — only the plain language name is accepted
Groups
Groups are an alternative way to organize users, that can be used in example for cross-node grouping or temporary grouping to simplify some operation.
The groups feature can be managed from:
Admin > Users > Groups Management
Create Groups
Add Users
Clicking on the icon in users column, you can:
- Select and add users to the group
- Import a list of existing users as a CSV file containing the usernames (users must already exist)

Administrators
An “administrator” is a user that can access the LMS backend with limited visibility and permissions over features, users and courses.
You can have an unlimited number of administrators.
Three basic steps to set up an administrator:
- Set some user with the level “administrator”
- Create or edit an administrator profile, with assignment of the respective permissions to each profile
- Assign to the user the desired administrator profile
- Associate the users and course to be managed by each administrator
Create an administrator
Any existing user can be configured as an administrator by setting this level in his personal user profile, from the global user management area.
Administrator Profile
From this page you can create and manage Administrator Profiles
A Profile is a settings template that can be assigned to multiple users. Changes to a profile will affect all the users assigned to that profile
Special Settings
Click on the “Special Settings” icon to set some global configurations for this admin profile:
Edit Settings
From this page, you will be able to define the permissions on most of the backed features for the administrators assigned to this profile:
Language Settings
Give this user edit permissions on some specific languages in the language management area
Manage Subscriptions
See a list of the users assigned to this profile
Administrator Management
Assign Profile
Click to assign a profile to this administrator
Assign Users
Select which users this administrator will be able to view and managed, based on his profile settings. It's possible to assign:
- A list of single selected users
- One or more org-chart nodes
- All the users with some selected company role
- Users by group
Assign Courses
Select which courses this administrator will be able to view and managed, based on his profile settings.
There are three assignment options:
- All courses
- Some selected courses
- All the courses in a selected catalog
Assign Locations
Select if this administrator can manage some location configurations
Competences
Manage Competences
Forma LMS lets you create and manage a list of skills and competences required by your company roles and assigned by course and test completion.
Find the competence management under:
Admin > Users > Competences
You can group competences in categories, and for each category you'll be able to set:
- Name
- Description
- Typology: choose whether you are defining a skill, knowledge, or attitude
- Type: the competence can be set by a score or a flag (yes/no)
Assign competences to users
Assign by course completion
Users can obtain a competence by completing a course. Each course can assign one or more competences, see the Course Management guide.
Assign by test completion
A user could get a competence score by completing a test. See feedback management in the test learning object guide.
Company Roles
Overview
Forma provides another method to organize and define users by their company role.
Company Roles can be defined in:
Admin > Users > Company Roles
Role Groups
Company roles can be organized into groups of roles:
Company Roles
Each company role can be assigned to multiple users.
Users
This column shows the number of users assigned to this role.
Click on the user icon to see the list of assigned users.
Click on the chart icon for each user to see his skill-gap analysis report:
Competences
This column will display the number of competences required by this role.
Click on the icon to manage the competences required for a company role:
Assign: opens the list of available competences
Properties: set the minimum required score for this competence and the number of days of validity
Courses
This column will display the number of courses assigning the competences required by this role
Gap Analysis
See the gap analysis report for all the users in this company role:
Course Administration (Backend)
Backend Course Administration features: subscriptions, courses, categories, catalogs, coursepaths, etc.
Course Management
Overview
Course management is located under:
Admin > Elearning > Courses > Courses
The course management page is split in two main parts, as for the user management.
- Categories: a tree-like structure for content categories.
- Course list: a flat list of all the courses assigned to the selected category
What is a Category
A category is a container for courses, generally used to group courses by topics.
Categories will be shared among catalogs and other parts of the platform.
NOTE:
If you need a way to assign groups of courses to specific users, check the catalog feature
What is a course
A course is a logical container, you can manage administrative features from this backend section:
- Description and categorization
- Subscription modes and user enrollment
- Course scheduling
- Certificate assignment
Training features will be managed from the platform frontend instead:
- Learning Materials
- Course features
- Training stats
Categories
You can:
- Create an unlimited number of categories and nested categories
- Move a category under another category: click on its name and drag'n'drop the folder
- Delete a category only if it is empty
Filter and Search Courses
Options that apply to the course list below:
- Classroom: show only courses of type “classroom”
- Show also children content: list also courses from the child categories
- Waiting users: show only courses with users waiting to be approved
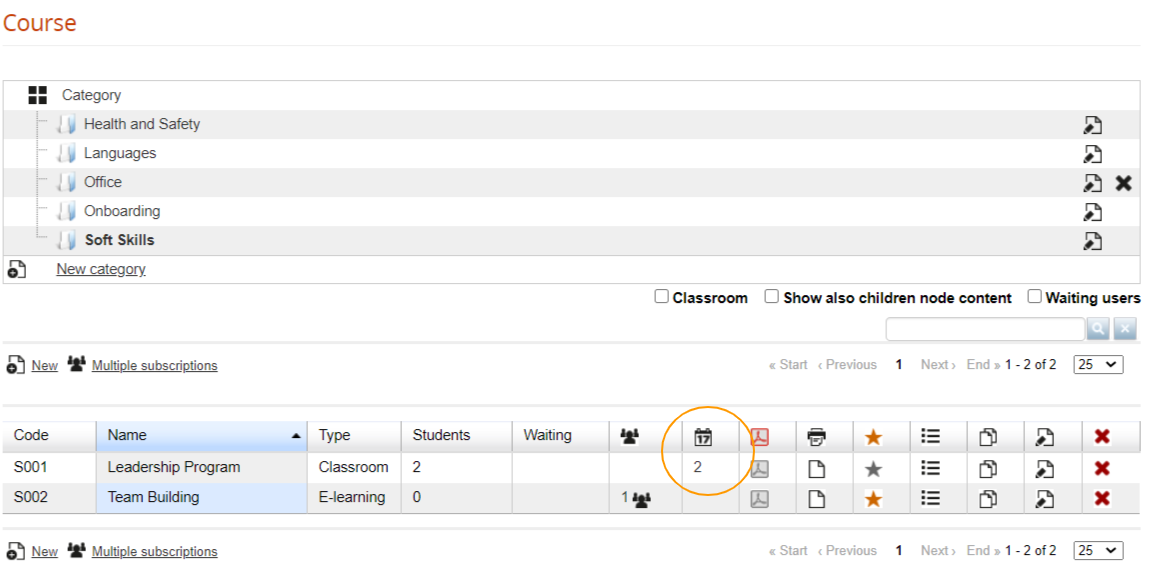
Courses
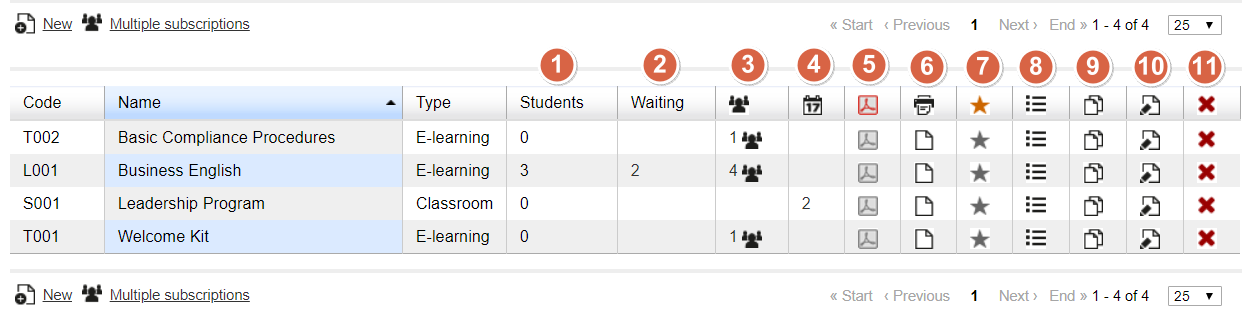
This list shows courses from the selected category, ordered by code, name or type. Here, you can control and manage the following features for each course:
Students
Simply shows the number of users enrolled to this course with level “student”
Waiting
Number of user subscriptions to be approved when “moderated” registration is active. Click on the number to manage the waiting users:
Subscriptions
Number of users subscribed to the course. Check the “subscription management” page of this guide for details
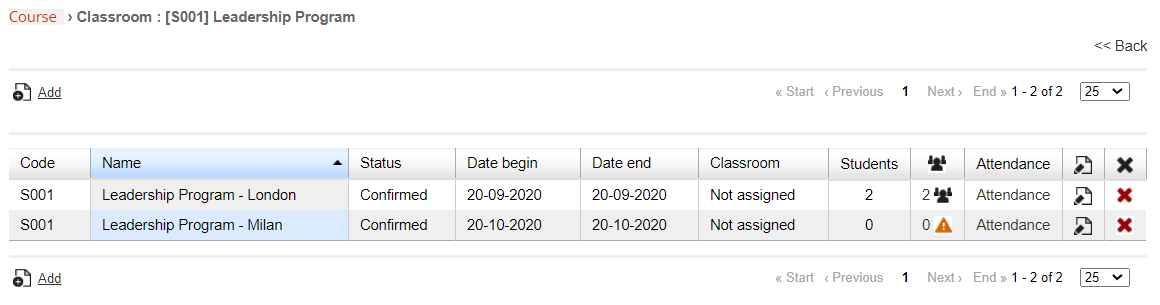
Editions
Number of editions available for a “classroom” or “elearning editions” course. Check the “editions management” page of this guide for details
Certificates Assign
Assign a certificate template to this course
Certificate Release
Check the list of available and released certificate for this course
Competences
Click this icon to set the competences assigned by the course. Each course can assign one or more competences, click on the icon to:
- Select the competences assigned by the course
- Edit the competence score assigned to the user when the course is completed
Manage Competences
Check the Competences Guide to learn how to create and manage competences in Forma LMS.
Menu
Assign a different menu template to this course
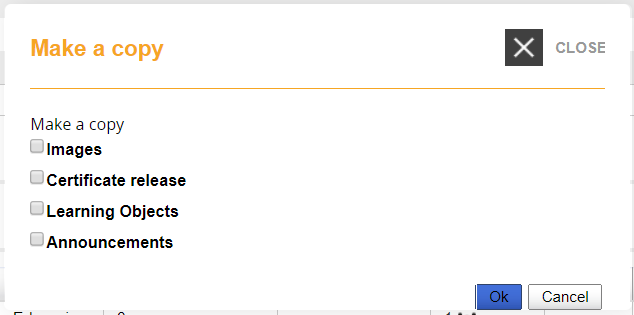
Copy
Duplicate this course. You will be able to select which elements of the course to copy:
Edit
Edit the selected course information and settings
Delete
Delete the course.
Caution!
This operation can't be undone!
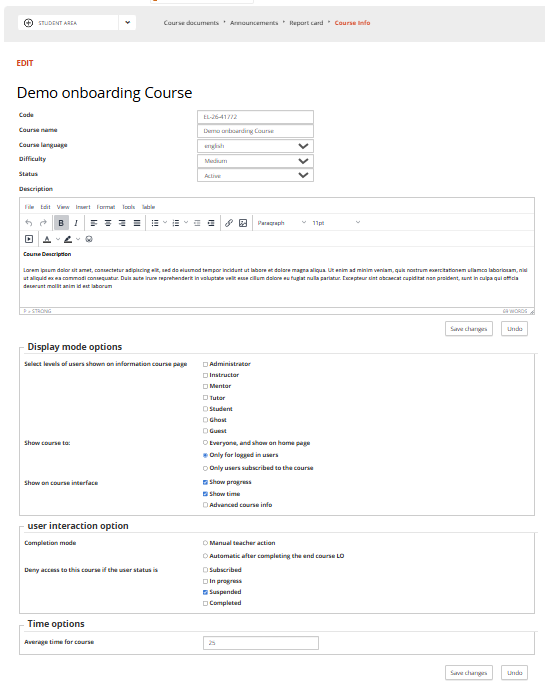
Creating and editing a course
Here you can see all the configuration settings available for a course. This same configuration page is used for both creating a new course and editing an existing one.
Most of them are self-explaining, we will provide descriptions and details where needed:
Main course information
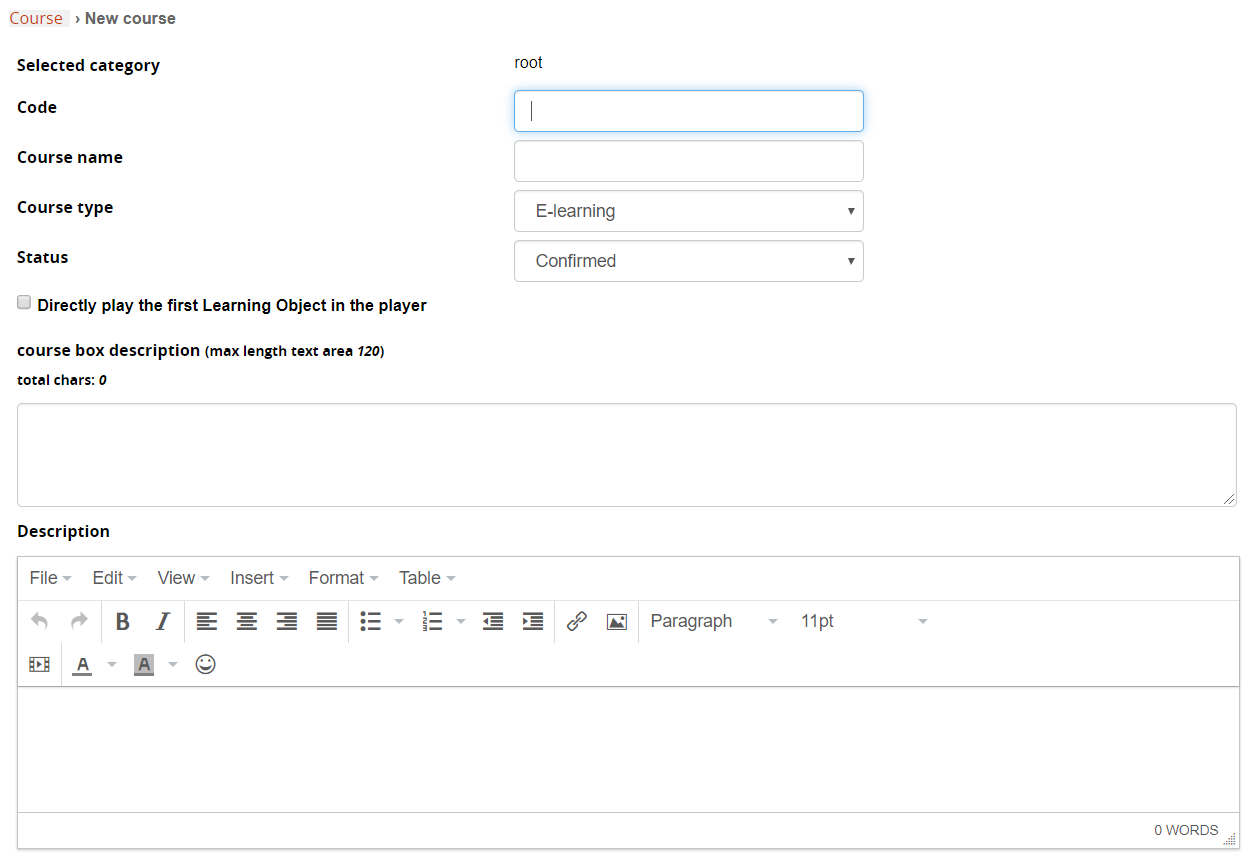
Selected Category: shows the selected category for the course. Can be changed upon course edit.
Code: enter an alphanumeric code that will help you identify different versions or releases of courses with similar titles, or to integrate course features with other applications.
Course Type: Select the course type:
- Elearning: standard elearning course
- Classroom: course with editions and classroom management
- Elearning with editions: course with edition management
Since Forma LMS 4.1.42 is not possible anymore to change the course type if users are already enrolled to the course. This and other conditions (subscriptions via API or import) led to some inconsistencies in previous versions, with "ghost" subscribed users on master courses converted from elearning to classroom or vice versa. Also, An automatic realignment algorithm ensures consistency between master course enrollments and classroom session enrollments by removing users enrolled only in the master course and adding those enrolled only in sessions. It operates on one or all classroom courses, respects overbooking rules, and safely handles repeated executions without side effects. It is also applied during upgrades to fix legacy inconsistencies. See the release article for details.
Course Status: Select the status for this course:
- Under Construction: the course is only accessible to the users responsible for preparing its content (normally teachers, tutors, mentors and/or administrators);
- Confirmed/ Available: the course is accessible to the users. Confirmed is meant to be used for classroom courses, available is meant for elearning courses
- Concluded: the course is finished and only those users who have concluded it have access;
- Cancelled: the course is no longer accessible, and registration from the course catalog is no longer possible.
Directly play the first object: when clicking on the course “enter” button, the first LO will be automatically opened. Don't use this option if you have more than one LO, because it would be impossible to play the following LO's
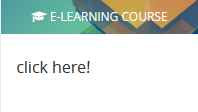
Course Box Description: enter the text to be displayed in the “my Courses” boxes. You can also insert a link, provided you write it with the appropriate HTML Code
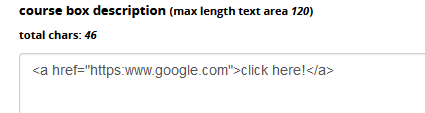
The description will then be displayed on the My Courses page and in the Catalog
Description: full description that can be shown in the “course info” module, or inserted in certificate templates with a tag.
Details

Course Language: Define the language used for course materials. This option will be useful to filter or select courses by language in catalogs, enrollment policies, administrator assignments
Difficulty: label to describe course difficulty level
Credits: credits assigned by this course, to be shown in reports and calculated through the “time period” option
Labels: assign a label to group courses with the “label” feature
Course Subscription
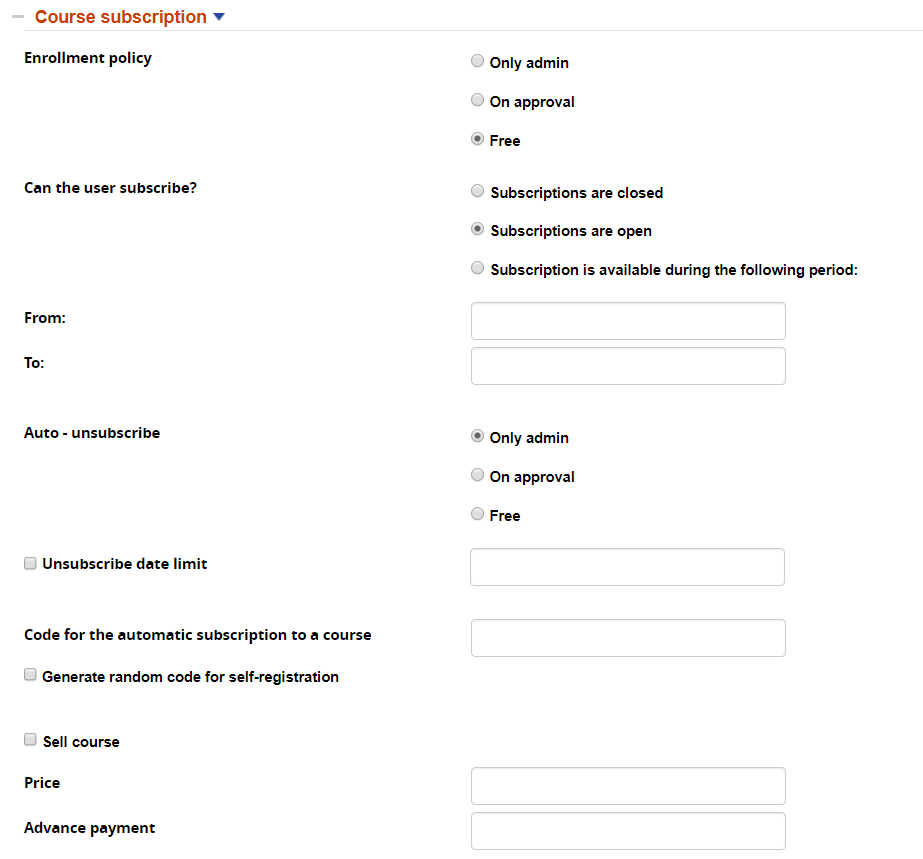
Free: the course will be displayed on the “catalog” page, and the user will have the possibility of self-enrolling
On approval: the course will be displayed on the “catalog” page, and the user will have the possibility of self-enrolling. The request will have to be approved by a manager (an admin)
Only admin: the course will be displayed on the “catalog” page, but only admins will have the possibility of enrolling users.
It might make sense to describe those options in the course description, for instance, writing “ask your manager to enroll you”.
Code for automatic subscription: lets users self register to this course, entering this code upon registration or through the code field in the userpanel
Sell course: enable this course for ecommerce features
Display mode options
The following options will let you define some aspects related to course visualization and layout elements:
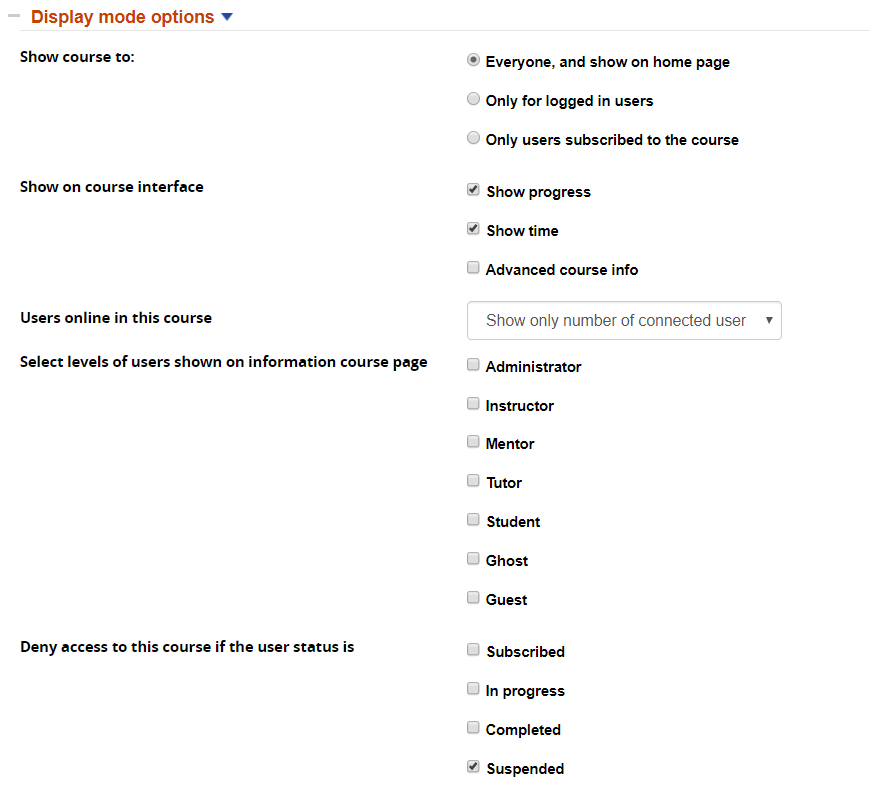
Show Course To: The above section describes the course visibility options. Any course can be displayed or not to users who are not yet enrolled. Please also see the reference guide on Catalogs to learn how you can use catalogs, combining them with the displaying options.
Show on Course interface: choose elements to display or hide inside the course
Users Online in this course [Deprecated]: choose whether and how to display the instant messenger.
Deprecated: the IM has been removed since version 4.1, and the options has been removed in forma 4.2
Users to show on Course Information module: you can choose by level wich users to display in the course info module inside a course
Deny Access to this course: Block access to the course for users in a specific status
Time options
In this section, you can configure options related to course scheduling and duration

Days of validity: course will be available to user only for the number of days defined in these fields. Time is calculated based on the date of user first access to the course.
Note: When “days of validity”is set, the course closing date shown in the course boxes on the “My Courses” page will be dynamically calculated based on each user's first access date . If closing date is set and is prior than the user calculated end date, it will be displayed instead.
Average time for course: Estimated time for course fruition. It doesn't affect the user's stats, but can be used in course info and in reports. Decimal values are supported using a comma as the decimal separator (e.g., 1,50 to indicate 1 hour and 30 minutes).
Special Options
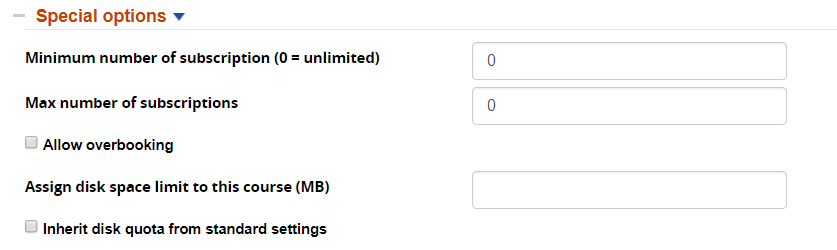
Max number of subscriptions: once the limit is reached, course subscriptions by users will be blocked
Allow overbooking: once the max-subscription limit is reached, users will still be able to enroll to the course and put in a waiting list
Documents Upload
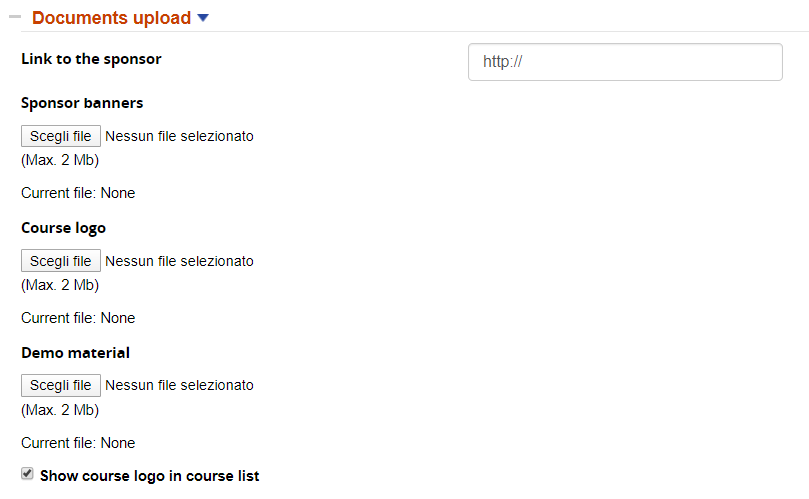
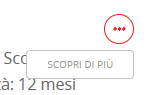
Demo material can be anything you want, and it will be displayed in the My Courses page as well as in the Catalog, like this

When you click on the three dots, you will see a clickable link allowing you to download whatever demo material you have uploaded.
Editions
Overview
In Forma, the idea behind editions is to have many separate issues of the same master course, with different start/end date and subscription groups.
All the editions of a course will inherit and share some features from the Master course:
To create a course with editions, you can select the desired course type upon course creation.
IMPORTANT:
Do not convert an existing elearning course to editions: it won't be possible to manage the original subscribers that weren't associated to any edition
Add and Manage Editions
Click on the “editions” column in course management to add and configure your editions
A list of the available editions will be displayed:
Elearning Editions
You can use Elearning Editions to manage recurrent elearning or assessment courses requiring a start/end date and separate subscription
All the editions will share the same course materials, configuration, and certificate template.
Classroom Courses
Classroom courses extend the elearning courses with the ability so define for each edition:
- Different dates and classroom schedule
- locations
- attendance
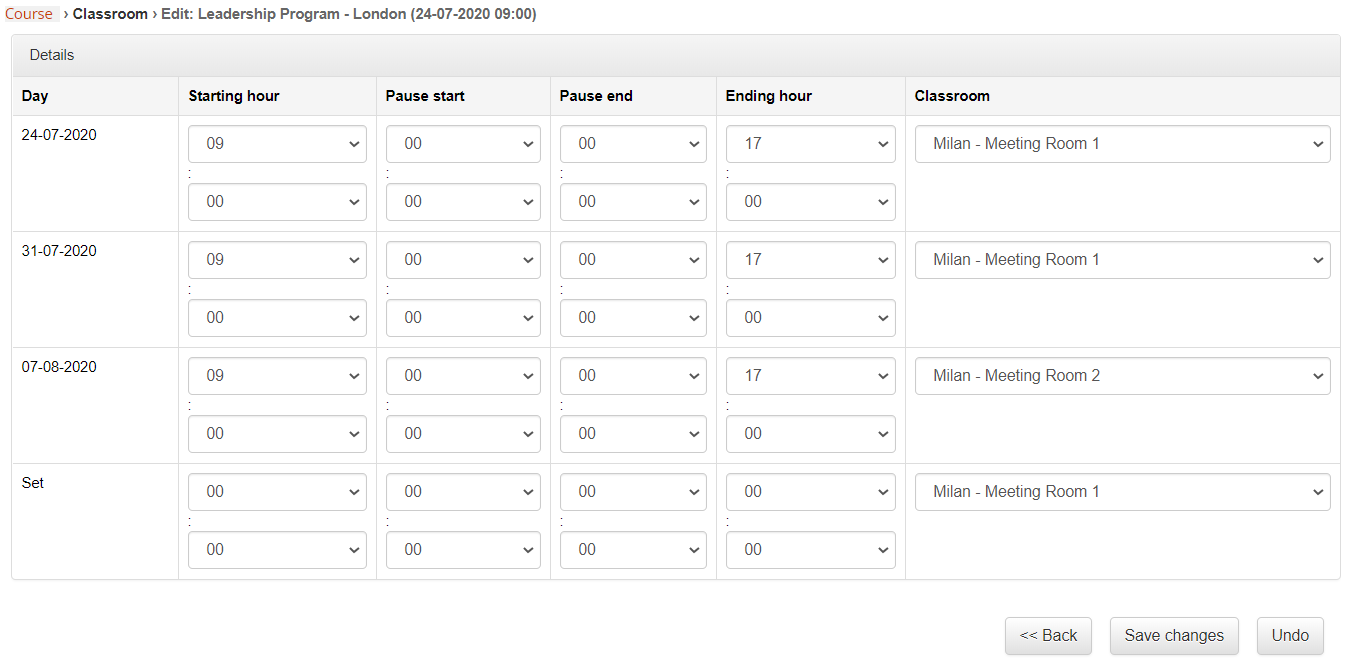
Dates Settings
First, in the edition configuration, select one or multiple dates for the classroom lessons:
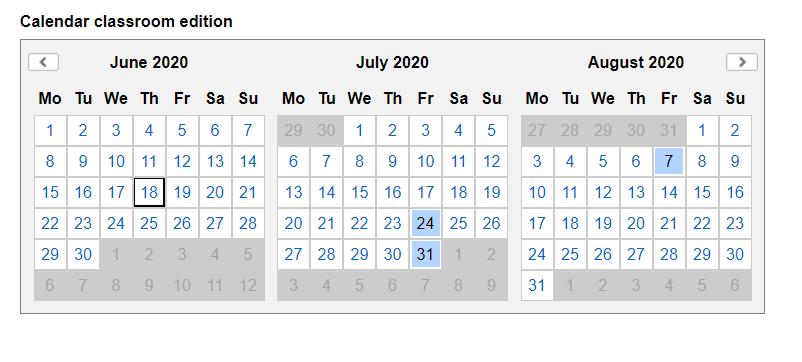
Then in following page you will be asked to set for each date:
- Lesson hours
- Classroom Location
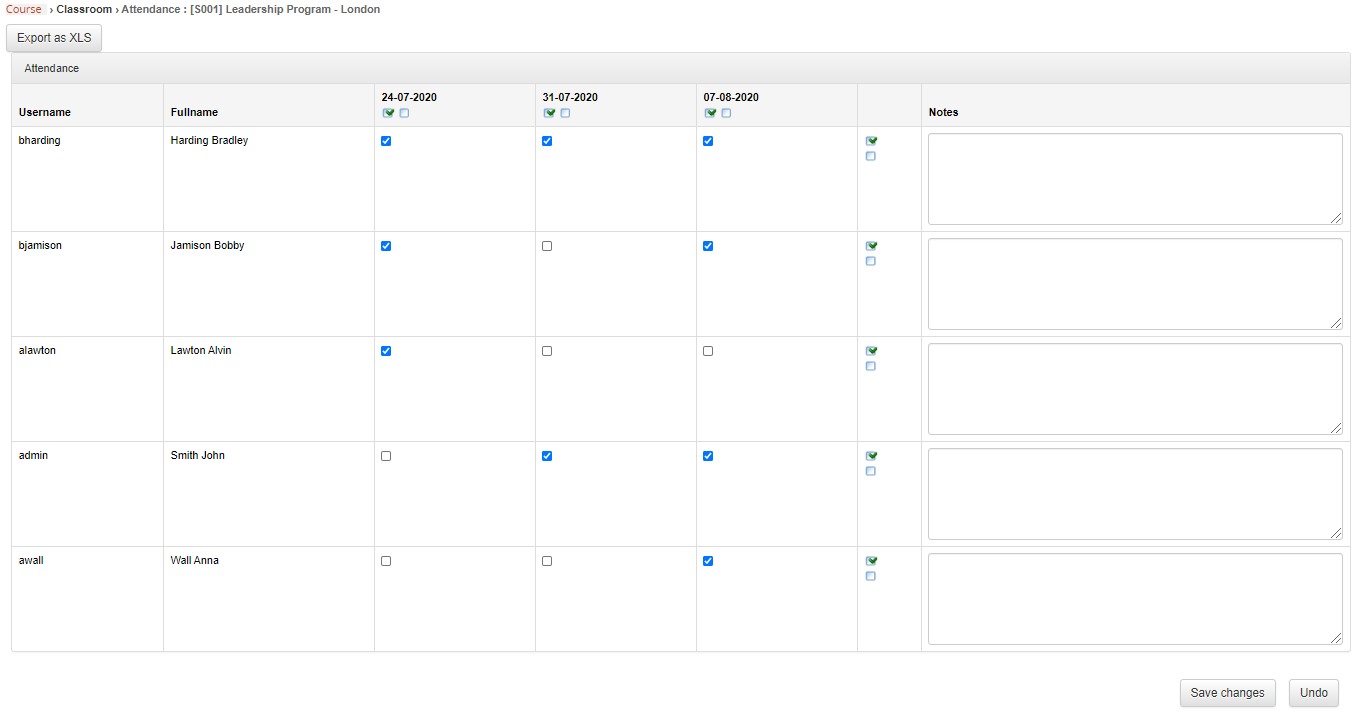
Attendance
Use the “attendance” feature to flag the student that were actually present at each lesson day:
Subscription management
You can access subscriptions management from the course management page:

Standard Subscription Management
Fast Subscribing of a Single user
Use the “fast subscribe” field to easily add a single user to the course.
Select the “Send Alert” checkbox if you want the user to be notified for the subscription
Subscribing multiple users
Click on the “Add” button if you want to add multiple users at once:
1. Select users: the system will open the user selection page, letting you select either:
- Multiple single users
- Massive select all users from some org-chart nodes
- Massive select all users in a group
- Massive select all users by company role
On the same page, you can select whether to notify the selected users for the subscription
2. Select users' role in course:
User Roles
Users can be enrolled to a course with 7 different roles, that can give different privileges in course frontend access and management depending on the course menu settings.
Available roles are:
- Administrator: usually a god admin with full permissions on all the course management feature
- Instructor: usually used for teacher, can upload learning materials and access course stats, but not configuration features (i.e., menu management, intro page edit, etc.)
- Mentor
- Tutor
- Student
- Guest
- Ghost: doesn't appear in some stats
Other Options
- Edit/Delete selected
- Import from course: let you import all the users subscribed to another course
- Import: import subscriptions as a CSV file containing a list of existing usernames
- Copy: copy the list of users subscribed to another course, leaving them subscribed also to this one
- Move: move subscriptions from this course to another one, removing them from the present one.
Subscribed users list features
The list of subscribed users lets you:
- Sort by username, full name, or set any desired field in the dynamic column
- Level: set the role for each user in the course, just click on the role to change it
- Status: change the user status in the course:
- Subscribed
- In Progress
- Completed
- Suspended
- Overbooking
- Subscription to confirm
- Waiting user
- Active from/to: set a range of dates for the course to be available to this user. Before and after these dates the user won't be able to enter the course.
- Remove the above validity dates
- Delete subscription
Multiple Subscriptions
With this feature, you will be able to:
1. Select users to be enrolled:
- Single or multiple single users
- Massive select all users from some org-chart nodes
- Massive select all users in a group
- Massive select all users by company role
2. Select one or more courses to enroll the selected users to
3. Set the role for all the selected users on all the selected courses
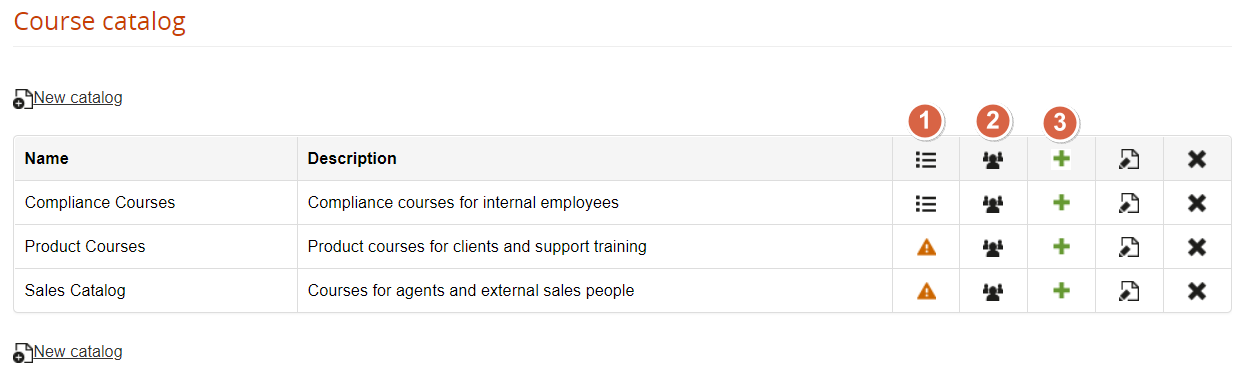
Catalogs
Global Catalog
By default, the catalog module will display a frontend list of all the available courses, and users will be able to self-subscribe or buy courses, depending on each course status and settings.
Activate the catalog
You can activate the catalog view by enabling the “Course Catalog” label in:
Admin > Settings > Elearning Configuration > User Area LMS
Catalog Settings
The behavior of the catalog module can be configured in
Admin > Settings > System Configuration> Settings > Elearning
Frontend View
Multiple Catalogs Management
Multiple catalogs Management features are located under:
Admin > Elearning > Courses > Catalogs
Add Courses
Use this feature to assign courses to this catalog
Assign users
Use this feature to assign users that will be able to view this catalog. You can select:
- Multiple individual users
- Orgchart nodes
- Company roles
Subscribe users
Select users to be automatically assigned to all the courses in the selected catalog
Frontend View
If you use multiple catalogs, each assigned to a node or branch, each user will be displayed the catalog related to the node he is assigned to.
Certificates
Certificate Management
The general certificate management features are available under:
Elearning > Certificates Management > Certificates
Here you can create certificate templates and manage and release certificates for all the courses
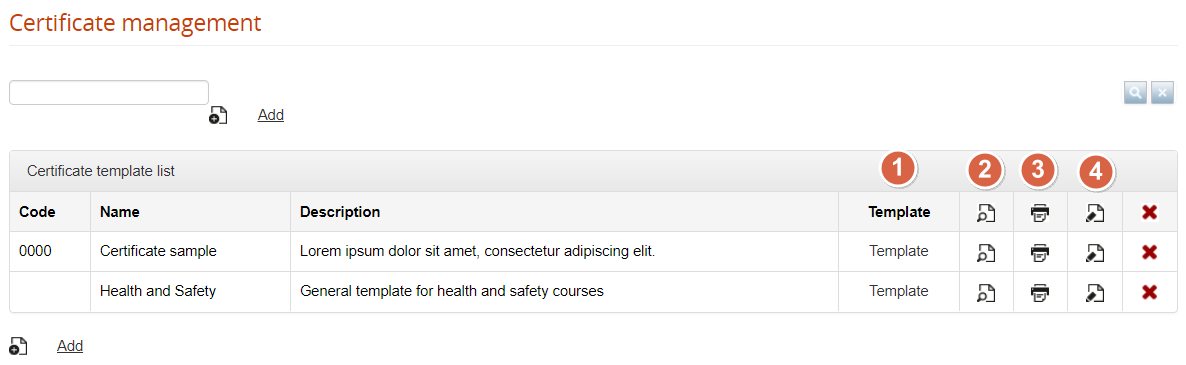
Certificate Template
It is possible to create an unlimited number of templates, each of those can be assigned to multiple courses.
Certificate content can be easily created with a text editor, using placeholder “tags” where dynamic content should appear based on user and course information.
It is recommended to place the text inside a table: this will help you correctly place your text, your images, and your text in the correct positions.
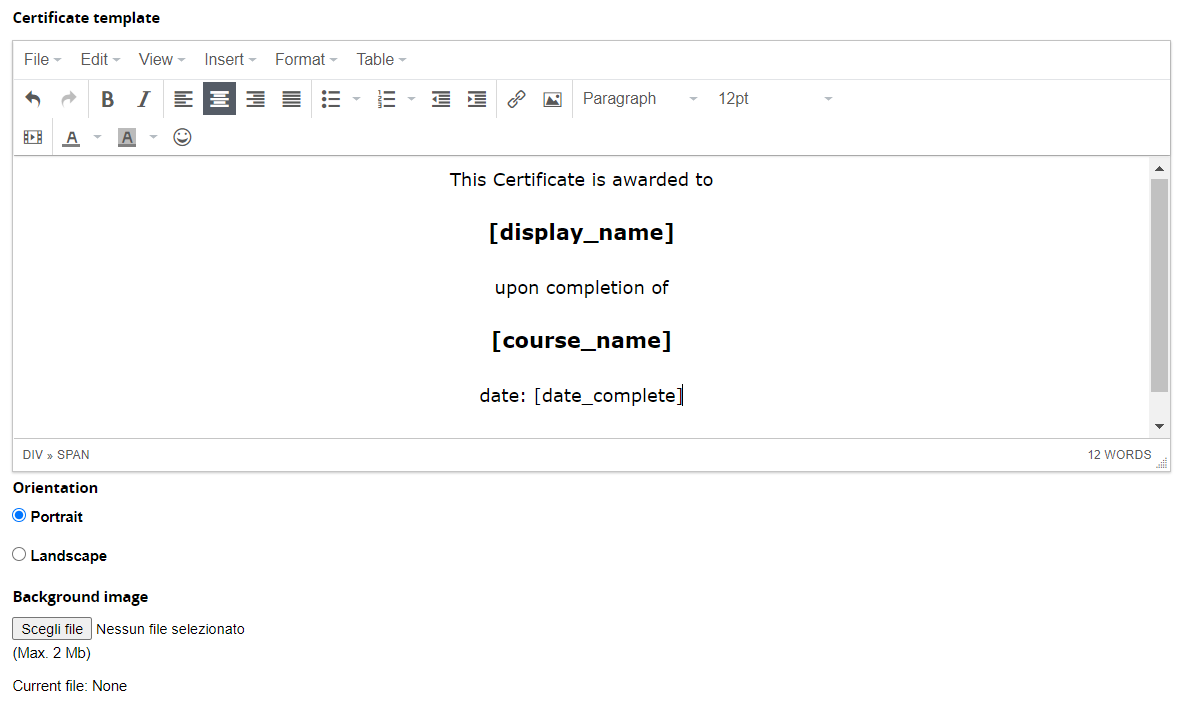
Tags - dynamic fields
The certificate can include dynamic fields. The list of available tags can be found under the text editor: every field has its own description on the right.
If you have added additional user fields, they will be listed as [userfield_1] etc. , always with the description on the right.
Multipage Certificates
You can create multipage certificates by adding a page break, when you want the certificate to be split.
Insert > PageBreak
The background image will be repeated on each page.
Background image
The background image should be an A4. In pixels, it can be 595 × 842 with a low image resolution, or up to 2480 px * 3508 px with a 300 dpi resolution.
Preview
Click this icon for a preview of your template
Release
Click this icon for a list of all the courses using this certificate:
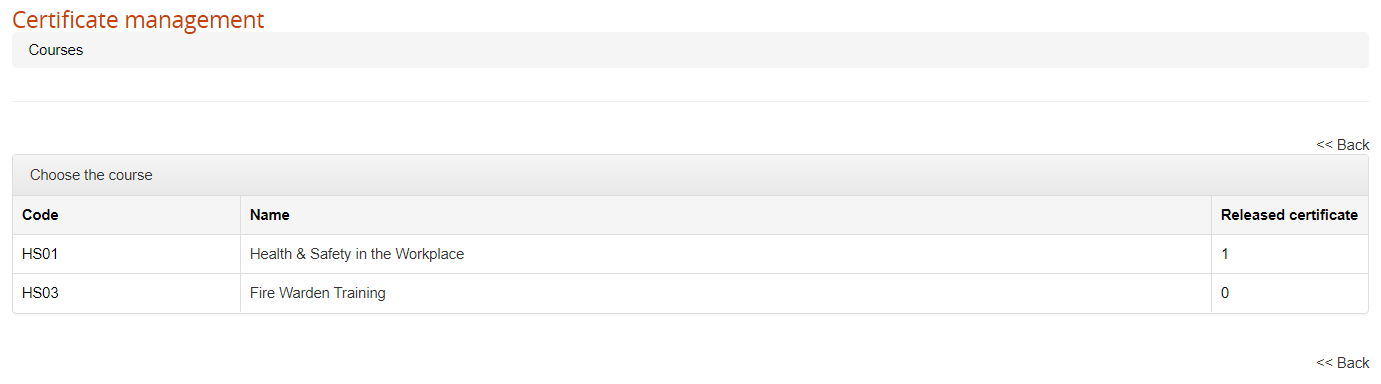
Click on the course title for a list of the users and their release status in each course:
Available options:
Field visibility: add other columns to the table
Advanced Search: add advanced search filters to table header
Generate all the selected certificates, to make them available for download
Download all the selected certificates in a single zip file
Delete a certificate and generate it again
Direct Course Access:
Please note this same user list is available from the course management for easier consultation(see below)
Administrator View:
This users list is automatically filtered on administrator assignements: each administrator will see only its assigned users
Edit
Change the name, code, and description of the template
Course Certificate Management
From the course management area, you can:
- Assign one or more certificates to a course
- Check and manage released certificates
Administrators:
you can assign to an administrator profile both features, or just the certificate release management. Check the administrator guide page for details
Assign Certificate to a course
Click this icon to assign a certificate template to a course
You can assign different certificate templates for different user status.
Click on the “number of released certificates” to see the list of subscribed users and their status:
Release
Click on this icon to see a list of the users and their release status in each course.
(See above: Certificate Management > Release)
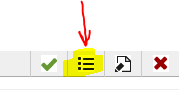
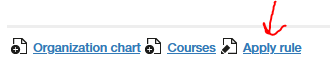
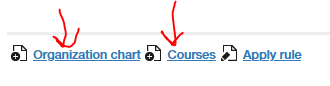
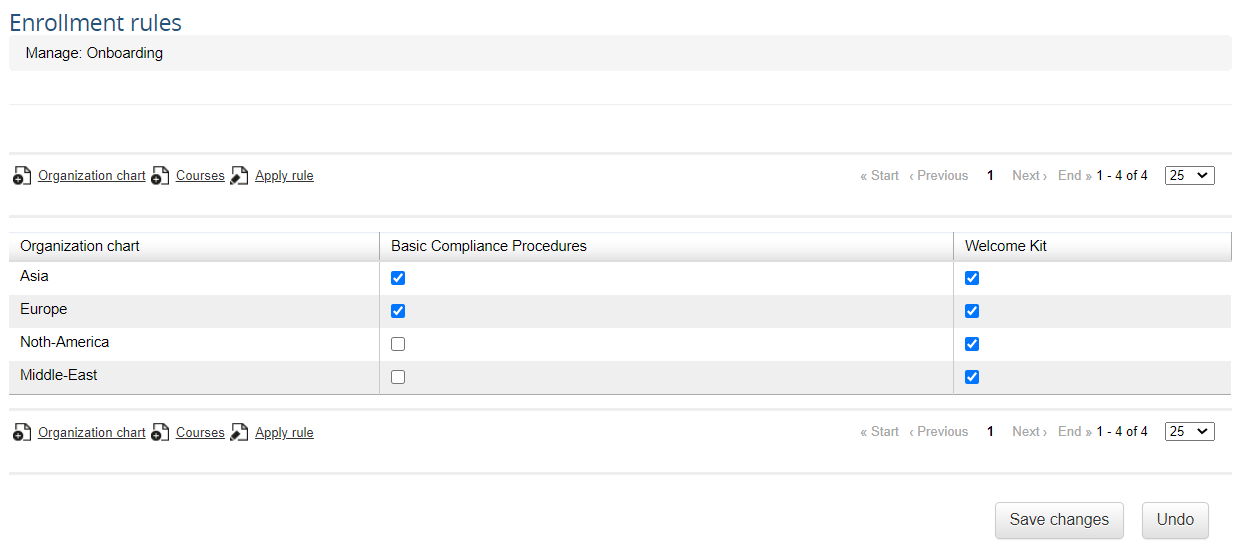
Enrolment Rules
Overview
With the enroll rules feature, it is possible to create automatic subscription rules based on different criteria.
You can set the enroll rules from:
Admin > Elearning > Enroll Rules
Adding Rules
When you add a new rule, you can set:
Title: a name for the rule
Language: the rule will apply only for users with the same language set for their profile, or for all users
Type: set the main criteria for selecting the users to apply this rule to. It won't be possible to change the rule type once it is saved. You can select users based on their:
- Orgchart Node
- Group
- Company Role
Managing Rules
Click on this icon to manage the rule:
Selecting Users
You will be able to select the nodes, groups, or company roles to apply this rule to, based on the type of rule chosen upon creation.
When the rule is active, all the users added to the selected node, group, or role will be automatically subscribed to some course.
Note:
Rules will automatically apply automatically only to users added to the selected nodes/groups/roles after its creation. To apply the rule also to users already within the selected criteria, see the "apply rule" button below
Selecting Courses
Here, you can select the courses to automatically enroll users. You can set different courses for each of the nodes, groups, or roles you selected
Applying the Rule
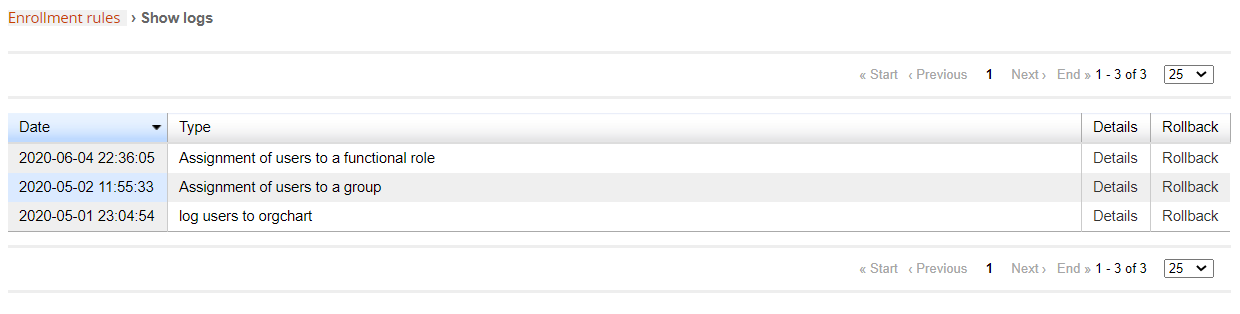
Logs
In this page you will see a list of all the applied rules. It will be possible to:
- Check a list of all the users subscribed through the rule
- Rollback the subscription, in case the rule was applied by mistake
Reservations
The reservation module allows the creation of subscription events (i.e., in presence seminars, meetings, exams, etc.), where users can subscribe from within a course. Events can be created and managed in two ways:
- by course administrators having the edit permission set for their subscription level (I. Teacher, tutor, etc.). The “Reservation” item must be added to the course menu
- by platform administrators, from the forma admin section
Administration > Elearning > Reservation Management
Event Categories
Administration > Elearning > Reservation Management > Category
A category is a general classification for events, like “Exams”, “Seminars”, “Meetings”, etc.
Categories can be created only from the administration panel, and will be available for all events in any course on the same platform. For each category, you can set:
- Name: the name of the category
- Max event for category: limit the number of events a user can subscribe to in this category
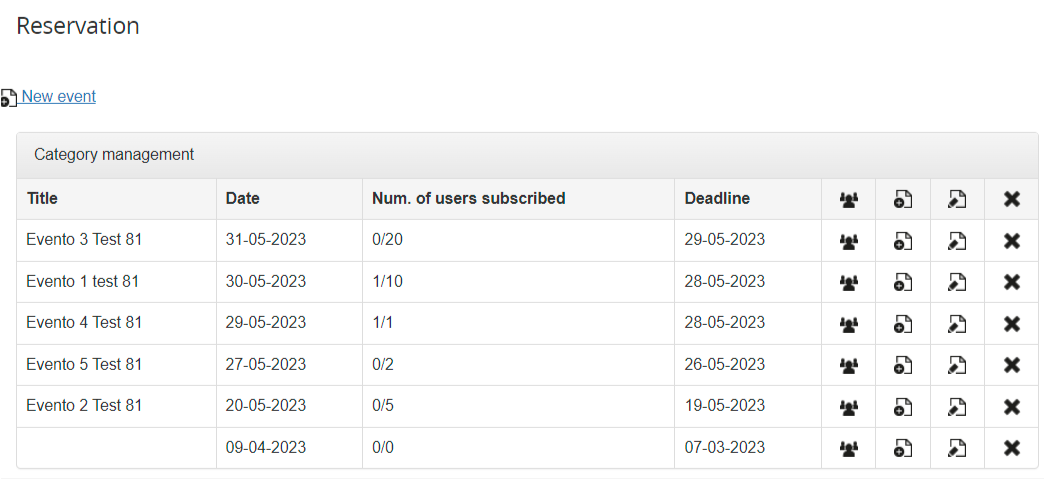
Events
Administration > Elearning > Reservation Management > Events
This section will let platform administrators add and manage events for all courses
Course Features (FrontEnd)
Frontend Course Management for course administrators, teachers, and students
Announcements
The “Announcement” module adds a news and communication board to your course.
The announcements area allows the teacher or person managing the course to publish a communication for the students, sending a personal notification to each user’s e-mail box.
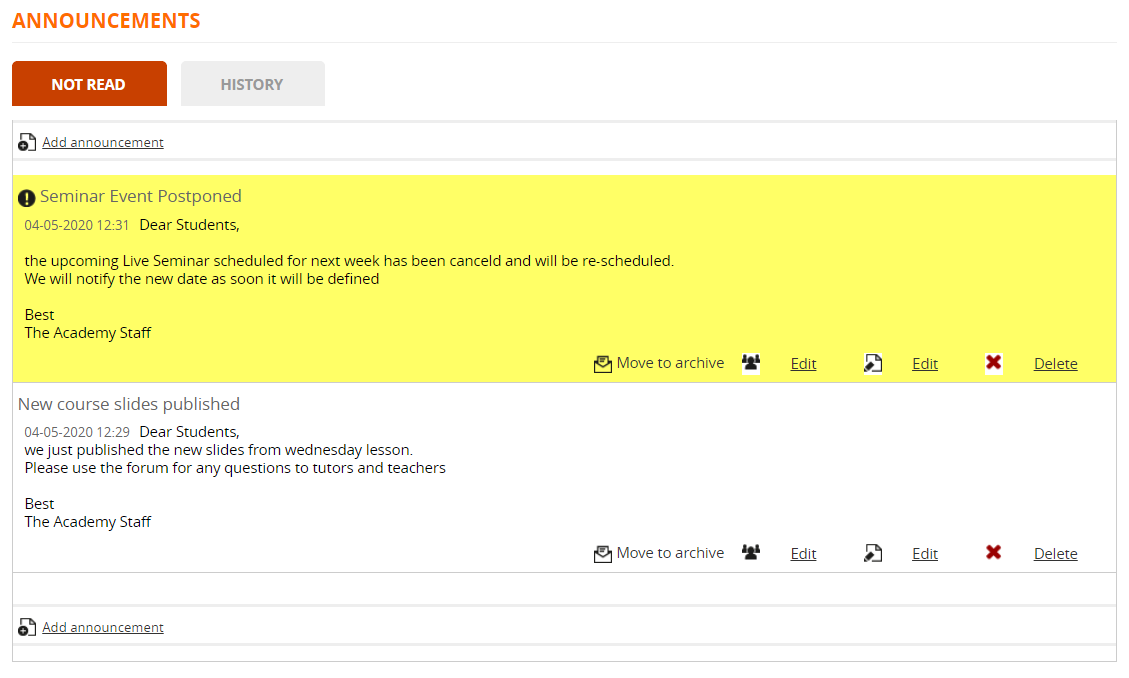
View and manage Announcements
All the course users with view permissions on the module can read announcements
Students will be able to read and archive under the “history” tab, announcements they can see.
This is the full view for user roles with edit permission on the module (i.e., course administrators, teachers, tutors):
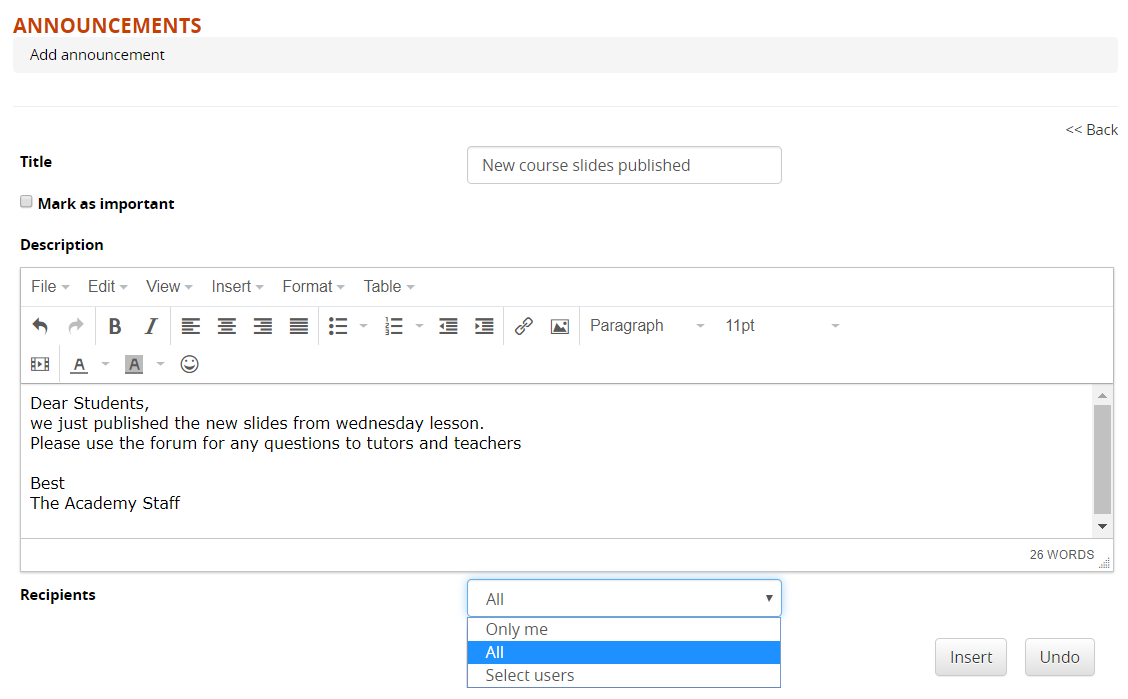
Insert an announcement
When adding a new announcement, you can define:
- Title
- Mark as important: the announcement text will appear highlighted
- Description: consider this text will be also sent by email or SMS, avoid using complex HTML structures.
- Recipients: Announcements can be published for all or just some subscribed users, select:
- Only me: if you are preparing the text and don't want it to be sent yet
- All: all the users subscribed to this course
- Select: will prompt the list of subscribed users that will be able to see this announcement
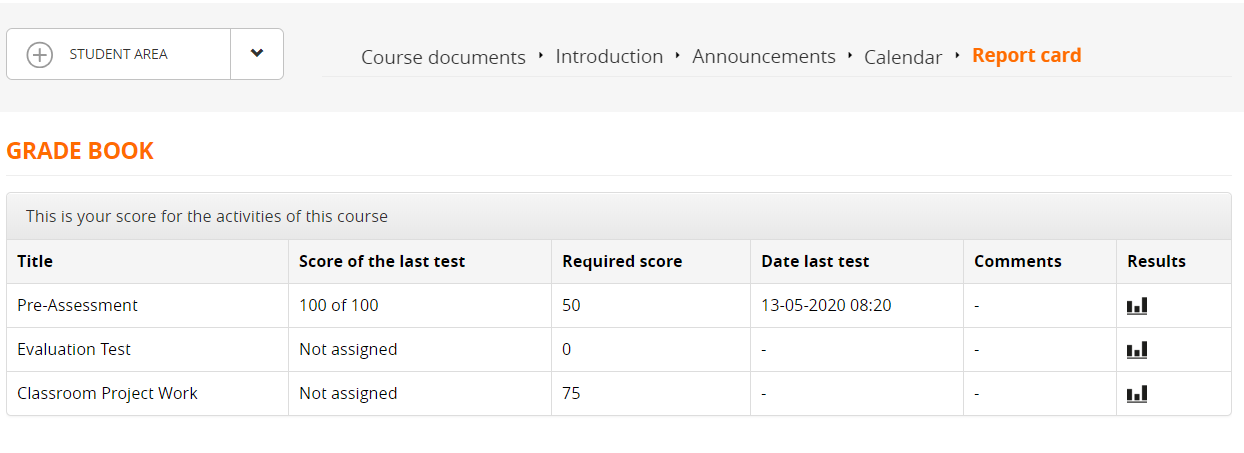
Report Card
This module shows to the user his own scores in tests, SCORM and classroom activities.
Visibility of each evaluation item can be set in gradebook module
Newsletter (Course)
This module allows course managers (i.e., administrators, teachers, courses) to mass-email users subscribed to subscribed users.
Features:
- Define the sender, the subject, and the message of the communication.
- One or more attachments may be included in the newsletter.
- Select all or some users
It is also possible to choose which users to send the communication to based on the language in which the platform is configured.
The communication can be sent either by e-mail or SMS (when this service is managed by the platform).
Check also the Global Newsletter settings
Manage Menu
This module is generally assigned only to course administrators, with view and edit permissions, and located under
Teacher Area > Manage Menu
This module will let you:
- Add new modules to your course
- Edit menu item names
- Change module permissions
Changes made here will affect only the present course specific menu, and won't reflect on general menu templates or any other course: this will give you maximum flexibility with menu management and customization.
If you need to apply changes to several courses, consider assigning or creating a menu template from general administration, or ask a god admin to do that.
Please refer to the general menu management feature for details.
Course Forum
Course forums will be available to all course users, or only selected course users
The feature is usually located under the “Collaborative Area” menu, but you can use the menu management feature to:
- move the link
- rename the link
- assign viev/create/moderate permissions for each subscription role
- remove the feature from your course
Check the global community forum guide for details about forum creation and management
Gradebook
REMOVED: this feature has been deprecated and removed since Forma LMS 4.2, replaced by the new Course Report module
The gradebook is one of the most important and useful course features, used to manage all the evaluation activities in a course:
- Test Learning Objects
- SCORM objects with score
- Classroom activities
Overview
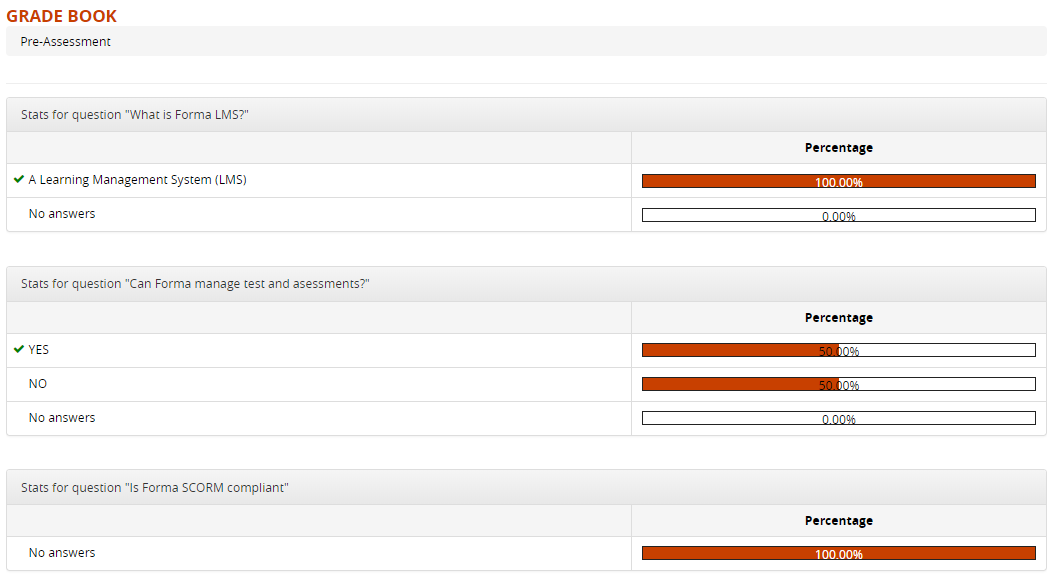
View Answer stats
Edit test gradebook options
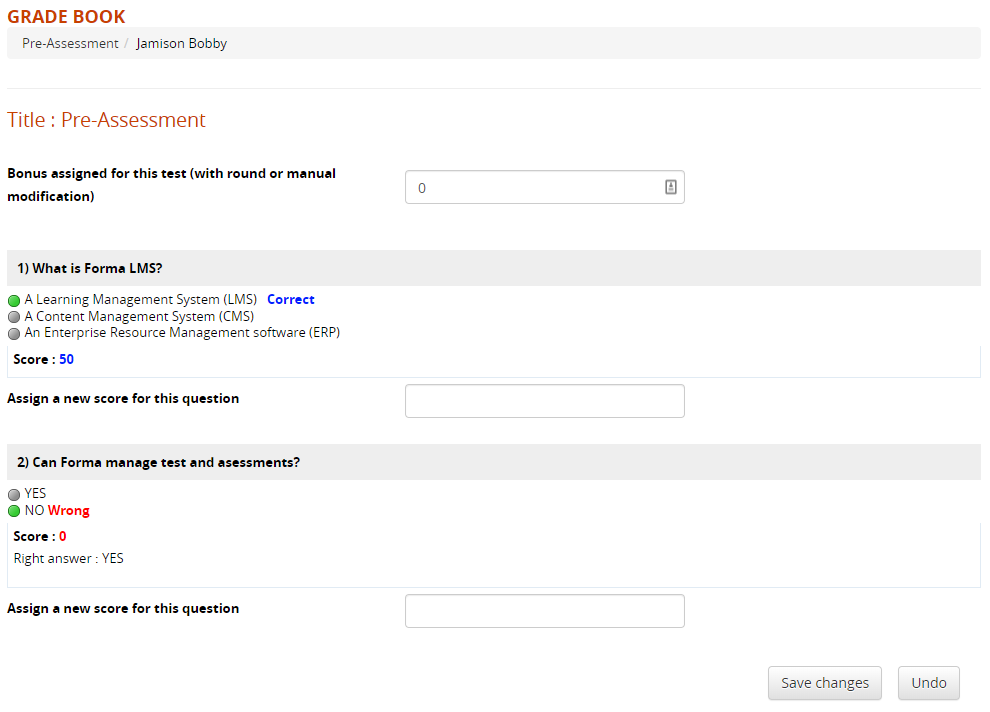
Use the “Edit” icon for each test to see a list of the scores for all the user. You will also be able to:
Configure:
- Weight of the test score in the final score calculation
- Show or hide the test score in user ratecard
- Use or ignore the test score in the final score calculation
Plus, for each user you can
- View and edit the final score
- View the full test execution (see below)
- Edit the execution date
- Add a comment to be displayed on user scorecard
- Cancel last execution, so the user ca take the test again
Test execution detail
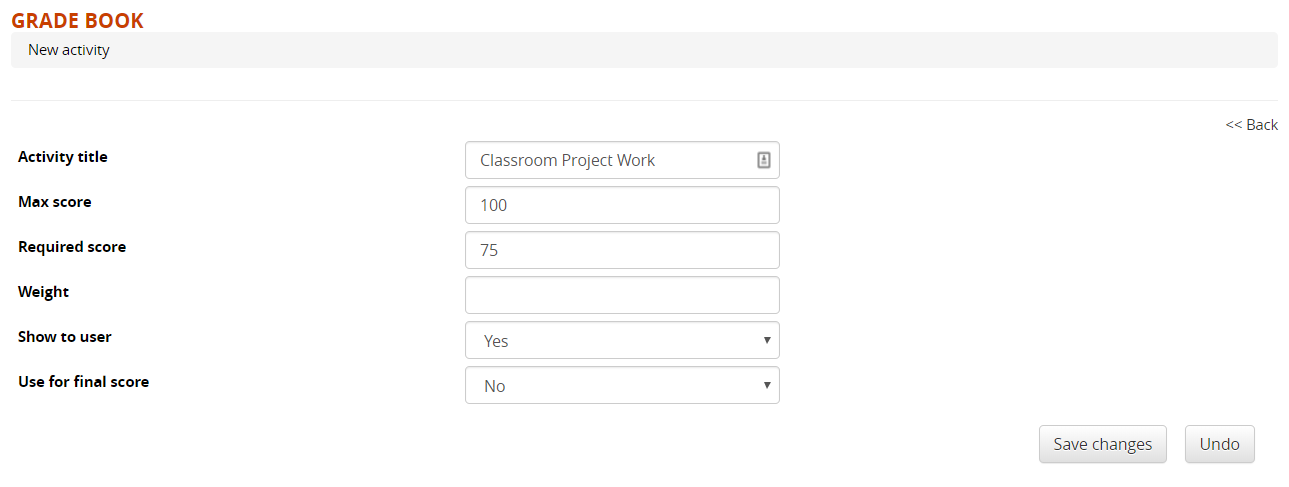
Add a new activity
Here, you can also manually add more scores to be calculated for the final course score:
- Activity: record user evaluation score for external activities, not done directly in the platform
- SCORM Results: is a SCORM object has some test, here you can add it to the gradebook
Detail
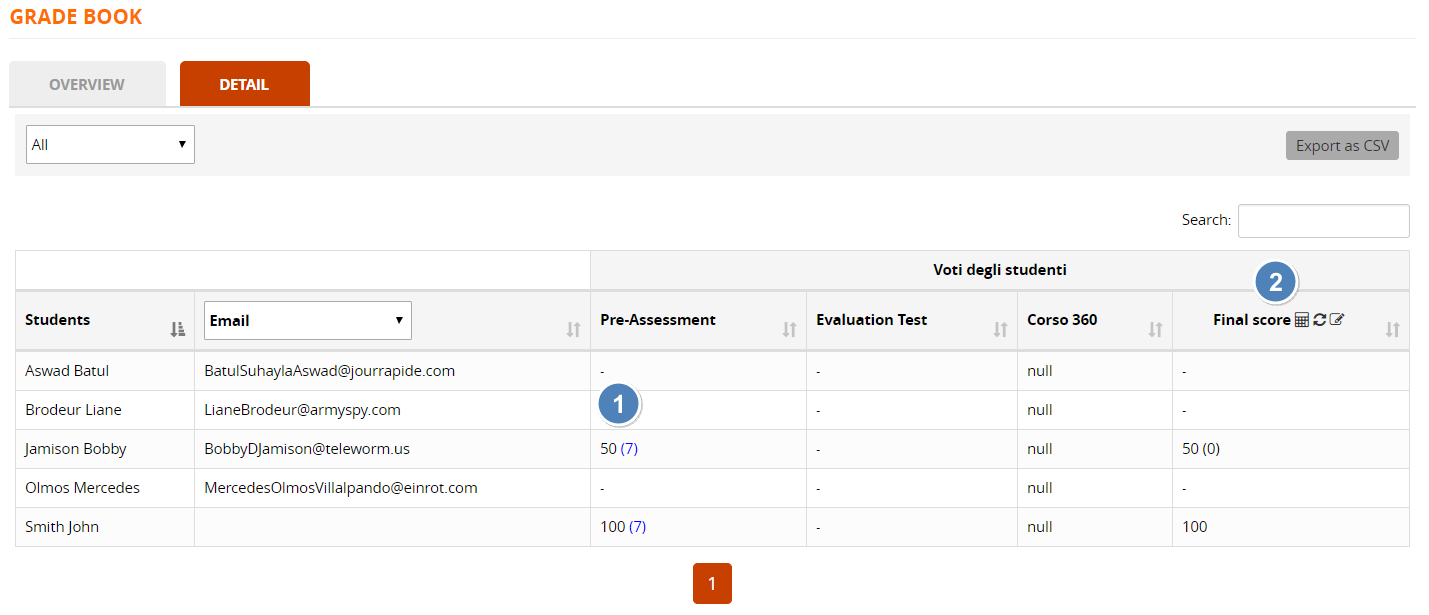
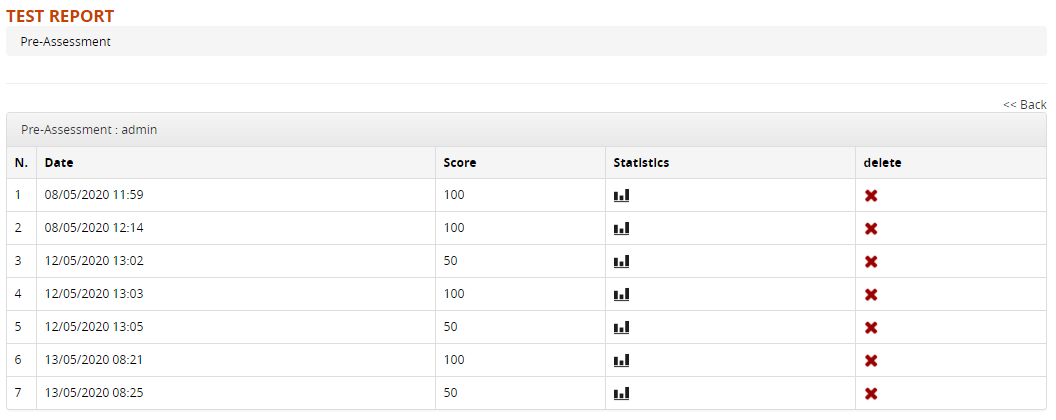
- Score and Attempts: vote of each user in the last attempt for each evaluation item. Number of attempts is shown in brackets, click to see the full attempts hisoty
- Final Score: this column lists the final vote for each user. The score is calculated on-the-fly on page loading, manually edited score ar shown in brackets. Check this page for details on final score calculation and related behaviours.
Click on the icons to:- Recalculate final score for all user
- Round the vote to decimals
- Edit the final score
Attempts History
Edit Final score
Click on the icons on the “Final score” column to:
- Recalculate the final score for all users
- Manually edit the final score for all users
Course Stats
REMOVED: these features have been deprecated and removed since Forma LMS 4.2, replaced by the new Course Report module
Forma provides different stats to monitor course and user progress:
- Usage Stats: monitors the global course activity, by tracking how many course sessions and operation each user takes
- User Stats: tracks the progress status of each user on the course learning objects
- LO Stats: shows at a glance how many users completed each learning object
- User Object Grid: detailed report of user's status over each LO, with the ability to edit dates and completion status.
Check the UO Grid page of this guide for details
These features are usually located under the “Stats Area” of the course menu
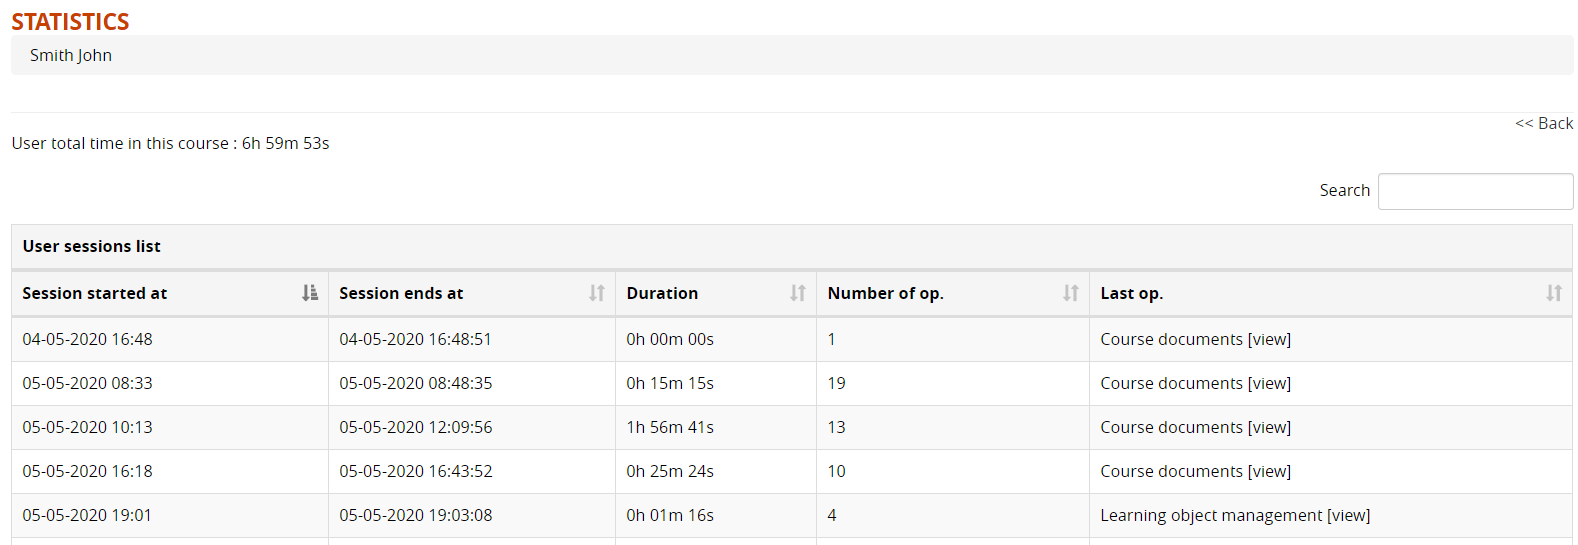
Usage Stats
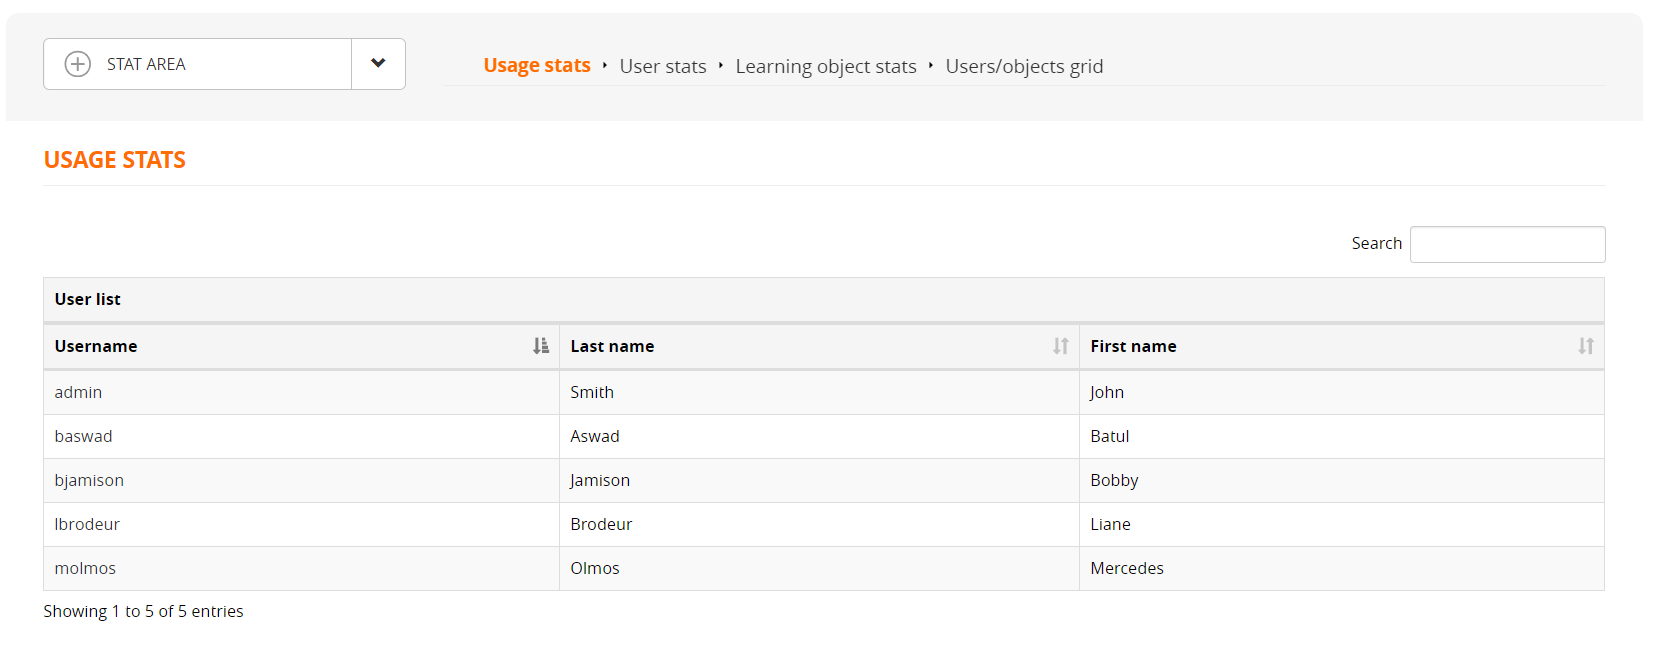
Click on the username for a detail of the user's sessions in this course:
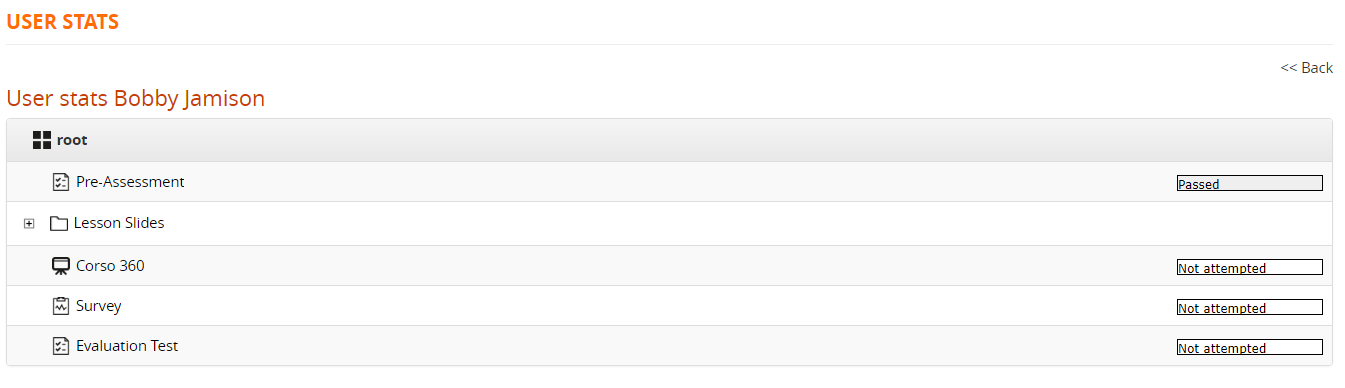
User Stats
User statistics provide the teacher with a report on the activities of each individual, highlighting their level of progress in the course.
By clicking on the name of each user, their progress status for each course object can be viewed.
Displays:
- Filters
- Status: click to edit user status on the selected learning objects
- Learning Objects: number of learning object new / started / completed
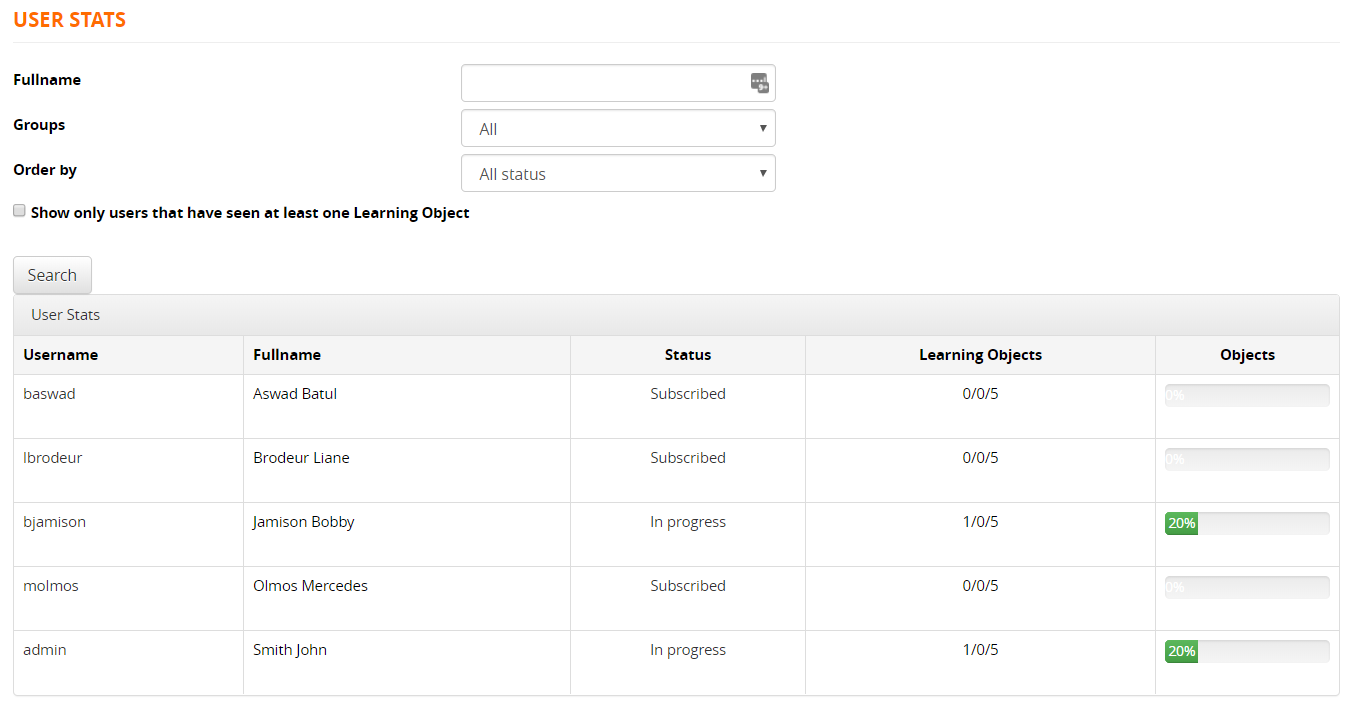
Filter for the desired criteria, or click on a username for details:
LO Stats
In statistics by object, a comparison can be made regarding the status of all the users in relation to a specific learning object.
It is also possible to view the aggregated results of a survey.
On the initial screen, the objects for which the comparison is to be made can be selected by clicking on the magnifying glasses.

User/Objects Grid
REMOVED: this feature has been deprecated and removed since Forma LMS 4.2, replaced by the new Course Report module
The “User Object Grid” module allows:
- display detailed information on user status and scores on each learning object
- edit user status and completion dates
- reset user tracks on learning object
- export detailed reports
Overview
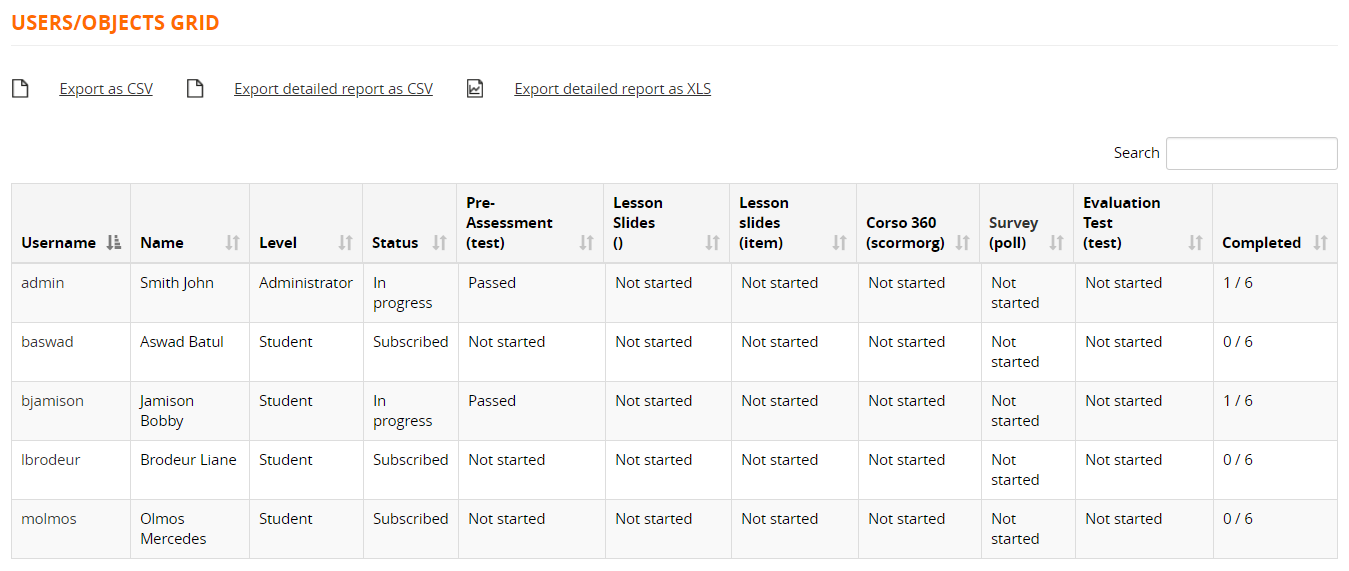
User Report
Click on a username to see detailed information:
- Name: Click to check details on this object and reset user status
- Status: click to edit
- First / Last access date: click to edit
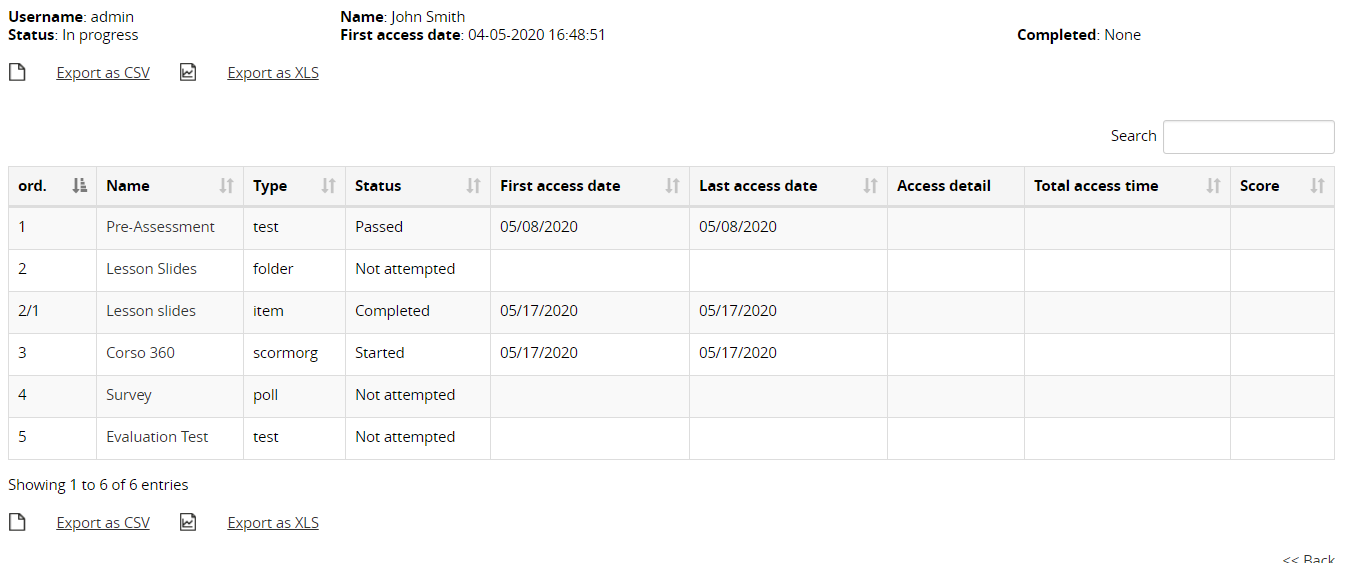
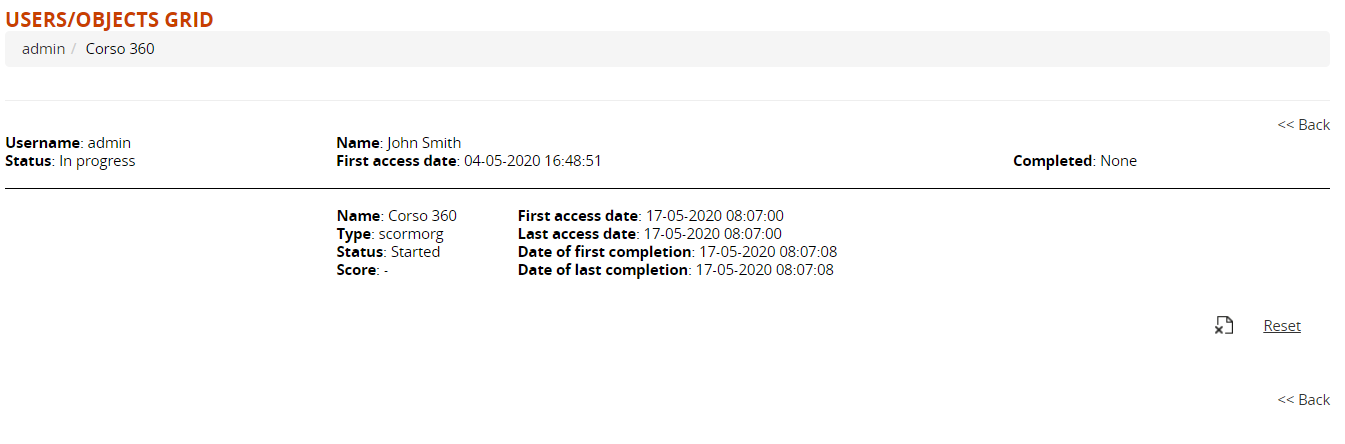
LO Details
Course Info
This module will disply a structured info page for the course:

Users with edit permissions on the menu item will see the "EDIT" button and will be able to change some of the general course settings:
Course Report
Overview
The Course Report Module extends Forma LMS reporting capabilities by centralizing all course-related tracking data into a single, cohesive view. It enables administrators and trainers to analyze user progress, completion status, and performance at both course and participant level, supporting more informed decision-making. Built on the platform’s flexible reporting system, it allows customizable filters, detailed data selection, and export options. This module is designed to simplify monitoring course activities and improve the efficiency of training evaluation processes.
Upgrading from Forma 4.1.4
This module has been introduced with Forma LMS 4.2. If you are upgrading from older forma versions, this single module will replace all the following teacher area features:
During the upgrade process all these features will be automatically removed both from the course menus and from the menu templates in admin area. A link to the new module will be automatically created in the same menu area both for course menu and menu templates. trying to migrate the same menu permission for administrative roles as the old modules.
Permissions eventually set to users enrolled with the role of student, ghost or guest will be removed.
Check your menus item after upgrade. In case the new module is not present in a course, just re-apply to the course the menu template, making permissions changes if needed. View the menu management documentation for details.
Features
Dashboard
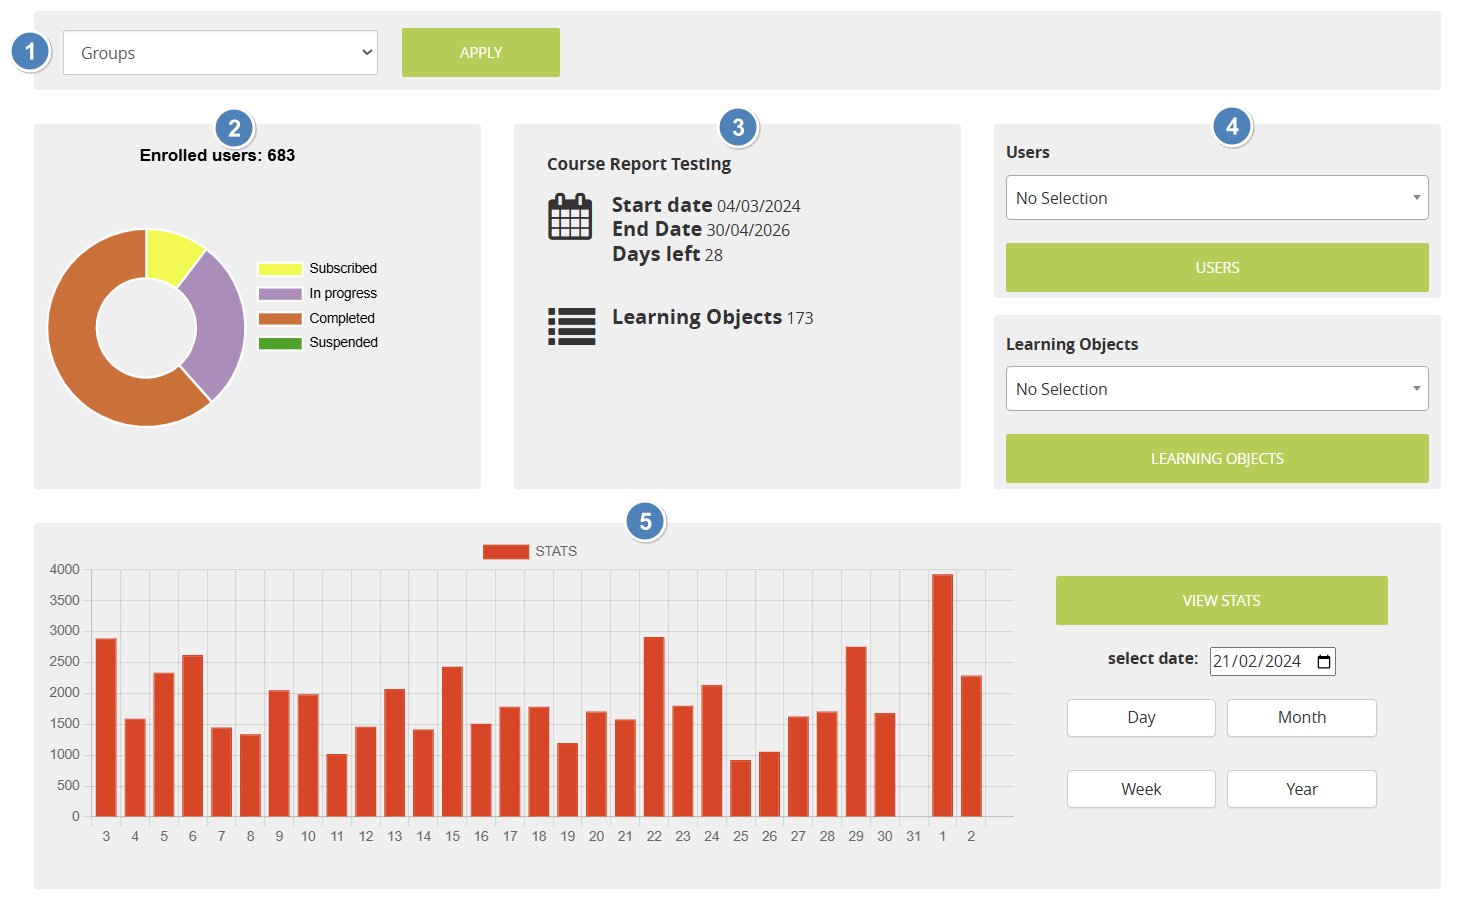
- Filters Bar: allow filtering the below data by edition or course group. Not displayed if groups or editions are not configured for this course
- Users status Chart: Total number of enrolled users, and pie chart showing the amount of users for each status. Mouse over each segment to see the number of users.
- Course Info:
- Start/End date, as set in the main course options. For classroom courses will show the dates set for the master course
- Days Left: counts remainig days from today until the end date of the course. Only shown if the end date for the course is set.
- Learning Objects: total number of LO in this course
- Quick Search by User: select a specific user or just start writing a username, and click the submit button to directly see his report details
- Quick Search by Learning Object: select a specific Learning Objector just start writing its title, and click the submit button to directly see the report details page for this LO
- Usage stats: usage stats for the last period.
User Report
Main Page

- Filters Bar: allows filtering the data below by edition or course group. Not displayed if groups or editions are not configured for this course
- Recalculate: recalculates the final score for all users
- Export: export the report in CSV or XLS format
- Search: search on the displayed data, enable advanced search, anable visibility of hidden columns
- Username: click on a username to display a detailed report of the status of this user on all the learning objects
User Report
Status and main tracking data for all the LOs for a specific user
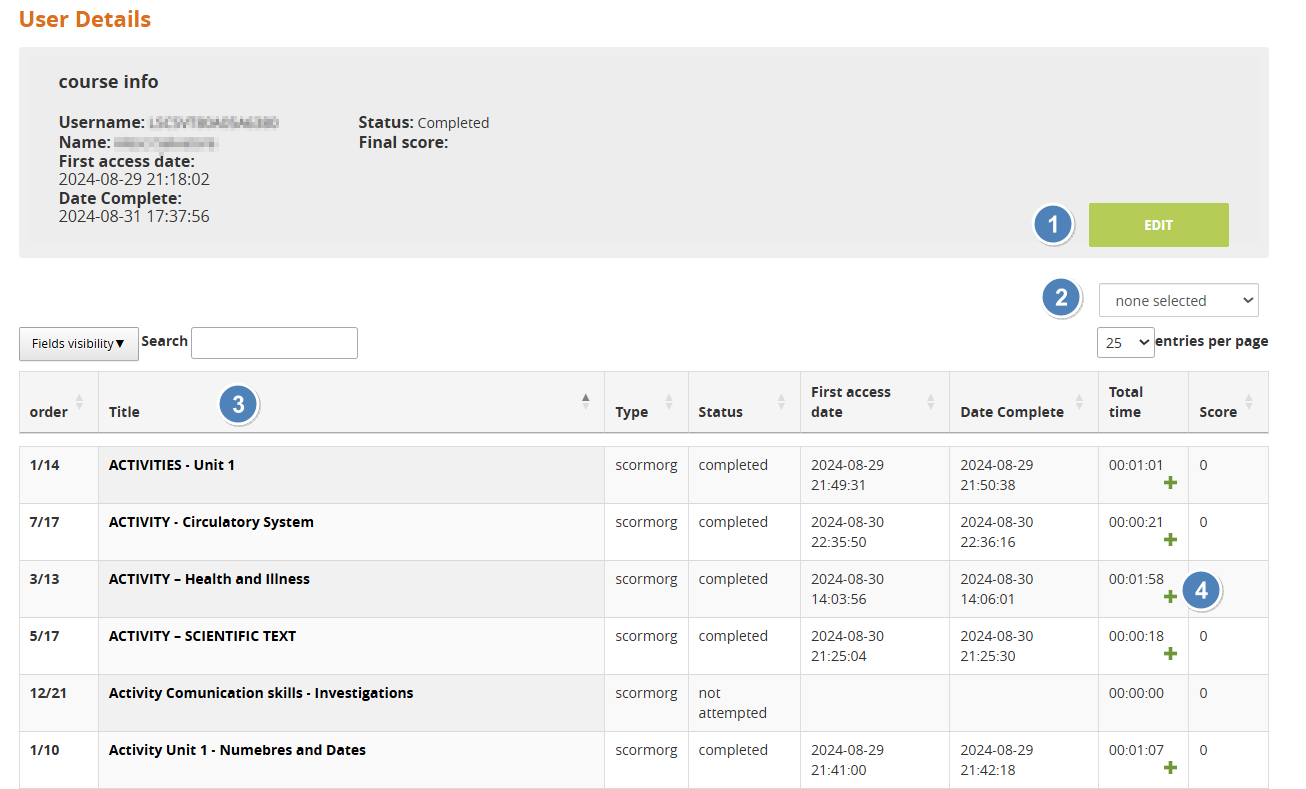
- Edit: edit the main informations for the user status on the course
- Status
- First Access
- Last access
- Export: export the user tracking data in CSV or XLS format
- Learning Objects list: click on the object title to see user details for this learning material
- Scorm time tracking: the colums displays the total time spent by a user in each scorm object. Click on the "+" icon to see a detailed report of all the accesses
Learning Objects Report
Main Page
This page lists all the learning objects in the course with informations about the progress of users in the course
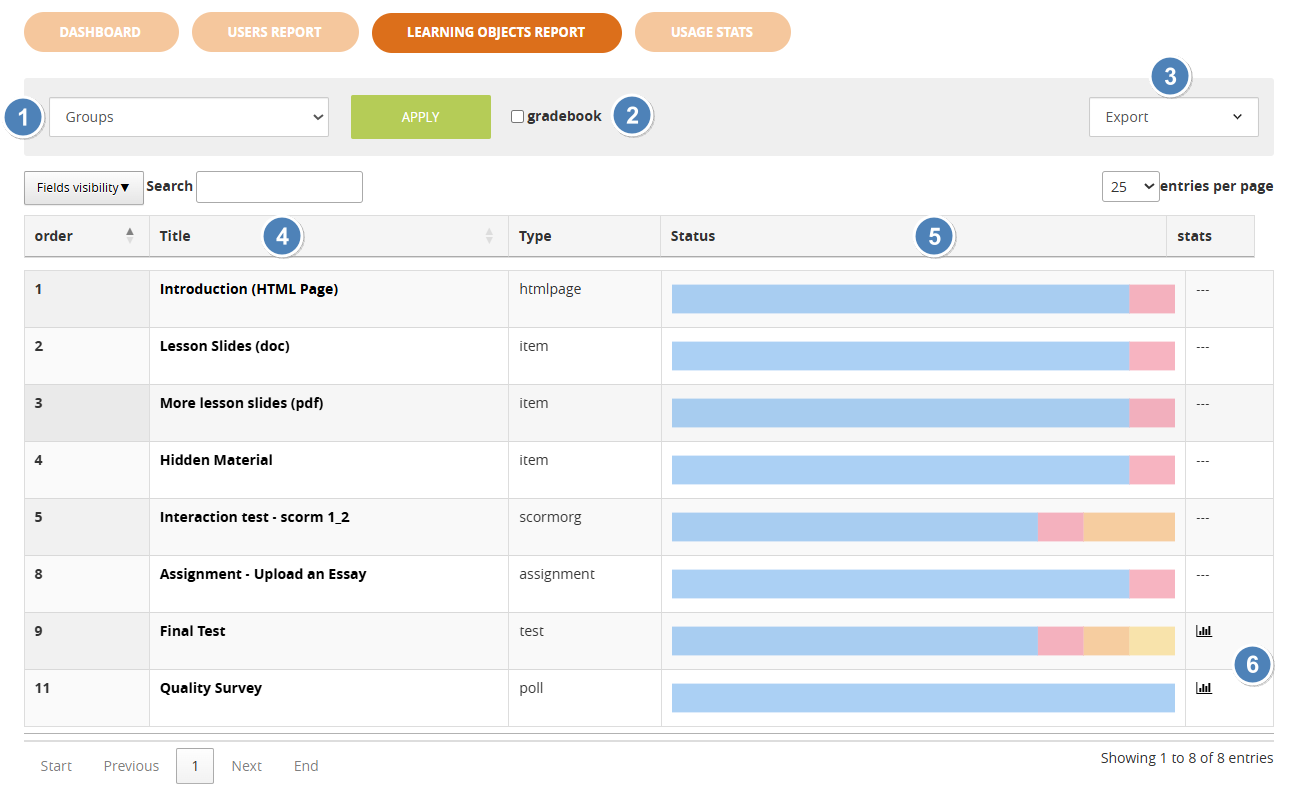
- Filters Bar: allows filtering the data below by edition or course group. Not displayed if groups or editions are not configured for this course
- Gradebook Filter: flag this checkbox to filter the list of learning objects and display only those with scores and marked as "Use for final" in the LO Management - properties section
- Export: export the report data in CSV or XLS format
- LO Title: Click on the title of a learning object for a detailed report
- LO user status chart: this chart represents the progress status of all users on a learning object. Mouse hover a segment of the status bar to see the number of users with that status in a LO
- Answer stats: click on the istogram icon to see statistics for the answers in a test or poll learning object
Learning Object Report
This view features an overview of the status of all users on this learning object, and a list of all the users with their main tracking info
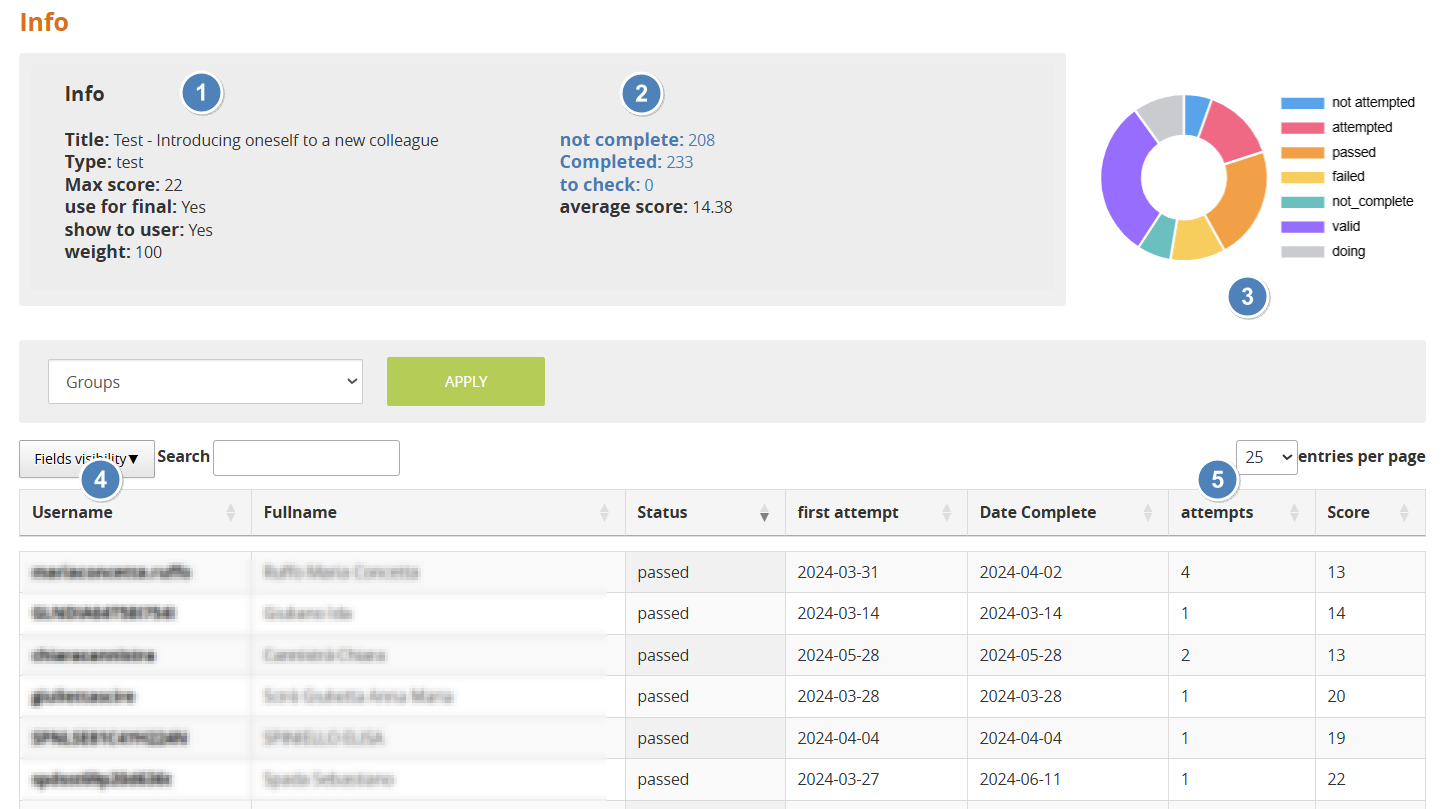
- Learning Object Info: main information about the selected learning objects. Score settings like max score, use for final, show to user and weight can be set and edited by each LO properties and editing sections
- Test Metrics: only displayed for "test" learning objects:
- User status: shows how many users have completed (passed or failed), not completed (not attempted or doing) an assessment, and the number of submissions waiting for a teacher validation (to check). Click on a label to filter the users in this status
- Average score: calculates the average score for all users in this test
- Score status chart: pie chart displaying the score status of all users. Mouse hover a segment of the status bar to see the number of users with that score status in this LO
- User tracking details: click on a username to see the user status and tracking details for this LO
- Attempts: number of attempt of the users in a test
User Details
This page displays the available details and features for the tracking of a user on a specific Learning Object, and can be reached by navigating either the user report or the learning objects report.
The page features the following info panel, while the content will vary based on the type of learning object displayed:

- Info: main tracking information for a user on this learning object. Some details may slightly vary depending on the type of LO
- Edit: click to edit the status, dates and status of this user on this LO

- Reset: delete all the tracking for this user on this LO. Warning: can't be undone!
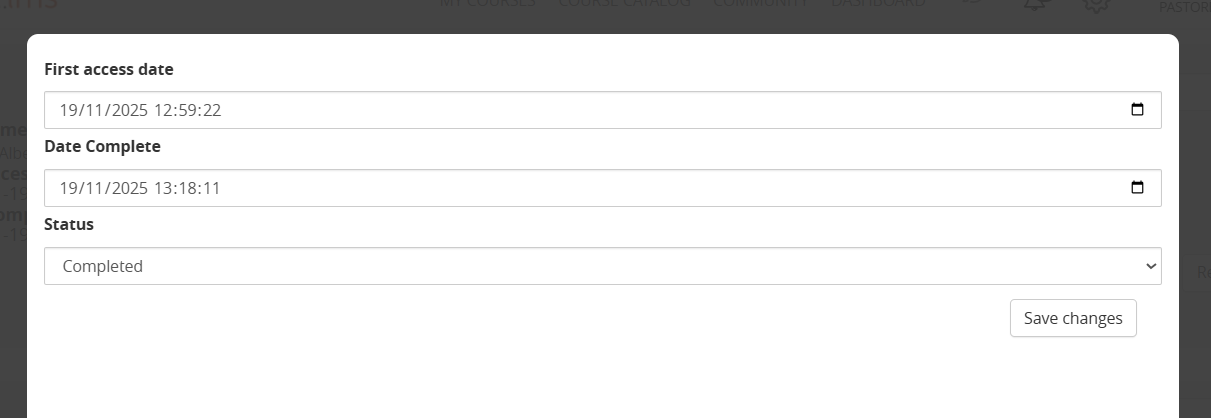
Test tracking details page
For learning objects of type "TEST" this page displays the last test submission made by the users, with the given answers and scores
- Submissions History: if the user made multiple attempts to complete the test they will be listed in this dropdown. The page will open by default from the last attempt
- User's Answers: display all the test questions answered by the user, for the selected attempt
- Edit: click this button to edit the user score for an answer and add a comment
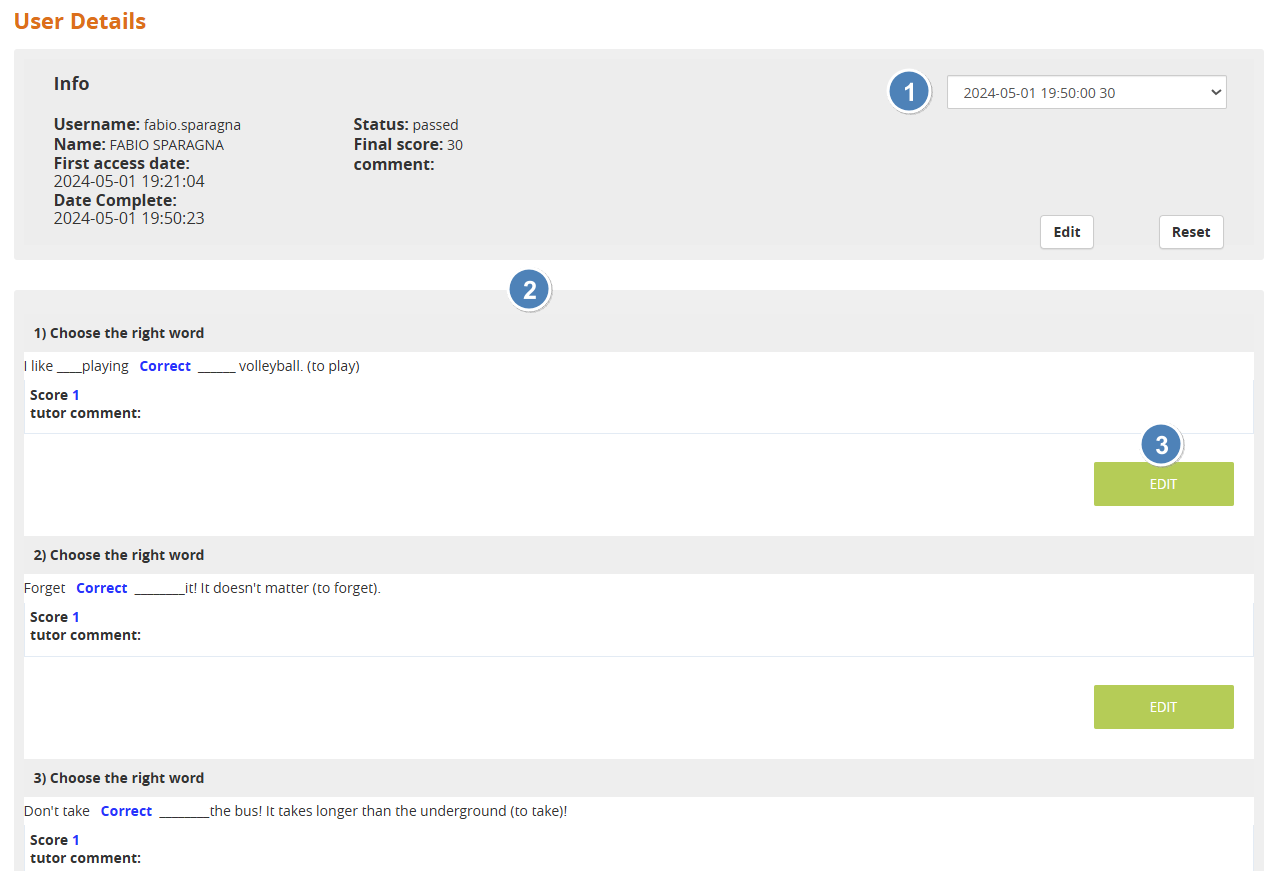
Edit a test tracking
For each user test attempt, it is possible to edit the tracking info including:
- Score Status: in addition to the generic LO status, it will be possible to set a score status specific for test LOs
- Comments: add teacher comments, visible to the user if set in test options
- Bonus score: increase the score achieved by the user
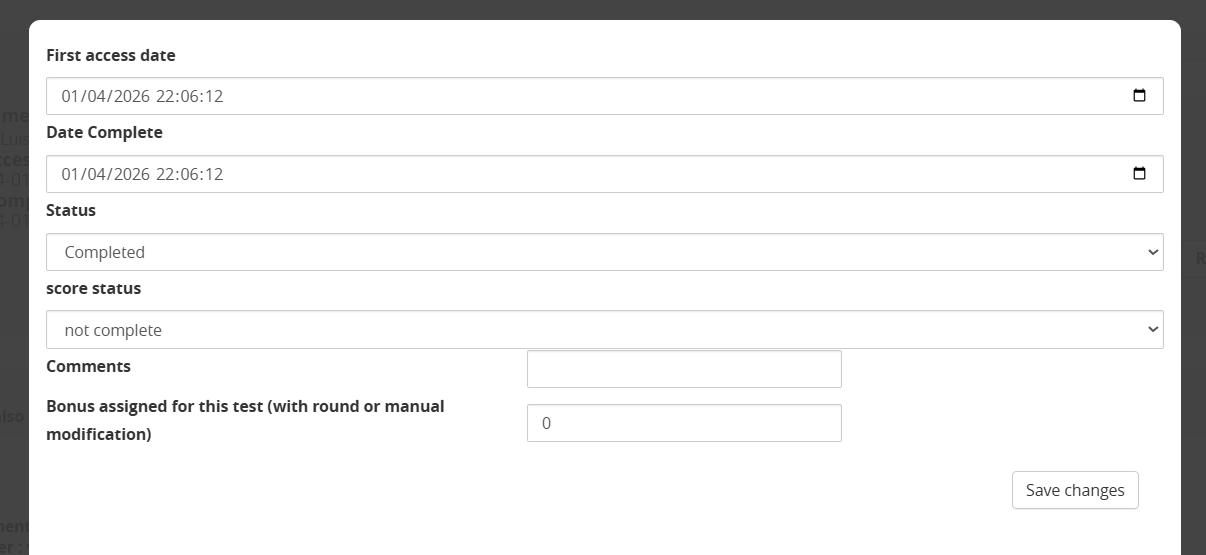
SCORM Tracking details page
It the object type is SCORM, this page will display available info about user's sessions
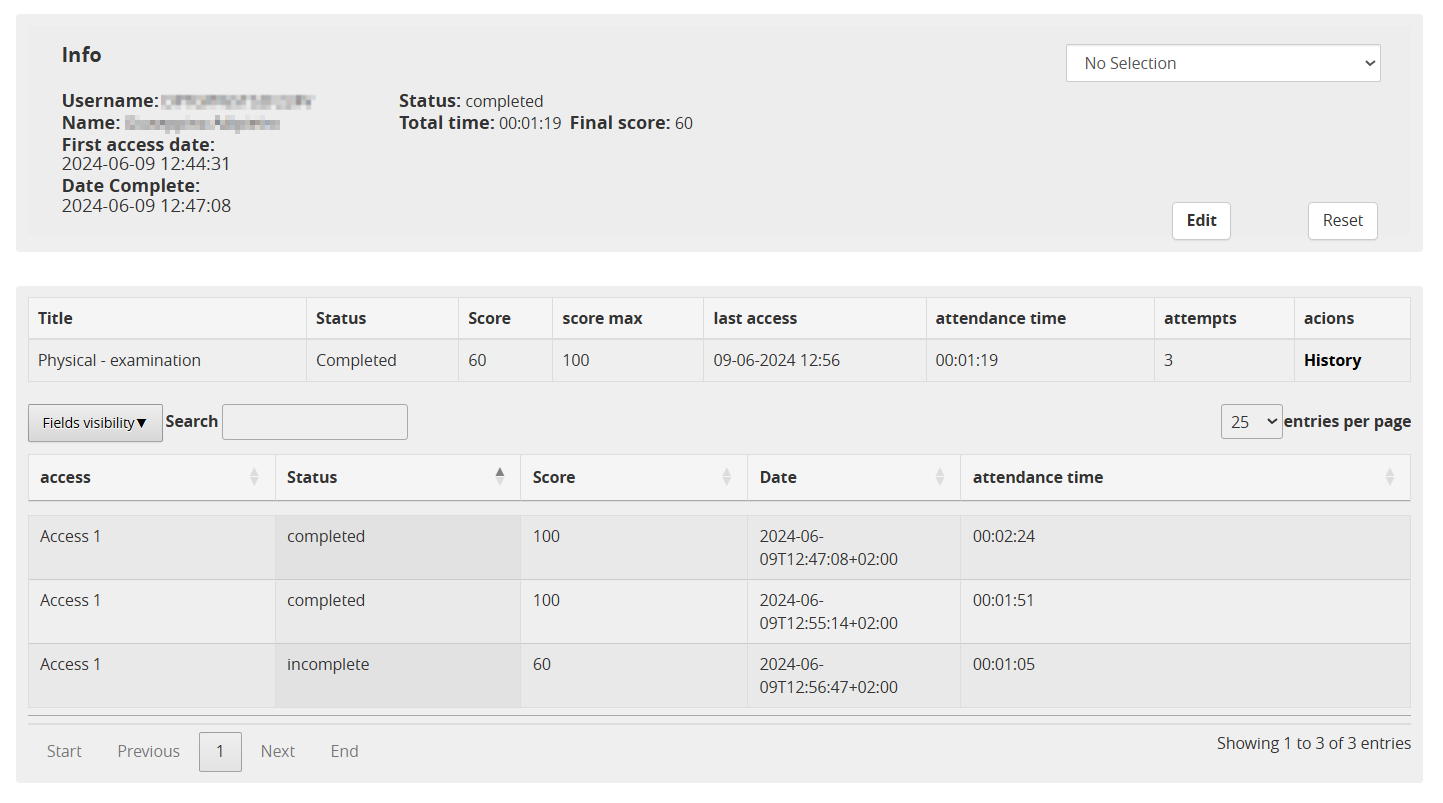
Usage Stats
Main Page
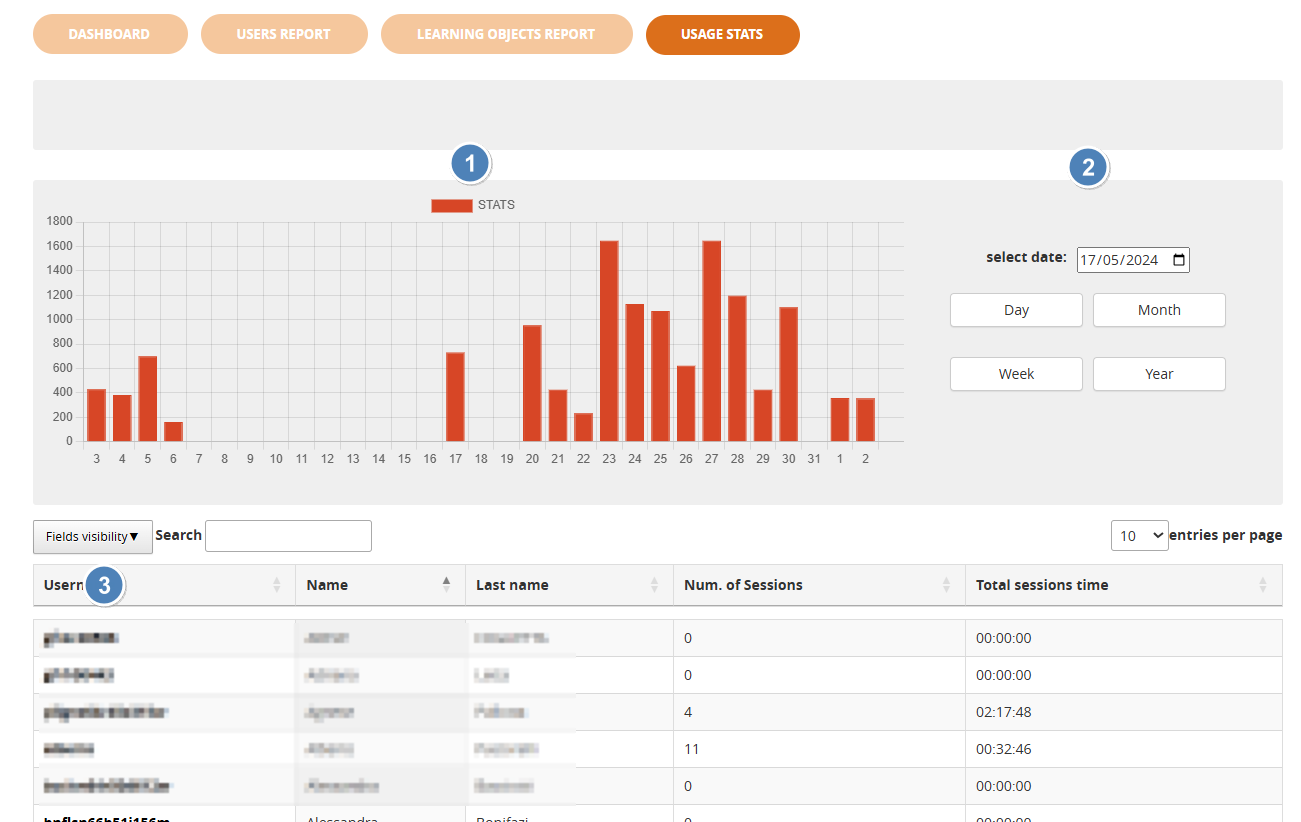
- Usage stats chart: volume of browsing activity of the users in this course for a selected time period
- Time filter: choose time range and start data for the usage chart. Start date defaults to the first available tracking.
- Users list: click on a username for a detailed list of browsing sessions and actions
Usage Stats by user
List of all the browsing sessions of the selected user in this course:
- Total time: sums the browsing time of all the sessions
- Actions: click on the icon for a list of the actions performed by the user in a session
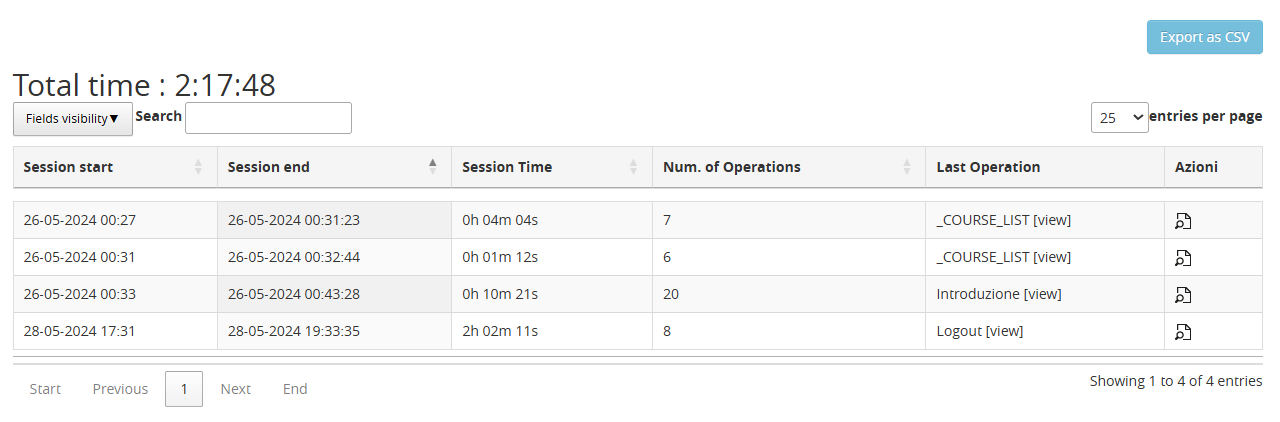
Course Final Score
Overview
The Final Vote represents the overall score achieved by a user within a course. It is automatically calculated based on specific learning objects configured to contribute to the final evaluation.
How the Final Vote is Calculated
The final score is computed by considering only the course elements explicitly marked as "Use for final" in the LO settings
Each of these elements contributes to the final vote according to:
-
its score
-
its weight
-
its maximum achievable score
Calculation Logic
The system applies a weighted normalization formula:

Final Vote = (Sum of (user score × weight)) / (Sum of (max score × weight)) × Final Score Scale
Where:
-
user score = score obtained by the user in each activity
-
weight = importance assigned to the activity
-
max score = maximum achievable score for the activity
-
Final Score Scale = maximum score configured for the course (e.g. 100, 200)
Important Notes
-
Only objects marked as "Use for final" are included
-
Activities not completed (or not valid) contribute 0 to the numerator
-
However, their weight is still included in the denominator
-
This means incomplete activities negatively impact the final score
Manage the Final Score (Forma 4.2 onward)
Object Inclusion Rules
-
No object is included by default
-
All objects that produce a score (e.g. tests, SCORM, assignments) must be explicitly marked as "Use for final"
-
This provides full control over which activities contribute to the final evaluation
Upgrading to Forma 4.2: when upgrading from a previous version to 4.2, the settings for existing materials in the gradebook (test, scorm or activities) will be mantained and migrated to each LO properties settings
When the Final Vote is Calculated
-
The final vote is automatically updated in real time
-
Recalculation occurs each time a user completes an object marked as "Use for final"
Benefits of the new behavior
-
Immediate feedback for learners
-
Always up-to-date final scores
-
No need to access the Gradebook to trigger recalculation
Check the Course Report Documentation for further details
Editing the final score
TBD
Manage the Final Score (Older Forma version)
Object Inclusion Rules
-
Test objects were automatically included in the final vote calculation
-
It was still possible to exclude them by modifying the "Use for final" option in the Gradebook
-
Other object types required explicit configuration depending on their setup
When the Final Vote is Calculated
-
The final vote is calculated only when the Gradebook module is accessed
-
This means scores may not be immediately updated after completing an activity
Check the Gradebook Documentation for further details
Editing the final score
TBD
Best Practices
-
Assign weights carefully to reflect the importance of each activity
-
Explicitly configure "Use for final" for all relevant objects
-
Inform learners that incomplete activities will lower their final score
-
Use the final score scale (e.g. 100 or 200) consistently across courses
Learning Objects
Management of Learning Objects, and detailed description of configuration and usage of each LO type
Learning Materials Management
The Learning Objects management page is made by three tabs:
- Course Objects: list of actual LO of the course, available for students. They can be directly created from this area or imported either from MyObjects or Shared Objects areas.
- Shared Objects: a repository of LO shared among all the courses and users with permission to access this tab
- My Objects: personal materials' repository for the logged user. A private area for teachers in which they can store their own objects, create new objects or import objects from other teachers. It is an inter-course area in the sense that the objects placed there can be viewed from any of the courses managed by the teacher.
In all the tabs, LO Objects can be organized into folders/subfolders.
Course Objects
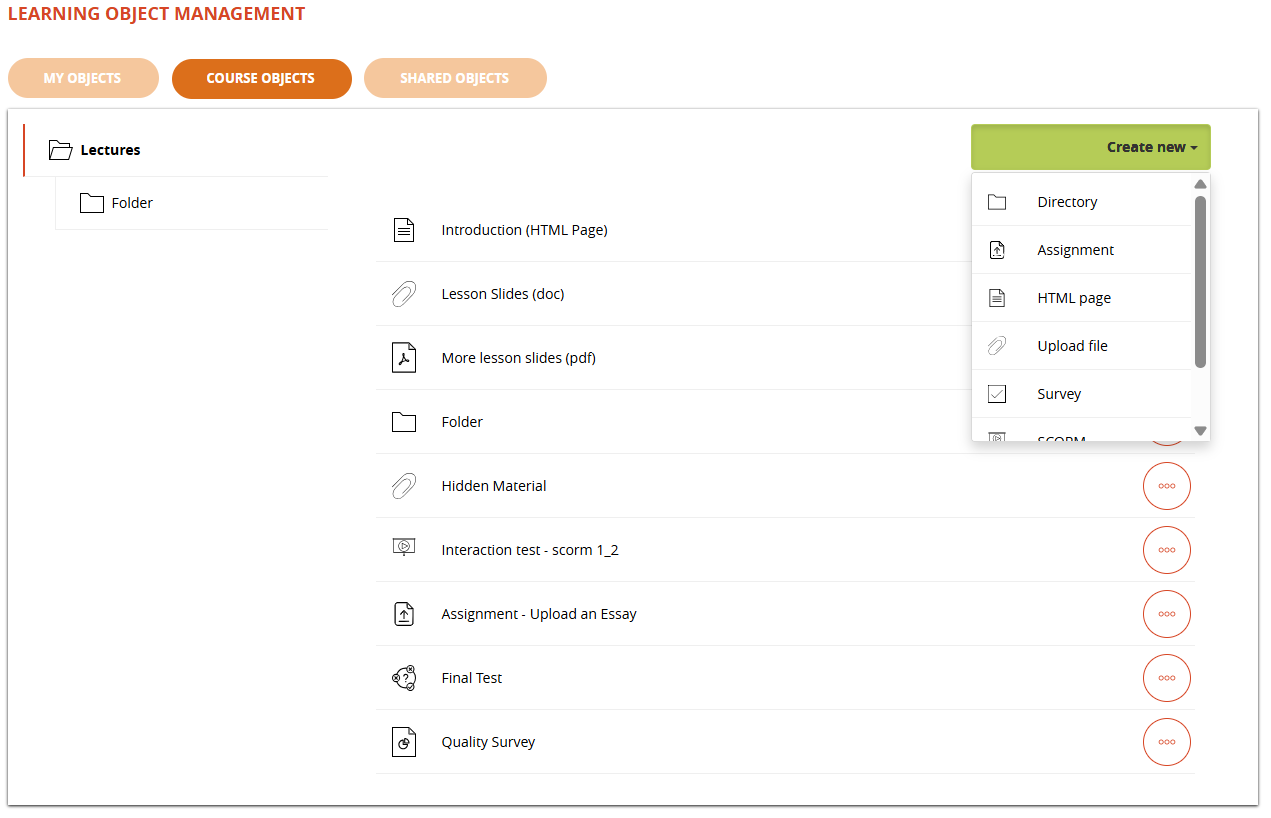
LO types
- SCORM
- TEST
- Upload file
- HTML page
- Survey
- Assignment (since Forma 4.2)
The following LOs are available until Forma 4 and REMOVED SINCE FORMA 4.1 and it won't be possible to create new ones. Previously created LOs will keep working but may be removed in feature releases.
- FAQ
- Glossary
- Links
LO actions and features
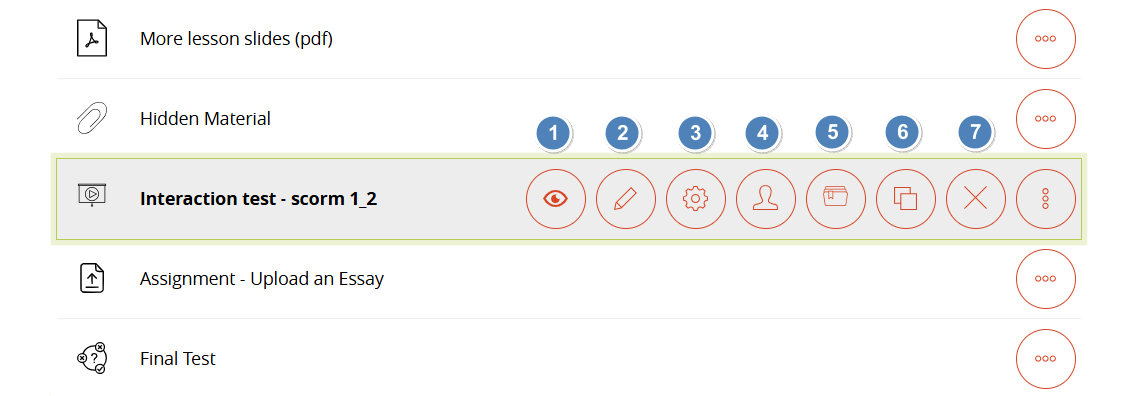
- View: open and launch the learning object. Actions will be tracked as for normal fruition
- Edit: access the edit page for this of learning object. Each type of learning object has a different edit mode.
- Properties: edit object properties for:
- Prerequisites
- LO Properties
- Assign: assign this LO only to specific users
- Categorize: Add description, category, and tags for the knowledge base
- Copy: duplicate the object
- Delete: Delete the object
Properties: Prerequisites
Click on the “Properties” icon to open the Properties > Prerequisites tab.
Here you can select the LO in the course that need to be completed for the object to be unlocked
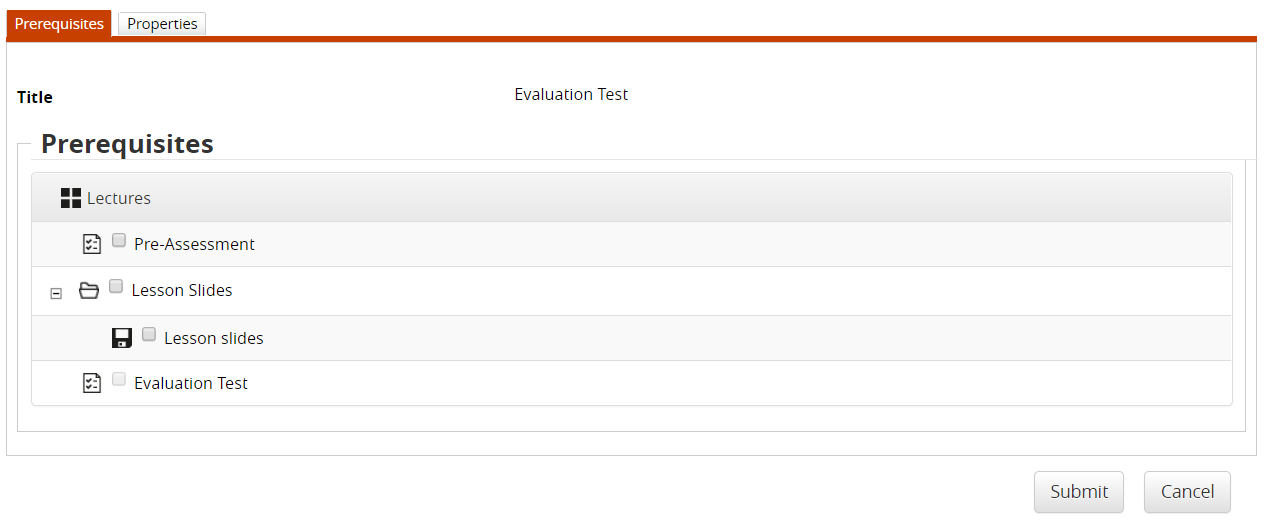
Properties: Properties
Here you can set the general configuration settings for this object. Different LO types might have different option sets.
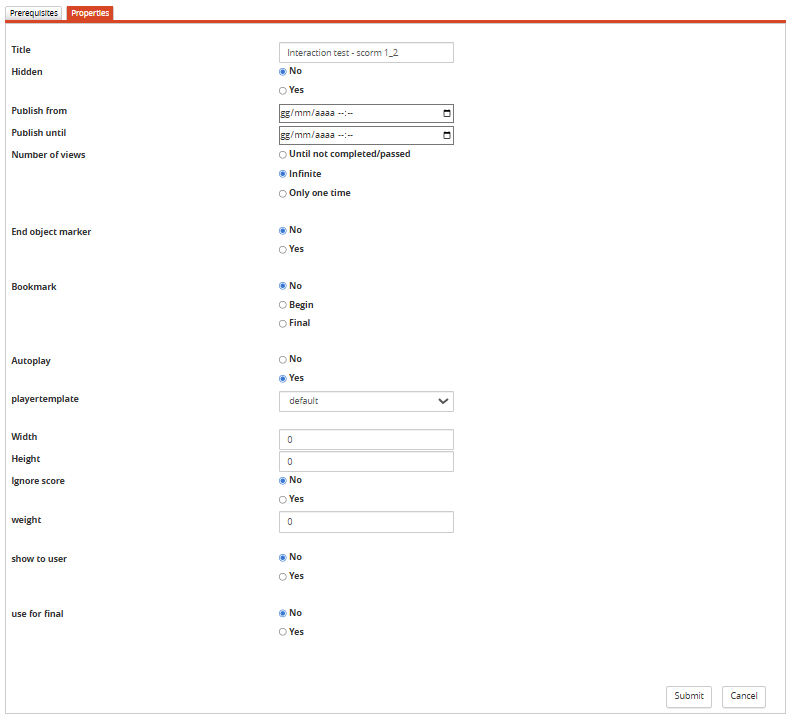
General options, available for all types of objects:
- Title: display LO name. Editable only for SCORM objects, for other types use their edit page
- Hidden: decide whether this object must be visible or not for students (default: yes)
- Publish from/until: the object will be visible only between the selected dates. Leave empty for unlimited
- Number of Views: define how the object must be accessible based on its completion status
- End Object Marker: if set to yes, completing this object will set the user status on the whole course to “complete”.
Score Options
The following options are available only for LO types involving scoring logics:
- Bookmark: this object's score will be reported as separate start score or final score for the course
- Ignore score: only managed for SCORM objects. Essentially, if a SCORM package has a minimum score defined in its manifest but the instructor wants to set a new threshold, this flag bypasses the value declared in the manifest."
- Weight: weight of this LO's score in final vote calculation
- Show to user: the score obtained for this LO will be listed in the user's Report Card
- Use for Final: this score is considered or not in the final score calculation
The options weight, show to user and use for final have been migrated in this position since Forma 4.2. In prior versions they were set from the gradebook module
Assign to selected users
Here you can assign the LO only to selected users or groups. Other users won't see the object.
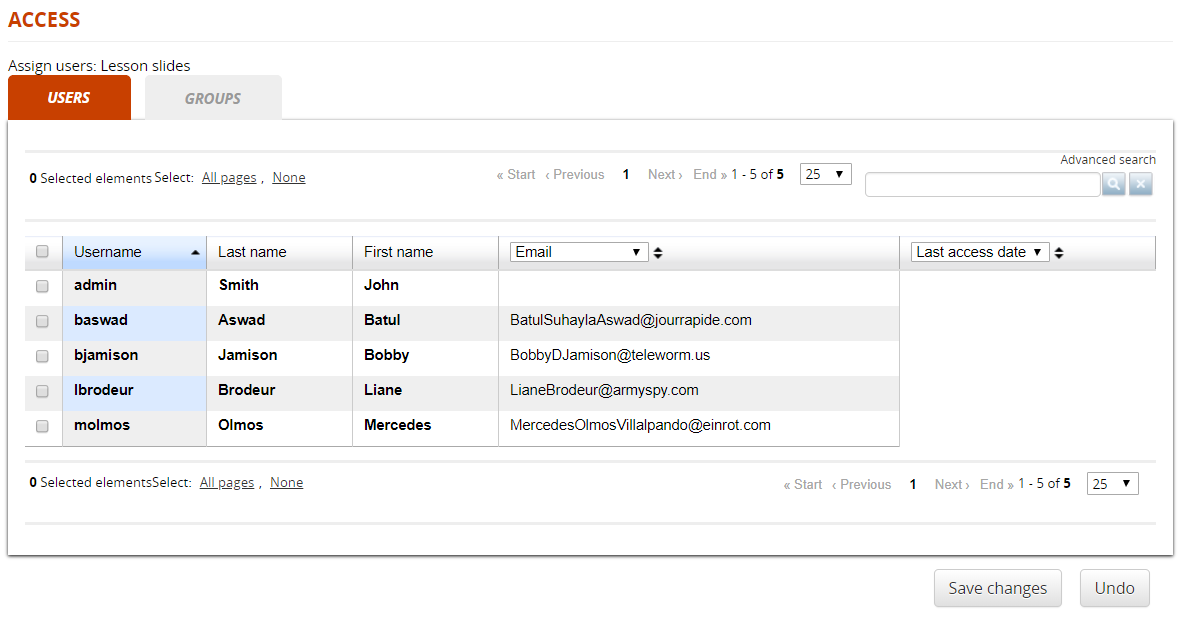
Categorize
Use this form to categorize the object within the Forma Content Library
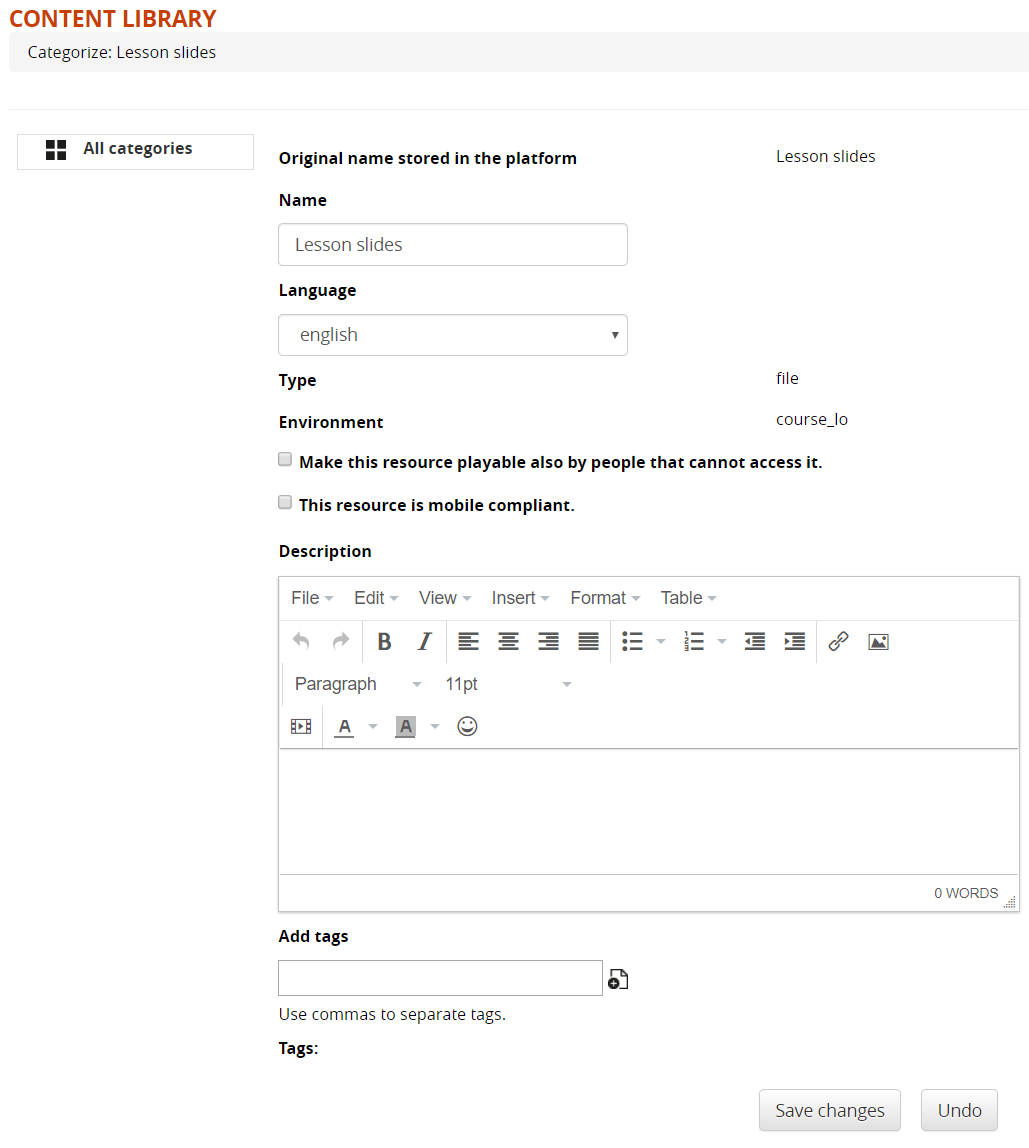
Shared Objects
This is the area where teachers can share teaching objects with other teachers, can import them to their own homepages or directly to the courses section.
Note:
- Importing entails making a new copy of the imported object, which will therefore be treated as a completely new object
- Teachers can create, copy and move any shared LO, but can delete only their own. Only administrators can delete LO by other users.
My Objects
Materials in this area can be viewed and managed only by the logged user, and are shared among all the courses where he has teacher permissions.
File Upload
Select and upload from your computer any file to be used as a course material.
Downloadable files will be marked as “completed” once the users clicks on the download link.
You can set the “title” as the name to be shown for this object
Description can be entered but won't be shown with the existing platform features.
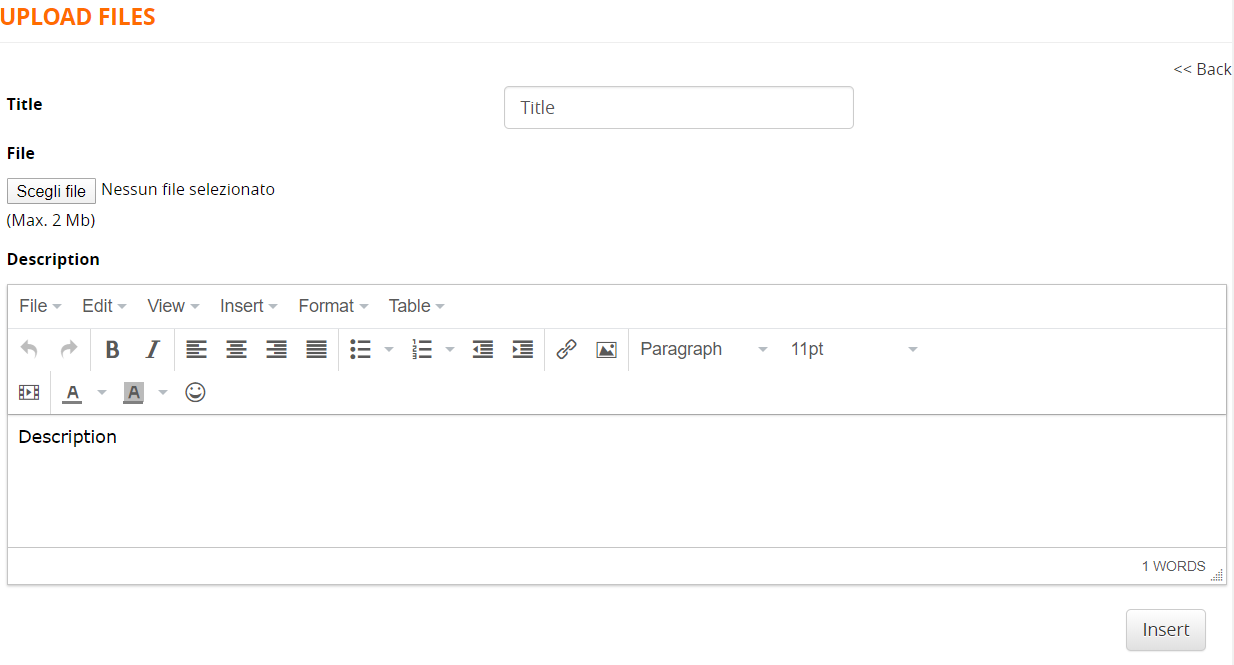
HTML Pages
Use the “HTML Page” learning object type to create a custom content page.
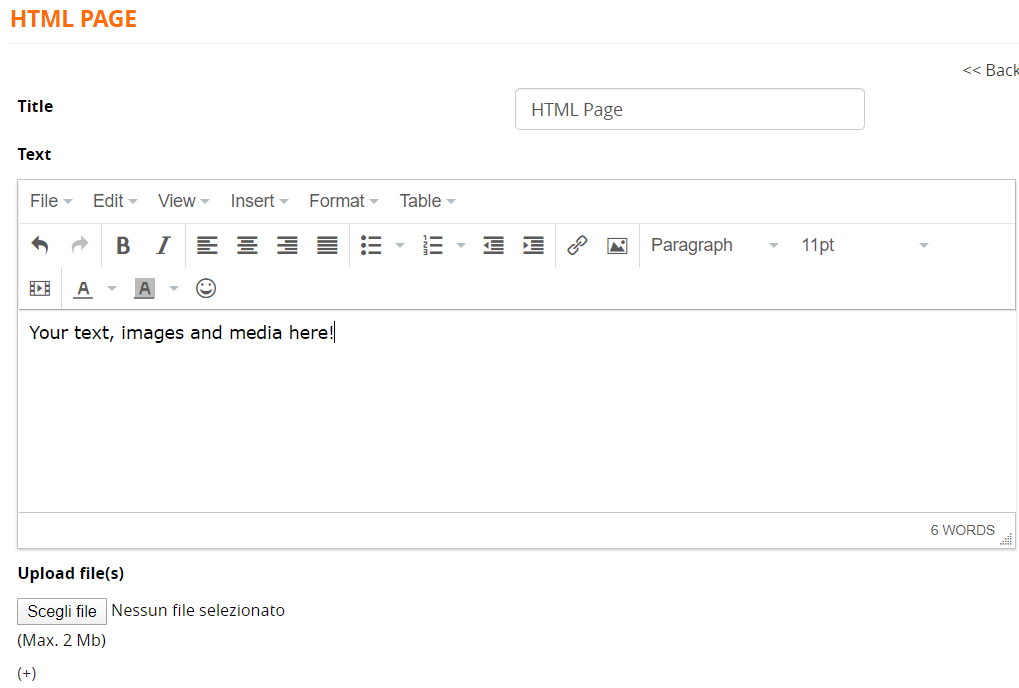
Explore the editor feature to:
- write Formatted Text
- Images
- embed media (i. YouTube or Vimeo videos)
You can also attach multiple files for download
SCORM
Upload SCORM Objects
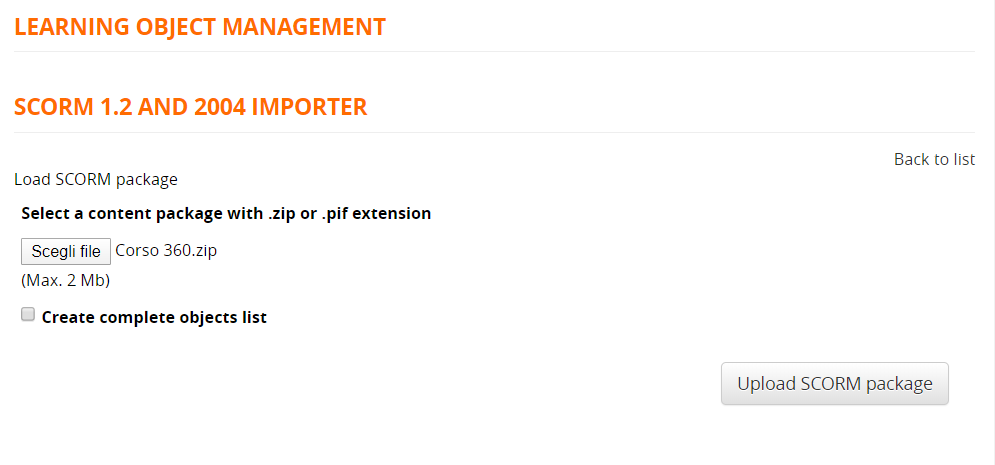
SCORM LO Properties
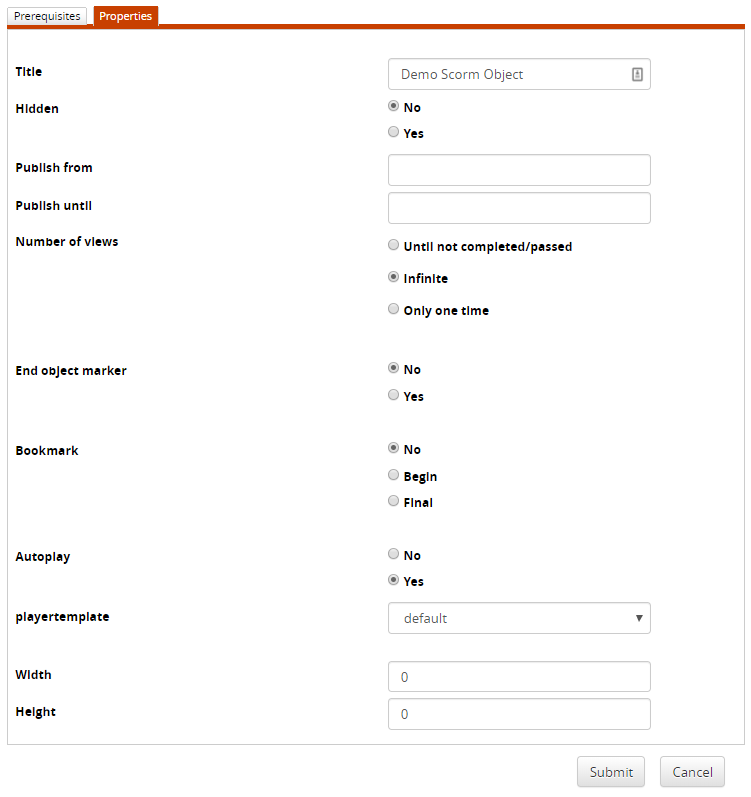
Test
Test Questions
Manage Questions
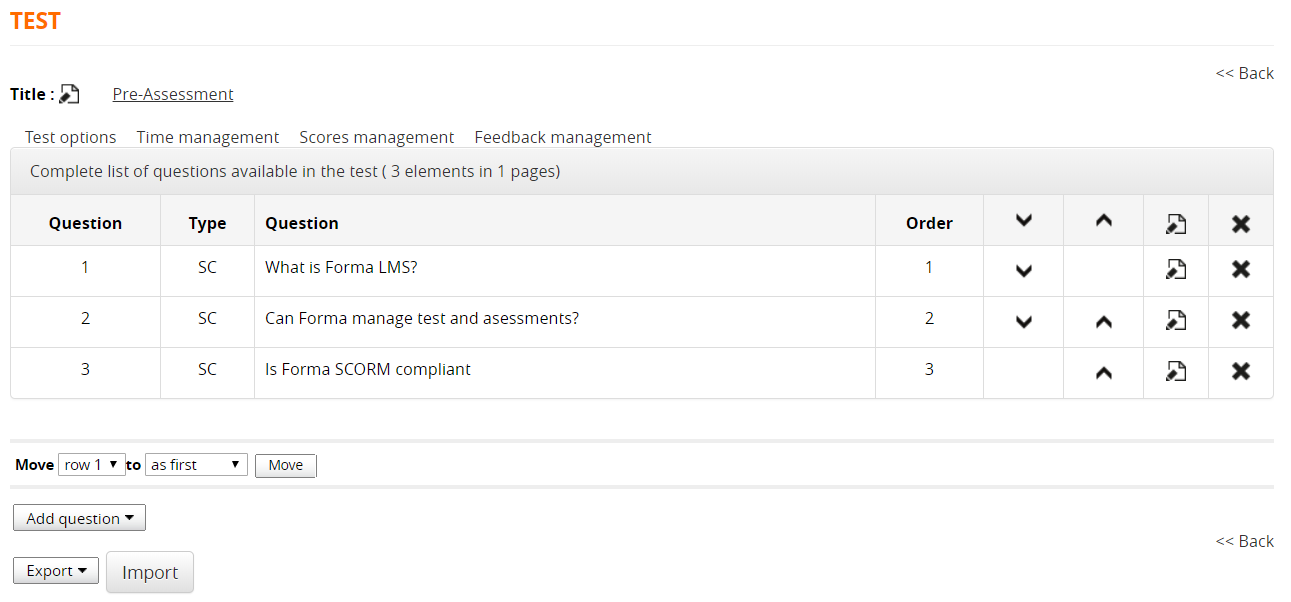
Insert/Edit Questions

Question Category: Select a category for this question. It will be possible to calculate category scores for each test compiling. Categories are globally defined for the whole platform in backend question category configuration
Difficulty: set a difficulty level that can be uses to automatically weigh scores calculation.
Question Types
This is the list of the available question types and test elements:
SC — Single Choice
MC — Multiple Choice
ET — Extended Text
TE — Text Entry
IC — Inline Choice
HT — Hot Text (Find the wrong term)
UP — Upload File
AS — Association
TE — Title
BR — Page Break
Test Options
Test display options

Attempts settings
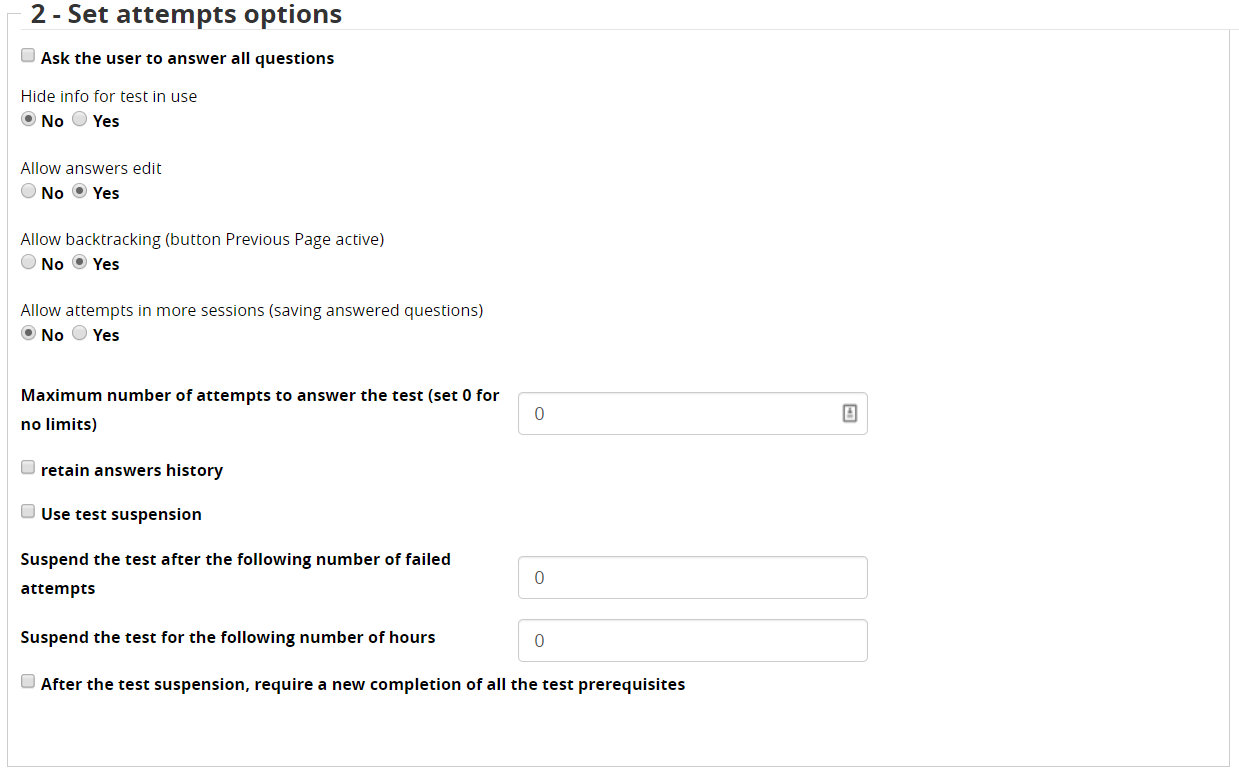
Test Suspension: to avoid conflicts when using test suspension the option "number of views" in the LO properties should be set to infinite
Results page settings
The following options determine which information will be shown to the user after submitting the test:
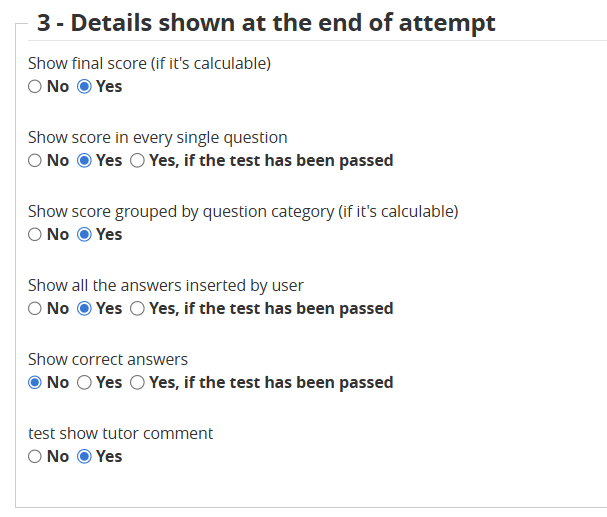
Time Management
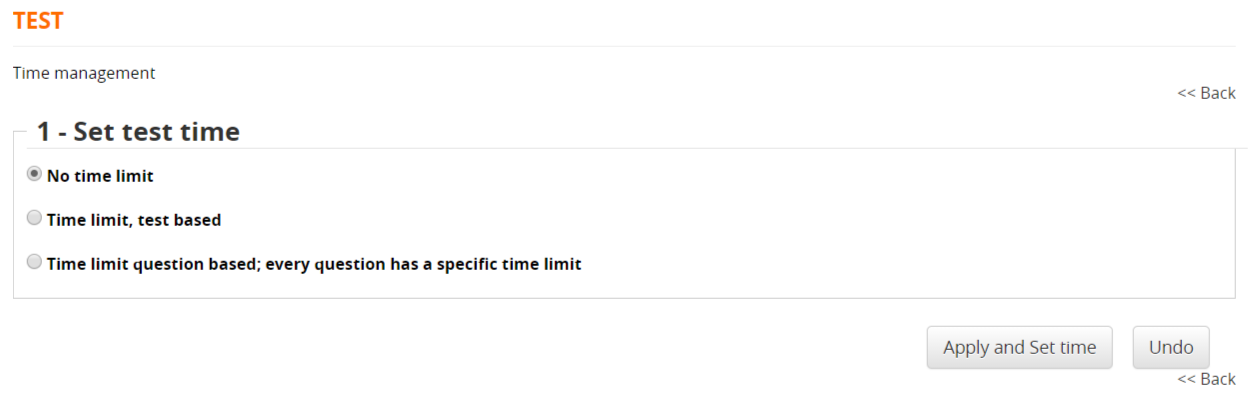
Score Management
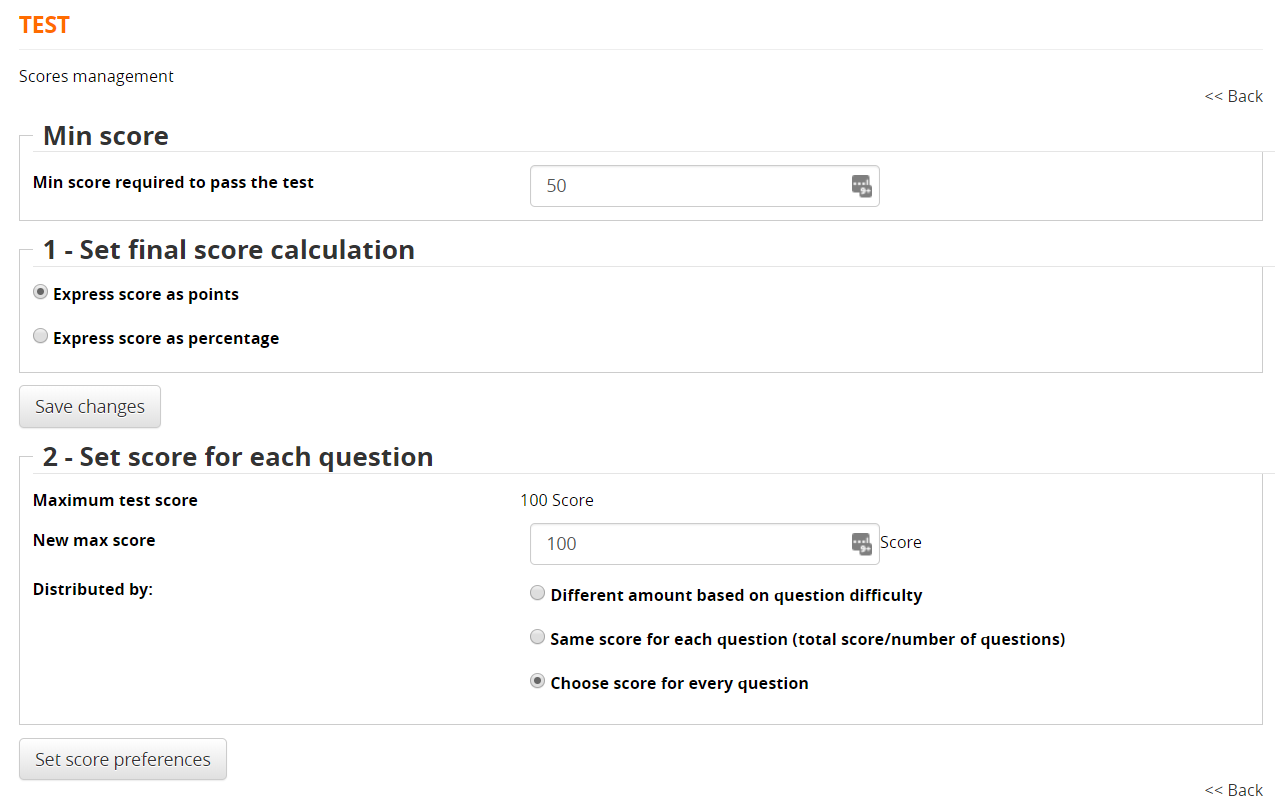
- A required score for the test to be considered as “passed”
- Grading by marks or percentage
- Set score per individual question
- Resetting the maximum score
- Dividing the maximum score by question, evaluated according to the difficulty level assigned to the question, score assigned to individual questions
Feedback Management
- Possibility of assigning textual feedback according to the score attained
- Possibility of assigning the achievement of a competency
- Subscription to a specific course depending on the result.
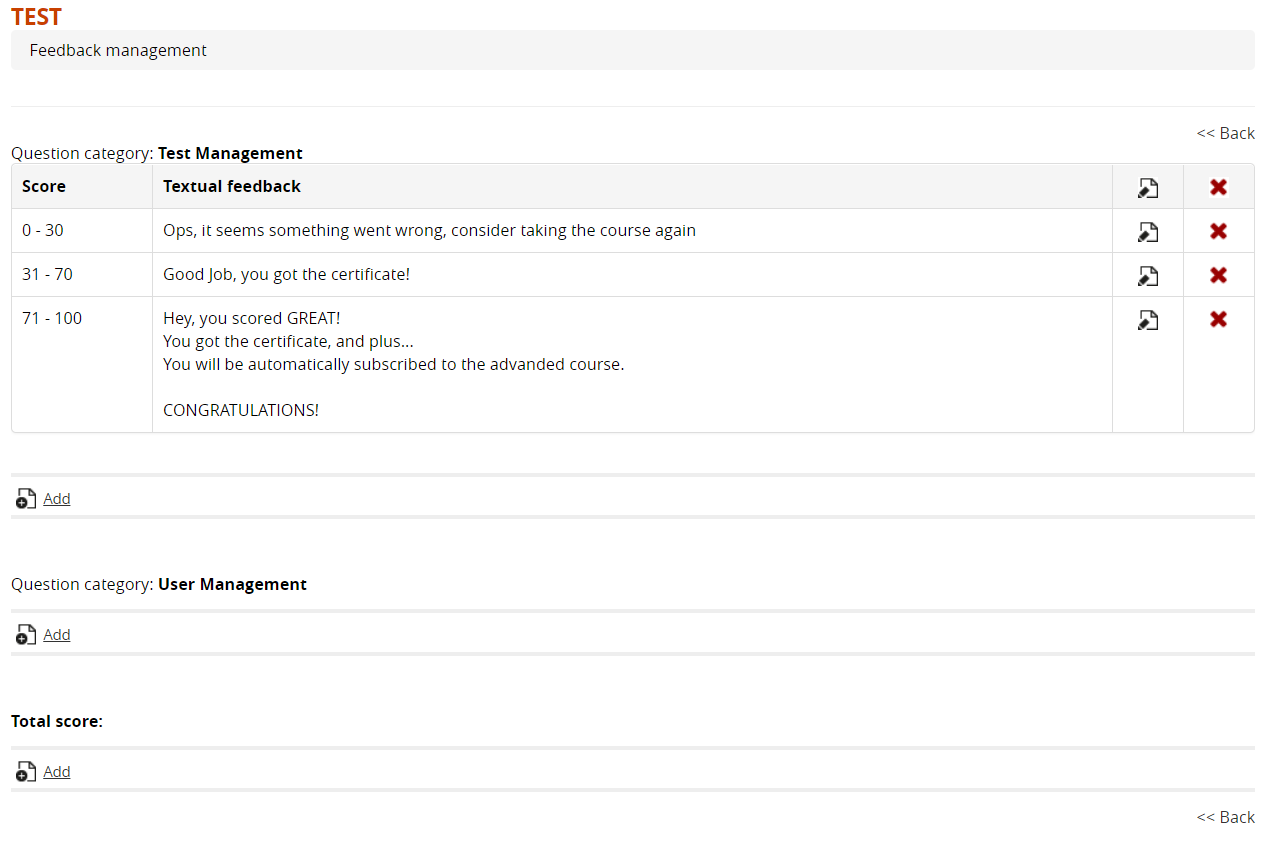
Insert Feedback
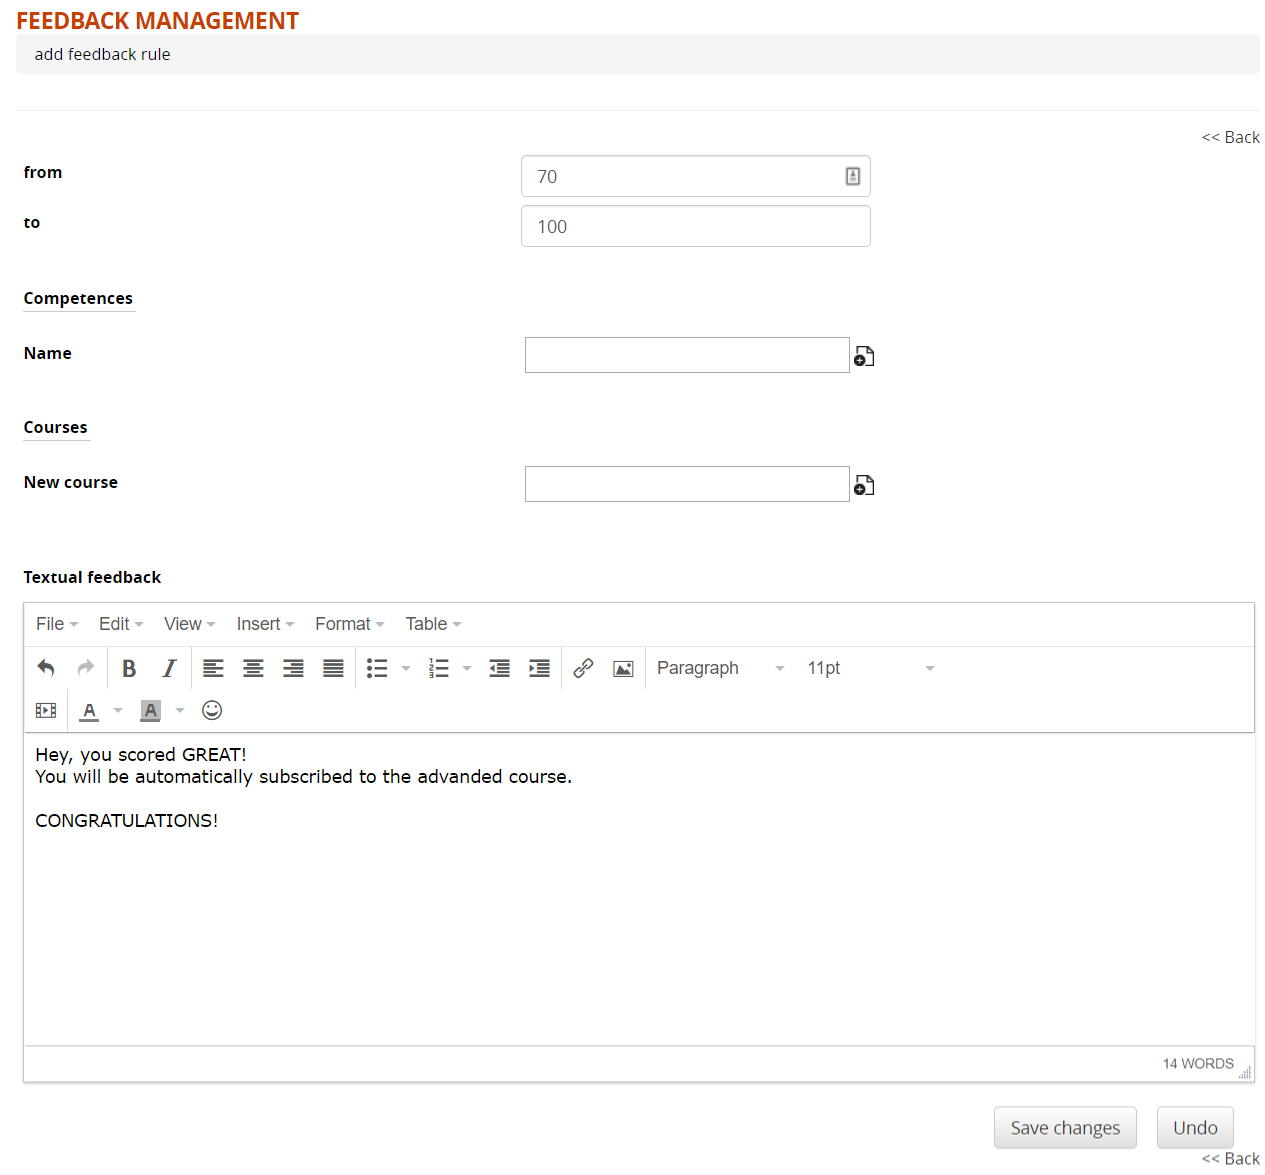
Assignment
Overview
The “Assignment” LO has been introduced in Forma 4.2, and allows administrators or instructors to assign customized tasks to learners, who can respond with an essay, a file, or text directly within the platform.
Replacing the old Gradebook "Activity" elements
If you are upgrading from Forma 4.1.x, previously created gradebook "activity" elements will be automatically migrated and converted into "Assignment" learning objects, placed at the end of the list of training materials within the same course.
All the activity configurations (Title, max/required score, weight, show to user, use for final) will be moved to the new learning object, and all the user scores and teacher comments will be migrated and visible through the new "Course Reports" module introduced with Forma 4.2
Creating an Assignment
Assignments are created as any other material from the "Learning Object Management" module in the Teacher Area of a course
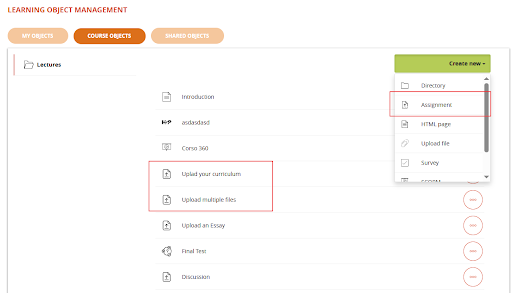
Assignment Options
When creating or editing an Assignment the following options will be prompted
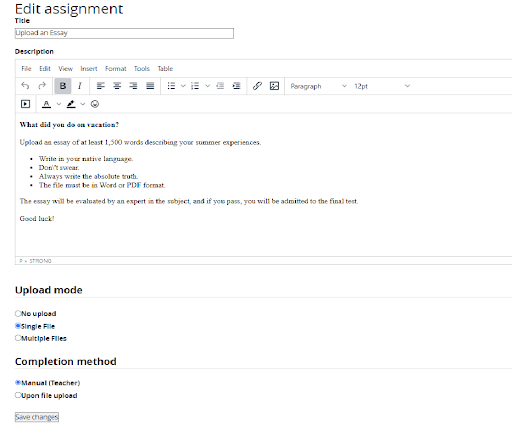
Upload Mode
Define if this activity needs some upload by the user:
- No upload: the activity will be held offline, i.e. during a classroom lesson
- Single File: the student will be asked to upload a single file
- Multiple files: the student will be asked to upload one or more files
Completion method
Define how the assignment will be marked as "completed":
- Manual: the object status will be set to "complete" wen teacher manually enters a score
- Upon file upload: the object status will be set to "complete" automatically when any file has been uploaded by the student
Assignment Score Properties
Score propertis for an assignment can be set from the LO properties page:
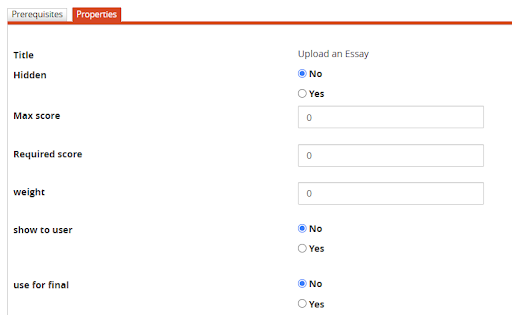
User view and upload
When a user accesses an Assignement material, the following elements will be displayed:
- Title and description, as set by the teacher during the LO creation
- File upload area, if the assigment is configured fore single or multiple file upload. If the assignment upload method is set as "No Upload", this block won't be shown
- List of uploaded files, If the assignment is configured for "single upload", when a new file is uploaded it will override the previous one. It won't be possible to upload new files once the LO has been reviewd by a teacher
- Teacher review
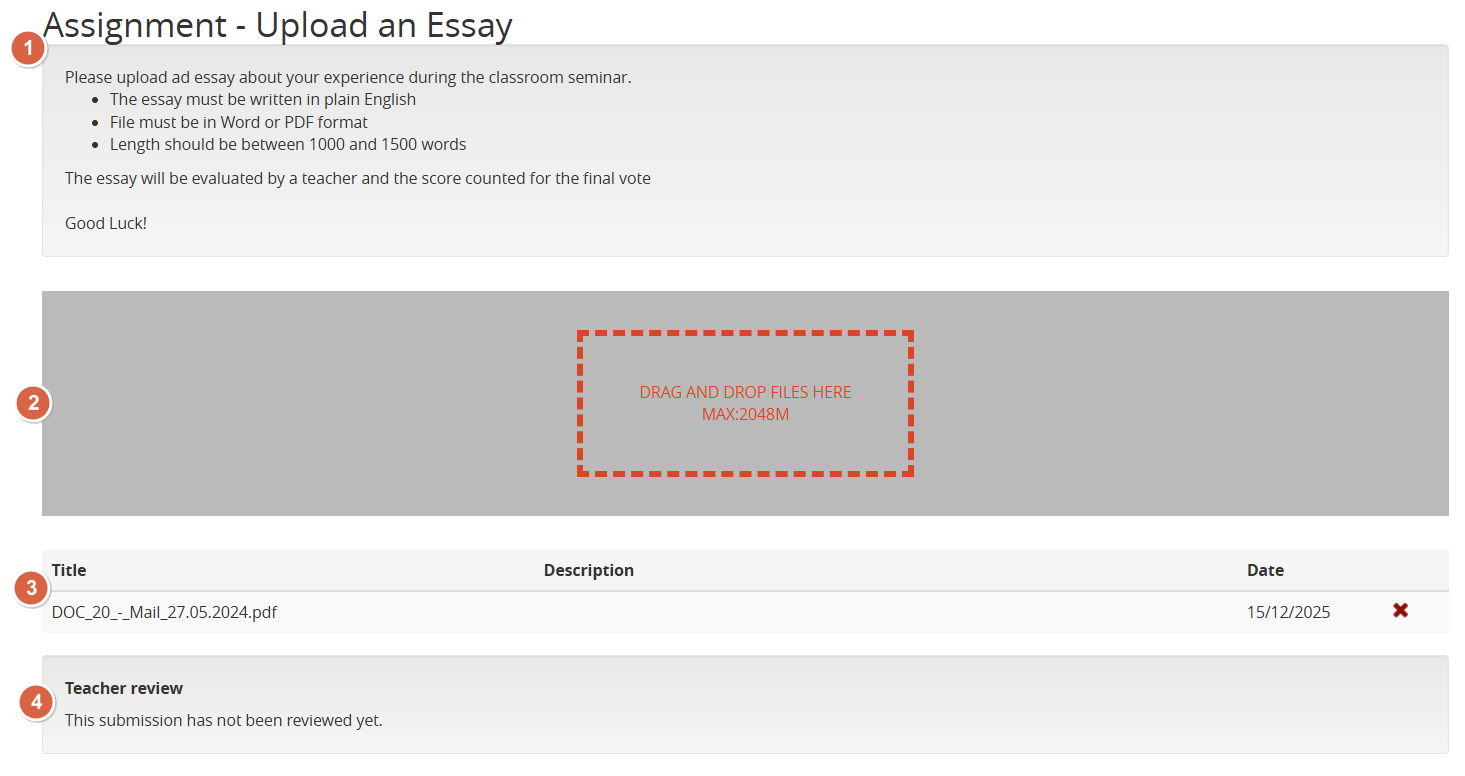
Evaluating an Assignment
Assignments will be listed in the Course Report module:
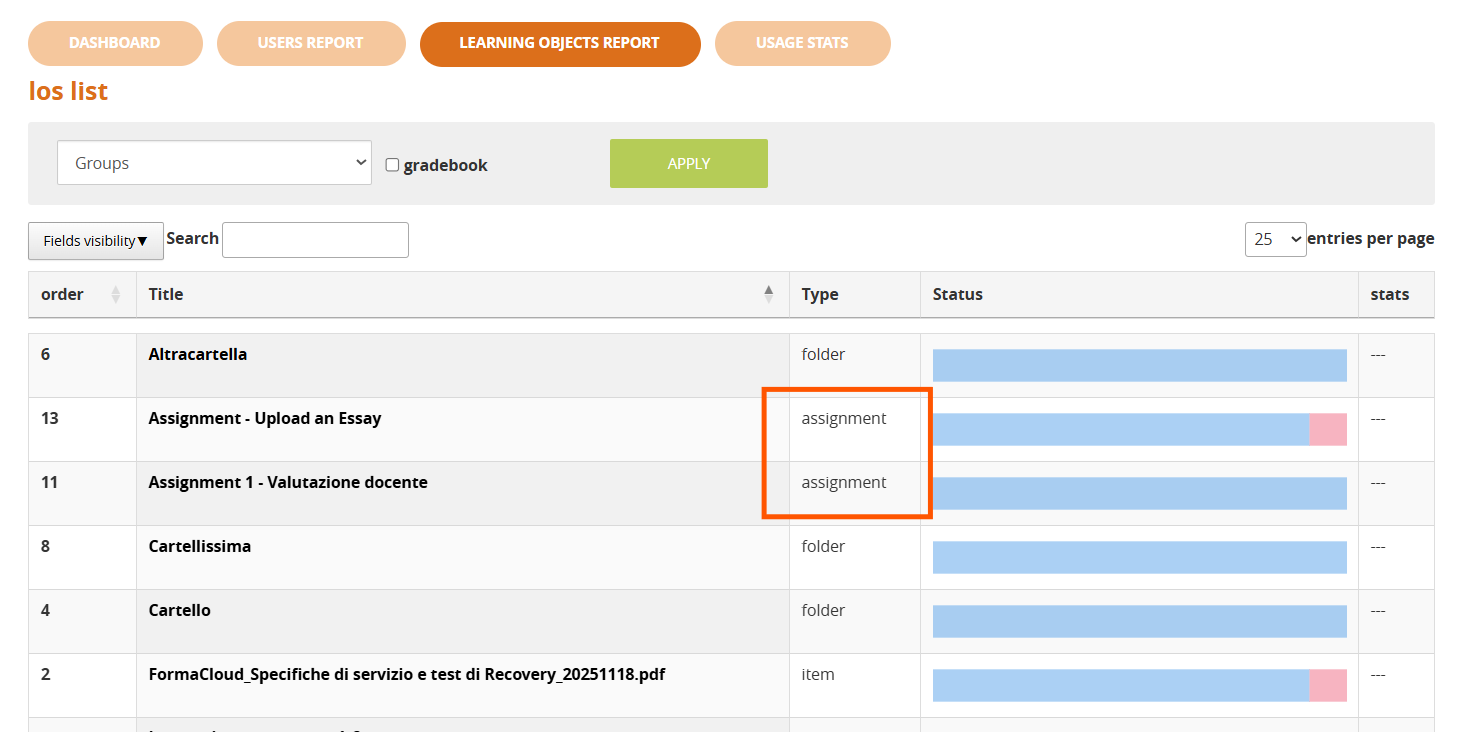
Clicking on the LO Title teachers will then be able to see the list of students and:
- Check the files uploaded by a user
- Assign a score
- Add a comment
File Name Handling for SCORM Packages
Feature available from: FormaLMS 4.1.39 (March 2026) Subsequent improvement: FormaLMS 4.1.40
Why was it introduced
In the past, when uploading SCORM packages or attachments whose names contained special characters — accented letters, apostrophes, spaces, parentheses, symbols, or non-Latin characters — the platform could encounter errors in various operations:
- inability to copy a SCORM learning object between different repositories;
- errors during package extraction or playback;
- broken download links;
- inconsistencies between what was recorded in the platform and what was actually stored.
To resolve these issues and ensure consistency across the entire platform, an automatic file name normalization system was introduced.
What the platform does
When a user uploads a file (SCORM package, forum attachment, quiz response file, course material), the platform automatically applies a series of transformations to the file name before saving it:
-
Accents are converted to their base letter Example:
lezione sull'età adulta.zipbecomeslezione_sulleta_adulta.zip. -
Spaces are replaced with underscores Example:
Modulo base.zipbecomesModulo_base.zip. -
Special characters and punctuation are removed Apostrophes, parentheses, dots, and various symbols are removed, keeping only letters, numbers, underscores, and hyphens.
-
Non-Latin characters are stripped out Ideograms, non-Western alphabets, and emojis are removed. If the file name consists entirely of such characters, the platform automatically assigns a safe fallback name, ensuring the upload never fails.
-
The file extension is preserved Users will continue to see the correct extension (
.zip,.pdf,.docx, …) to open the file with the appropriate application.
What this means for the user
- Uploads are never blocked due to file name issues.
- The original name visible to the user in the platform (learning object title, attachment label) does not change: normalization only affects the technical file name used behind the scenes.
- SCORM packages with complex names can now be copied, moved, and reused across organizational and home repositories without errors.
Where normalization is applied
Normalization is automatically applied in all areas where users can upload files:
- SCORM packages uploaded in courses;
- Forum attachments (both course forums and public forums);
- Quiz response files uploaded by learners;
- Course and lesson materials.
What happens to existing packages before the update
Platforms that already had SCORM packages, attachments, or materials with names containing special characters were handled through an automatic alignment procedure executed during the update to version 4.1.39.
During this process, the platform:
- identifies all files and folders with names containing special characters;
- renames each item automatically using the same normalization rules;
- updates internal references to maintain consistency between platform records and stored files.
The procedure is designed to be safe:
- before any changes, the full list of original file names is saved in the update log, ensuring traceability;
- if a file is missing, it is skipped without consequences;
- if a file with the new name already exists, it is never overwritten;
- internal references are updated only after confirming that renaming was successful.
Improvement introduced in version 4.1.40
In some scenarios — particularly when the same SCORM package had been copied multiple times across courses or repositories — the 4.1.39 alignment process could leave some references out of sync with the already renamed file.
Version 4.1.40 introduces a corrective step that automatically detects and fixes these remaining cases, ensuring full alignment between the file system and the platform.
Benefits for the end user
- Always reliable file uploads, regardless of the original file name.
- Error-free copying and reuse of SCORM packages across courses and repositories.
- Stable download and playback across all devices and operating systems.
- Automatically cleaned historical archive after the update, with no manual intervention required.
- Unchanged user experience: visible titles and descriptions remain the same.
Version summary
| FormaLMS Version | What it introduces |
|---|---|
| 4.1.39 | Automatic normalization for new uploads and alignment procedure for existing archives |
| 4.1.40 | Fix for residual misalignment cases in SCORM packages copied multiple times |
| 4.1.41 and 4.1.42 | No changes: feature stabilized |
Contents and Communication
Features to manage content and communication such as external web pages, communications, and mailings
Private Messages
The “Messages” feature allow users to send each other private message through the LMS, that will be notified by email.
Enable the messages feature
The feature can be enabled and disabled, even just for some groups of users, from the “User Area LMS” configuration page
Admin > Settings > Elearning Configuration > User Area LMS
Check the User Area guide for details
Messages will be then accessible as a button from the user panel
Send and receive messages
The system directly displays a list of the messages received by the user, it will be possible to send messages to one or multiple users.
Please note that:
- GodAdmin will be able to select any registered user
- Administrators will be able to select their assigned users
- Users will see only other users registered to their same courses
To send a new message, click “Send”, select the recipients from the list and compose the message.
Community Forums
Forma provides a global “Community Forums” feature, independent of course subscriptions, and featuring:
- Unlimited forums
- Forum moderation
- Notifications for new messages and threads
- Private threads
Separate forums with same features can be created also within each course, reserved to course users. Check the Course Forums guide for details
Activate Community Forums
You can activate / deactivate the community forums from the “User Area LMS” settings page:
Admin > Settings > Elearning Configuration > User Area LMS
You will be able to assign visibility over the whole community feature to:
- all the platform users
- only selected users / nodes
The link will be visible in the frontend main menu
Forums
Create a Forum
Forums can be created by platform administrators
For each forum, you can set:
- Title: the forum name
- Description: a description for this discussion board
- Emoticon Image: an icon to identify the forum
- Private threads: define whether all the discussions in this board should be private by default.
Note
private discussion threads will be only visible to the user that opened the thread and forum moderators
TIP
use the “private threads” feature to create a private support board for your users
Manage Forums

Here you can:
- Change the forums order
- Select users that will be able to see this forum
- Download the discussion board in Excel format
Discussion threads
For each forum, you can have unlimited discussion threads and messages
Add a new thread
Manage Threads
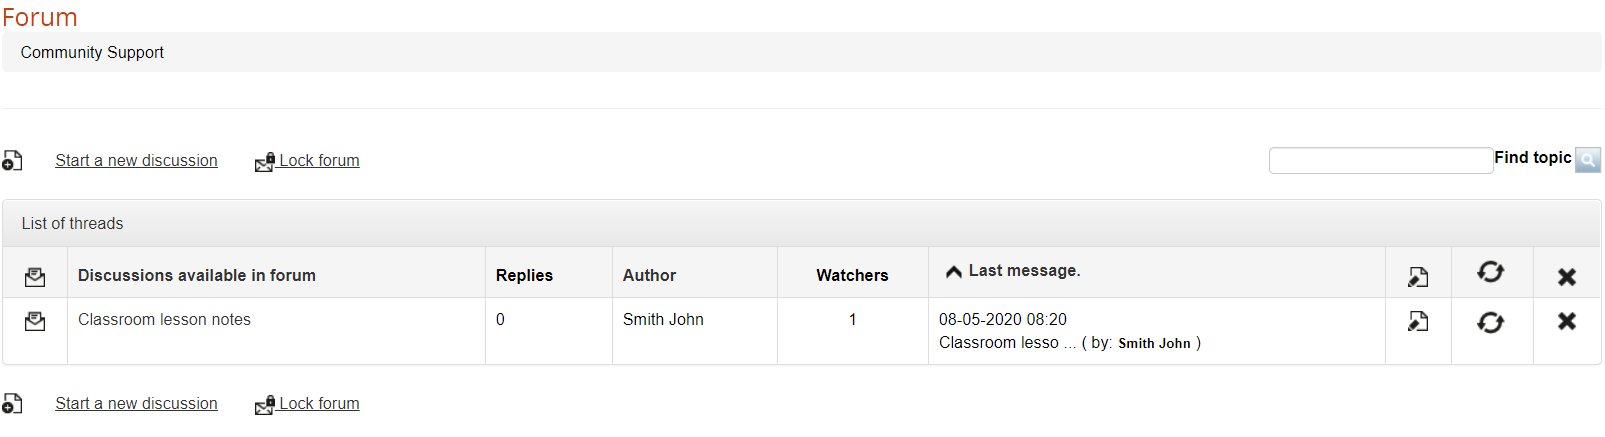
Manage Messages
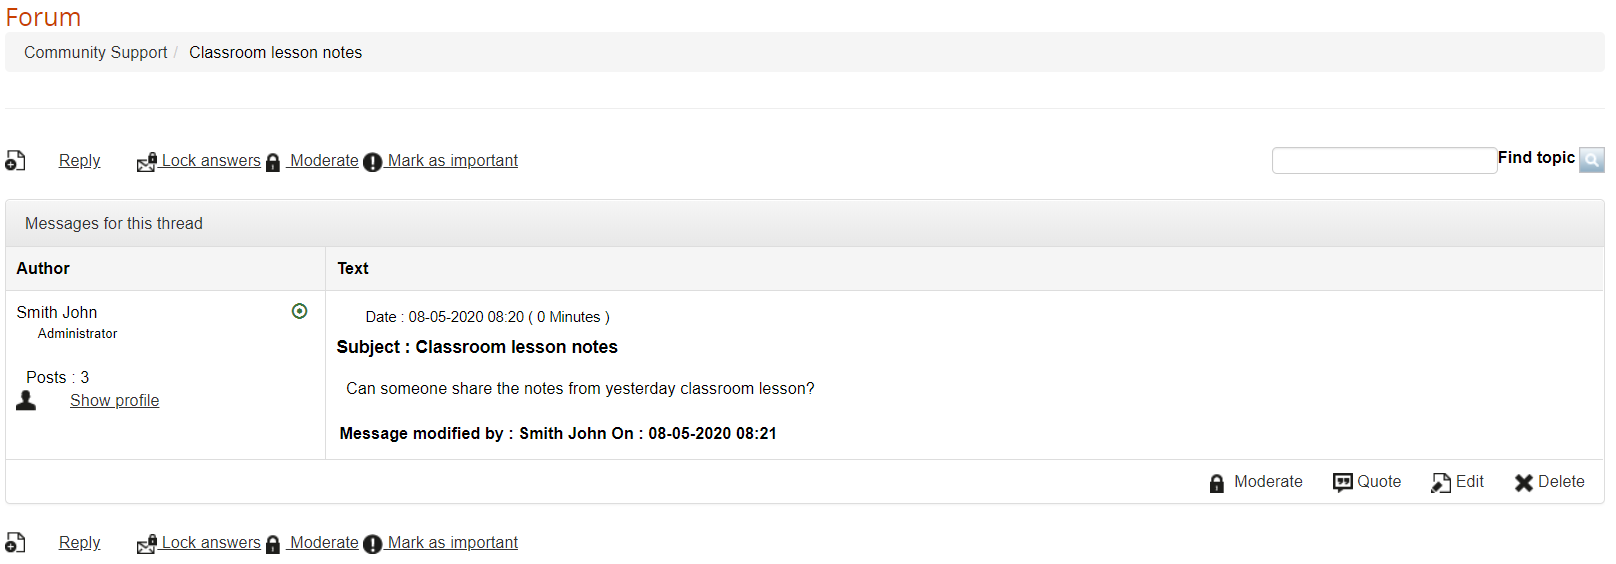
Web Pages
Web Pages
In Forma you can manage HTML pages to be displayed either on the login page or in a dedicated tab inside the “mycourses” area.
Web pages can be added and managed from:
Admin > Contents > Web Pages
Click on the “ADD” button to create a web page and set:
Title: this is the title of the webpage, and will be used also as link text in the login menu for external pages
Language: the page will be visible to users viewing the site in the selected language. If a different language is selected, the link to this page won't be displayed.
Publish: Choose whether this page should be visible or not
Default page: this page will be used as content for the MyCourses “Home” Tab, and will be hidden on the login menu
Description: content of the page
External Web Pages
All the published web pages, unless set as default, will be automatically shown as a menu on the login page:
Home Tab
The page selected as “default” will be used as a content for the “Home” Tab in MyCourses area, provided that Tab is active:

You can activate the home tab from the User Area management under:
Admin > Settings > Elearning Configuration > User Area LMS
The tab can be renamed from the standard language management area
Global Newsletter
The “Global Newsletter” feature will let you send massive emails to all or a selected group of users.
It is available under:
Admin > Contents > Newsletter
This feature is available only to platform superadministrators and administrators, and works in three basic steps:
- Compose your email
- Select the recipients
- Send the email
NOTE
if you need to send email only to a specific course users, check the Newsletter and Anouncement features in course management
Compose the email
Sender: this field will be used as “reply-to” field. To avoid anti-spam and server security systems, the platform will send the emails with the default email and smtp setting.
Attachment: One or more attachments may be included in the newsletter.
Email/SMS: The communication can be sent by both e-mail and SMS. For SMS, an SMS service provider must be configured through the plugin system.
Language: choose which users should receive the email based on their profile language
Once you click the “SEND” button, you will be prompted to choose which users to send the communication.
Select the recipients
The system will open the user selection page, letting you select either:
- Multiple single users
- Massive select all users from some org-chart nodes
- Massive select all users in a group
- Massive select all users by company role
Click “Save Changes” to proceed to the last step
Send the email
As a last step, the system will present the number of selected users, click “SEND” button to push your communication out.
To avoid server anti-spam filters, the system will automatically split the massive mailing in multiple blocks of recipients, with a pause in seconds between each block.
You can configure values for blocks and pauses in advanced configuration settings
Reports
Administration reports creation and management
Report Management
Overview
Forma LMS provides a powerful and flexible report generation system, with these features:
- Create unlimited custom report
- Report generation wizard
- Automatically filter reports for assigned users and course
- Scheduling

Public: when a report is flagged as “public” it will be visible to all administrators and superadministrators. Non public reports can be viewed only by superadministrators and by the administrator that created the report
View: view the report
Export in CSV or XLS format
Schedule the report to be automatically sent by email to selected users
Edit: modify configuration options for the report
NOTE: Users with level Administrator will be allowed to see and edit onlyy report flagged as “public”, or created by themselves. Within the reports, administrator will see users and courses based on their user assignements. See Administrators management guide for details
Create Reports
A four-steps wizard will guide you in report creation:
- Select the report category
- Select filter on the rows to display or data aggregation mode
- Select the report type: please note that it won't be possible to change the report type once saved
- Select column and criteria for the selected report type
Report Category
Forma natively provides three report “categories”, each based on a different logic for data displaying, and providing different report types.
Available categories are:
- Users-Courses: will display different data type for a list of users.
- Courses-Users: will display different data type for a list of courses.
- Aggregated: shows aggregated information for selected users and courses
User Selector
For each category, it is possible to select the users to be included in the report.
In most cases, the best option is including “all users” and simply filter by course:
Report Scheduling
Reports can be automatically generated and sent by email to some users
You can create an unlimited number of schedules:
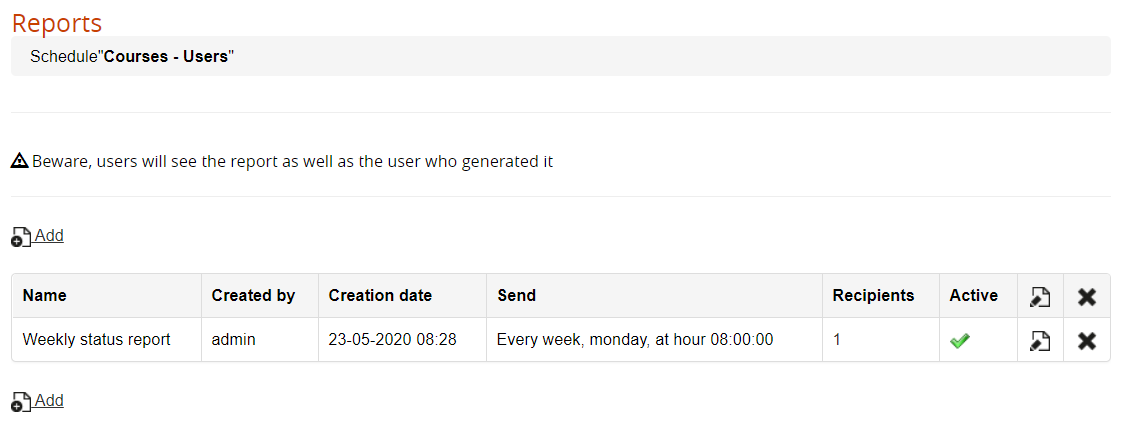
Upon schedule creation and edit, it will be possible to choose the users that will receive the report and set the date/frequency and time with the following settings:
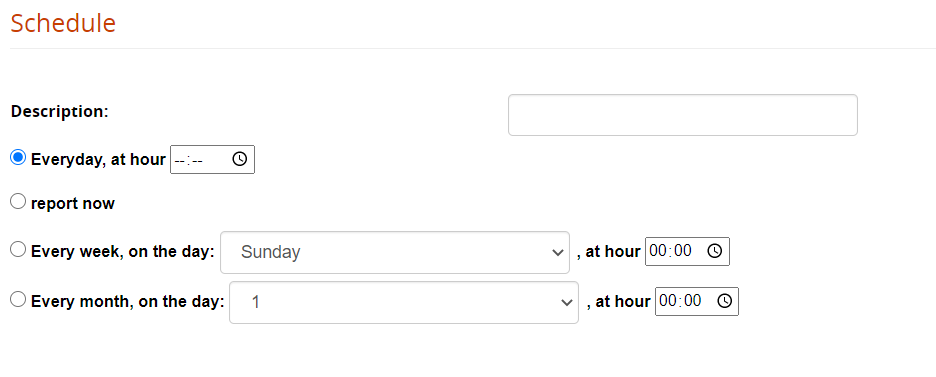
Advanced Settings (Report Attachment)
Further settings to configure how the scheduled report might be attached to the sent email can be configured under:
Adm > Settings >System Configurations > Settings > Advanced
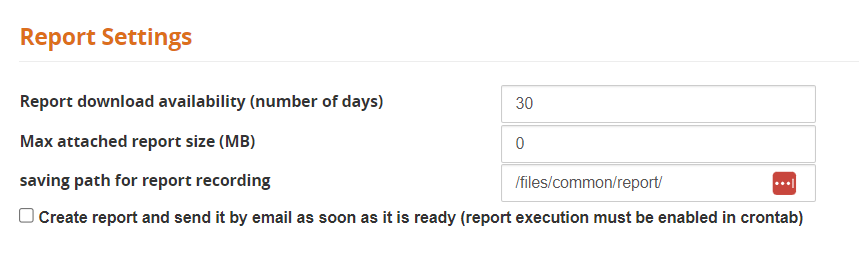
Set the "Max attached report size" according to your intranet or email account limits.
If value is set to zero, users will always receive a link to the stored file.
Cron setting
For the file to be sent, you will need to set up a cron-job on your server, calling the file:
[root]/cron/cron.report.php
User Reports
Reports in this category will show a list of users and their status on different items
Relates users to courses
This is the most commonly used report, that shows the status of each user on each course, based on the filters defined for users and courses.
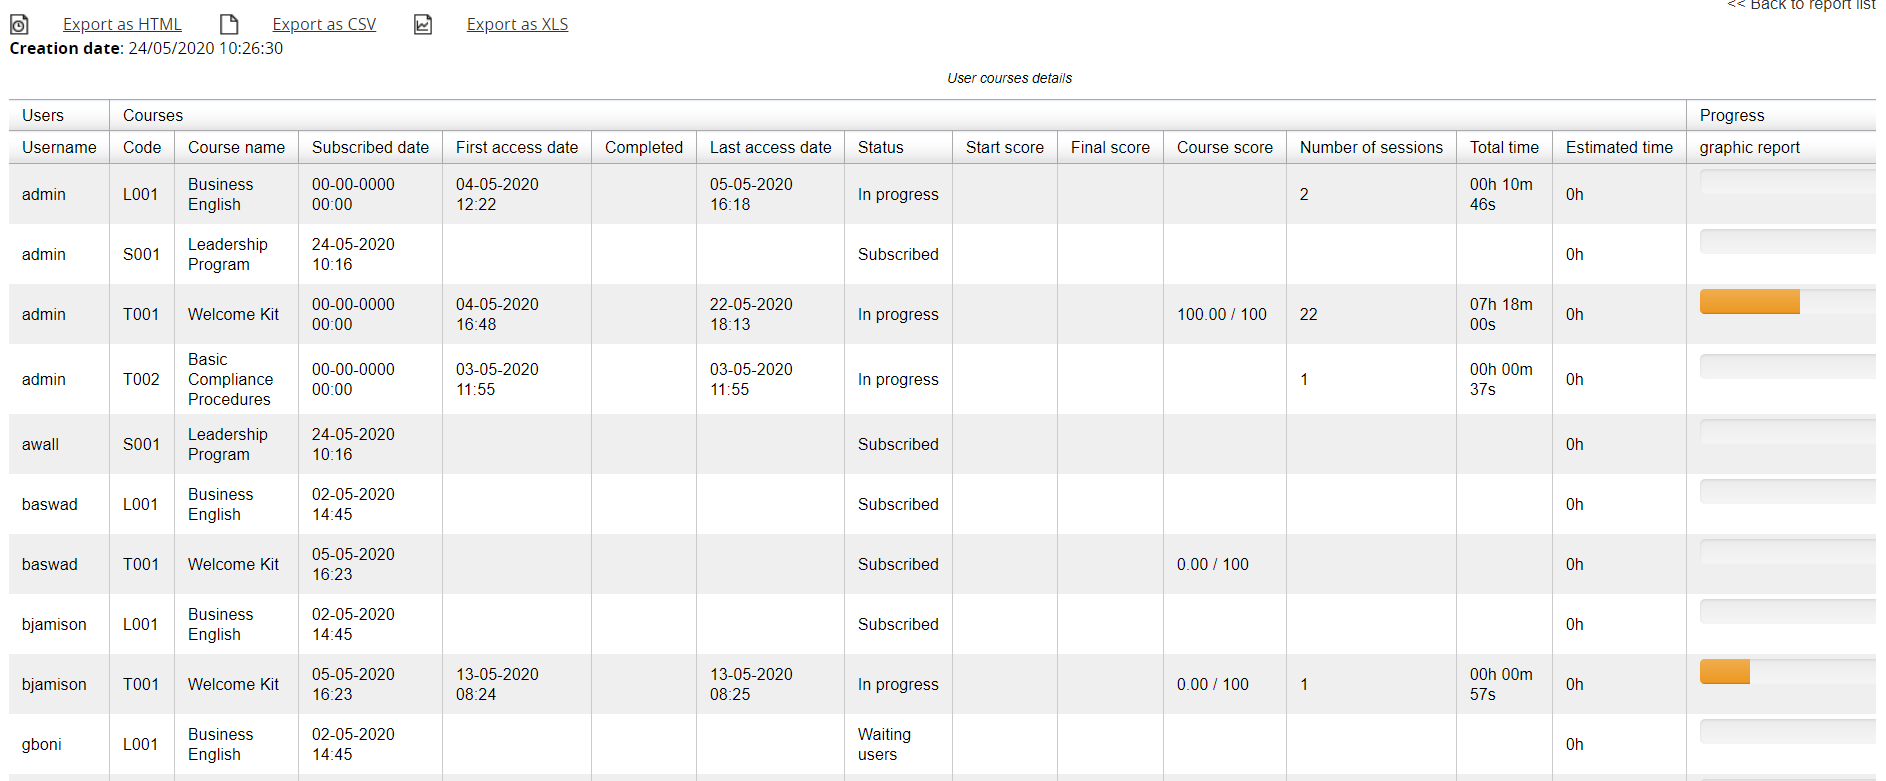
Example of report relating users to courses
Report Options
Select Courses: select to include all courses or only some courses
Conditions on selected courses: apply filters to display only users with specified conditions date or score conditions (i.e., filter only users subscribed after a certain date)
Show users custom fields: select which user personal information will be shown in the report
Custom Org: show data from the user org-chart custom fields
Display courses information: select which course information to show
Additional fields for courses: show data from the course custom fields
Classroom fields: show specific course information for classroom courses
Display user's information about courses: choose which information display about the user status on the course: status (i.e., completed, in progress), dates, scores, etc.
Progress: display user progress as percentage or progress bar
Other options: exclude suspended users, ordering options
Make delay analysis
This report will filter only users with specified completion status in a defined time range, to monitor user delays and send reminders.
Filter Options
It is possible to select users based on their status on the course:
- Users that haven't completed the course
- Users who haven't started the course
- All conditions must be satisfied
And based on the time condition of course and subscription:
- After (specify number) days from their subscription
- Course expiring in (specify number) days
- Course expiring on (specify date)
Relates users to Learning Objects
This report displays the status and progress of each user on the learning objects of one or more courses.
Report Options
Learning Objects types: choose which types of LO to include in the report
Select milestones: select to include or exclude milestones LO
Show users fields: show some information about the user
Display courses information: show some information about the user
Learning Objects Info: include information about the LO
Relates users to tests
Like the Learning Objects report, but filtered on test LO
Relates users to communications
Show if users have viewed communications
Relates users to corporate contests
Show user status on corporate contests
Course Reports
Relates courses to users

Example of Courses Report
Report Options
Time period: filter data from a selected period or time range
Other options:
- Group data per orgchart: will produce separate report tables for each orgchart node
- Show also suspended users
- Show only: Students — Filters count on users with level “student”
- Show: Assessments — related to the removed “assessment” feature — don't use
Display courses information: show information about the course
Additional fields for courses: show data from the course custom fields
Classroom fields: show specific course information for classroom courses
Display user's information about courses: shows further information about the course
Show statistics about courses: calculate course stats about user status and progress in each course
Relates courses with the teachers votes
Relates courses with users votes
Aggregated Report
This report will display aggregated data about users and courses
The following report types are available:
- Relates users to courses
- Course categories
- Years
- Relates users to communications
- Relates users to corporate contests
Layout & Templates
Managing Template & customizing forma layout
Templates
Forma templates are located in your forma installation under root/templates/[template]
Yon can create unlimited templates and assign them to different orgchart nodes and domains
Adding templates
To add a new template:
- duplicate the "standard" template
- rename your copy
Avoid editing the standard template, you may lose your changes during forma upgrades
Customizing Templates
- upload and overwrite images under \templates\[template]\images
- create a file named \templates\[template]\style\custom.css and add your custom styles
Template priority
When a user logs to the platform and multiple templates are assigned to nodes and domains, forma will load the template following this priority order:
-
Template assigned to the domain
-
Template assigned to the user node
-
Default template
In any other condition or unexpected configurations will be used the default template
Dashboard Configuration
The main settings for the dashboard configuration (from Forma 3.x onwards) are available under:
Admin > System configuration > Dashboard Configuration

You can create a new dashboard or:
- Clone/Duplicate
- Edit an existing layout
- Assign view permissions for each dashboard layout
- Delete an existing layout
Creating a new dashboard

- Dashboard name: Name of the dashboard. It's just for internal purposes, it's not visible to the users.
- Dashboard layout caption. This is the caption that appears when you hover on the dashboard button.
- Select a status: Draft/Published.
Duplicating a layout
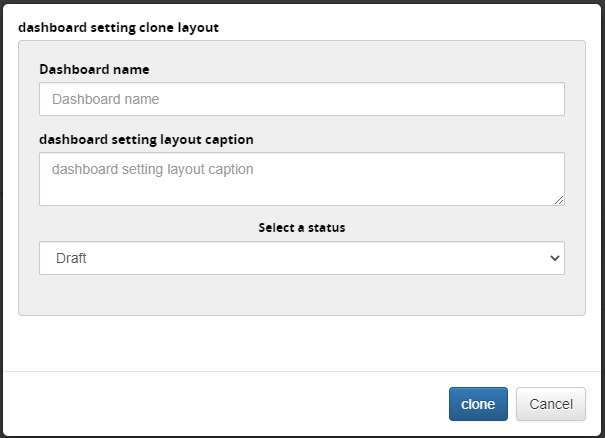
Duplicate an existing layout and set its Name, Description, and status
Editing a layout
Adding a new block
You can delete blocks using the 'X' button, or you can create new blocks:
The available blocks are:
- Ads/Announcements: this block displays a list of announcements from the courses the user is enrolled to.
- Image / video banner: this block adds an image banner, that can be linked to a video opening in a popup.
- Calendar: this block displays courses start/end dates and classroom days on a calendar layout
- Certificates: this block displays a list of the latest certificate available to users
- Courses: this block displays the next courses about to start or close or classroom days.
- Messages: this displays a list of private messages received by the user
- Welcome message: this block sets a custom welcome message on the dashboard page. If you don't set a custom message, the default one from the languages will be used.
Concerning the welcome message, we recommend using and/or customizing the default text in the language management, because it can include the user's first and last name, and it can be localized according to the user's preferred language.
Editing blocks
For each block, you can set:
- Type: Number of columns
- Title: a title that will be displayed to users
- Specific parameters for each block
Block width and position
The dashboard layout is based on a grid of 4 columns:
- Width: each block will occupy a variable width of 1 to 4 columns, for a maximum of 4 columns occupied on the same row
- Position: Every block can be dragged and dropped horizontally or vertically.
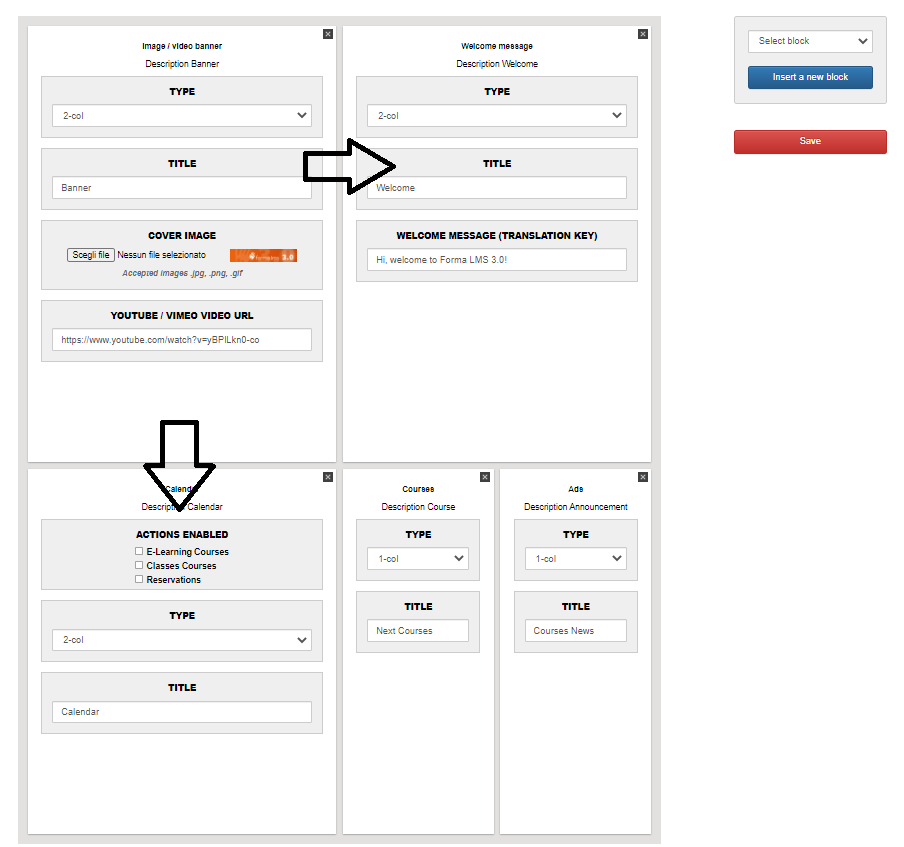
Viewing Permissions
Set the users, nodes or groups assigned to view each layout: with this feature you will be able to assign different dashboard layouts to different users.
Example
This is a good example
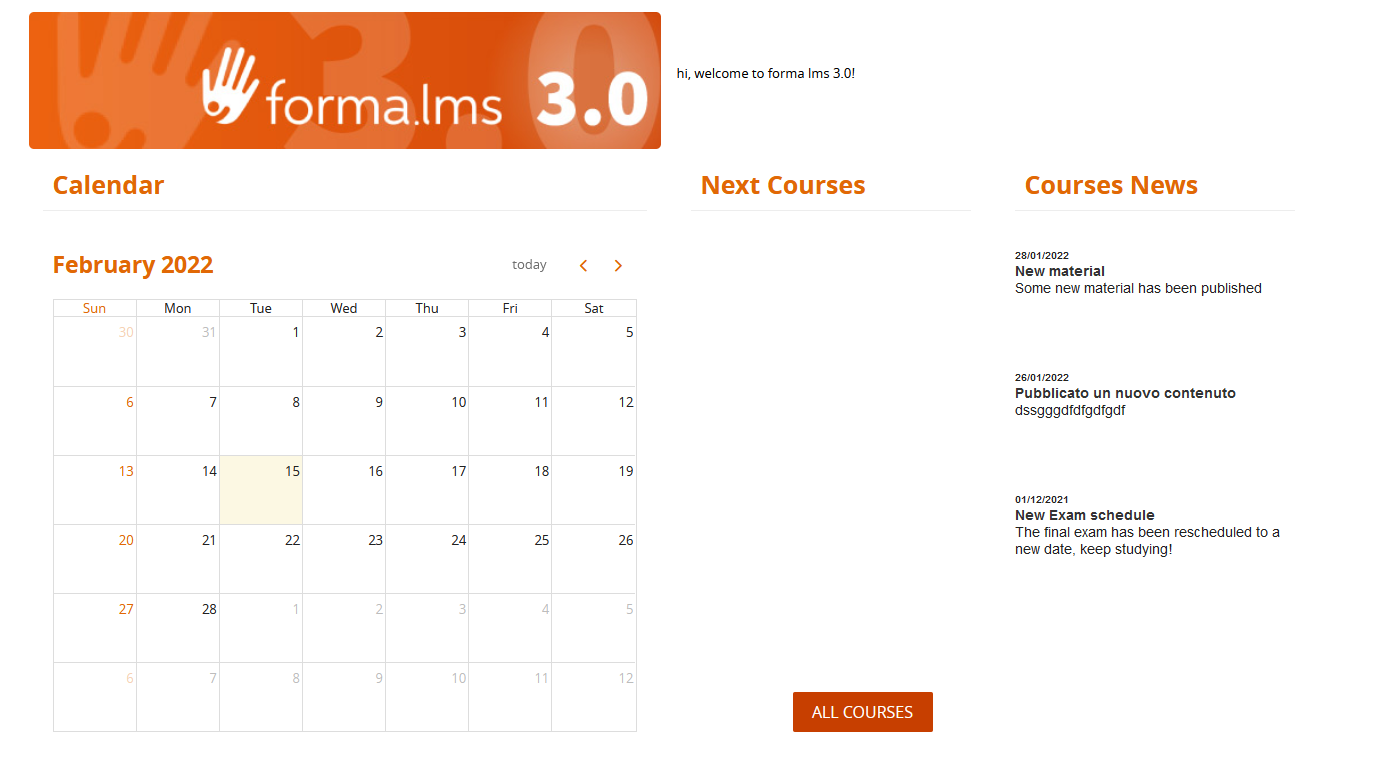
Let's see how it's configured in the backend.
On the first row, two blocks of 2 columns each. The Welcome message has been customized here, so this will override whatever message is in the language management.
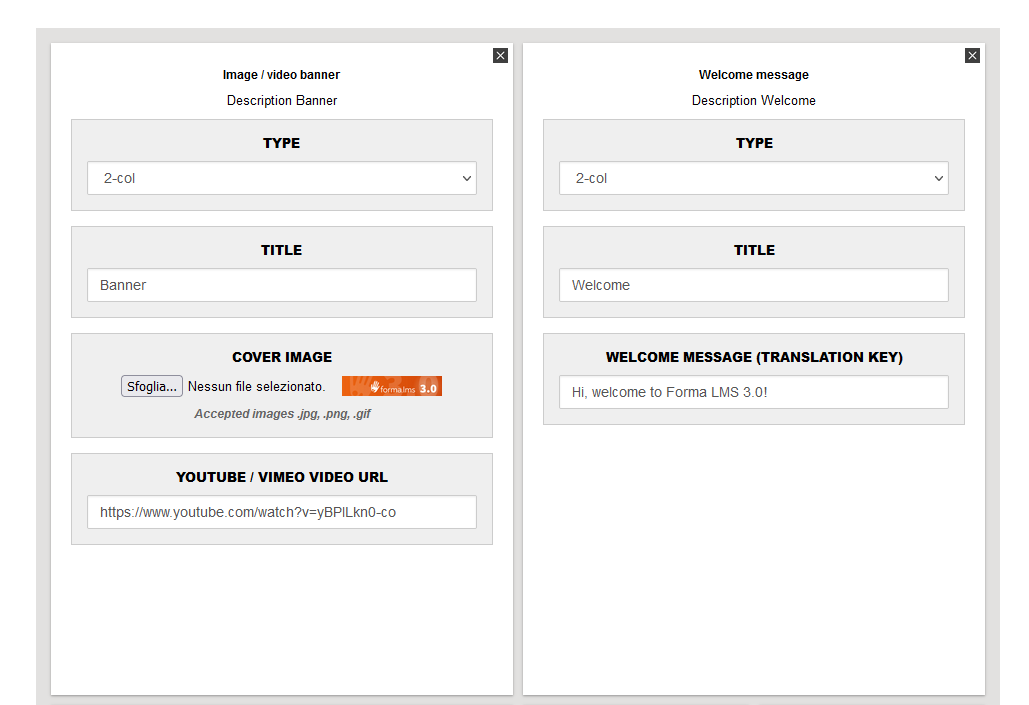
Let's see the second row: three blocks, the calendar has 2 columns and the other blocks have 1 each.
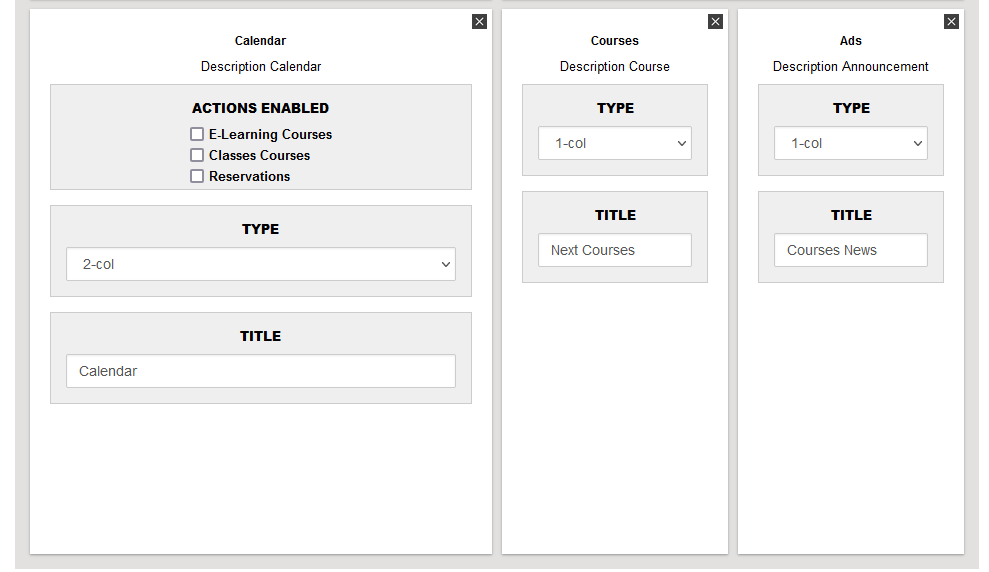
User Area LMS
From this area, you can activate and set visibility options for most of the frontend layout modules.
Admin > Settings > Elearning Configuration > User Area LMS
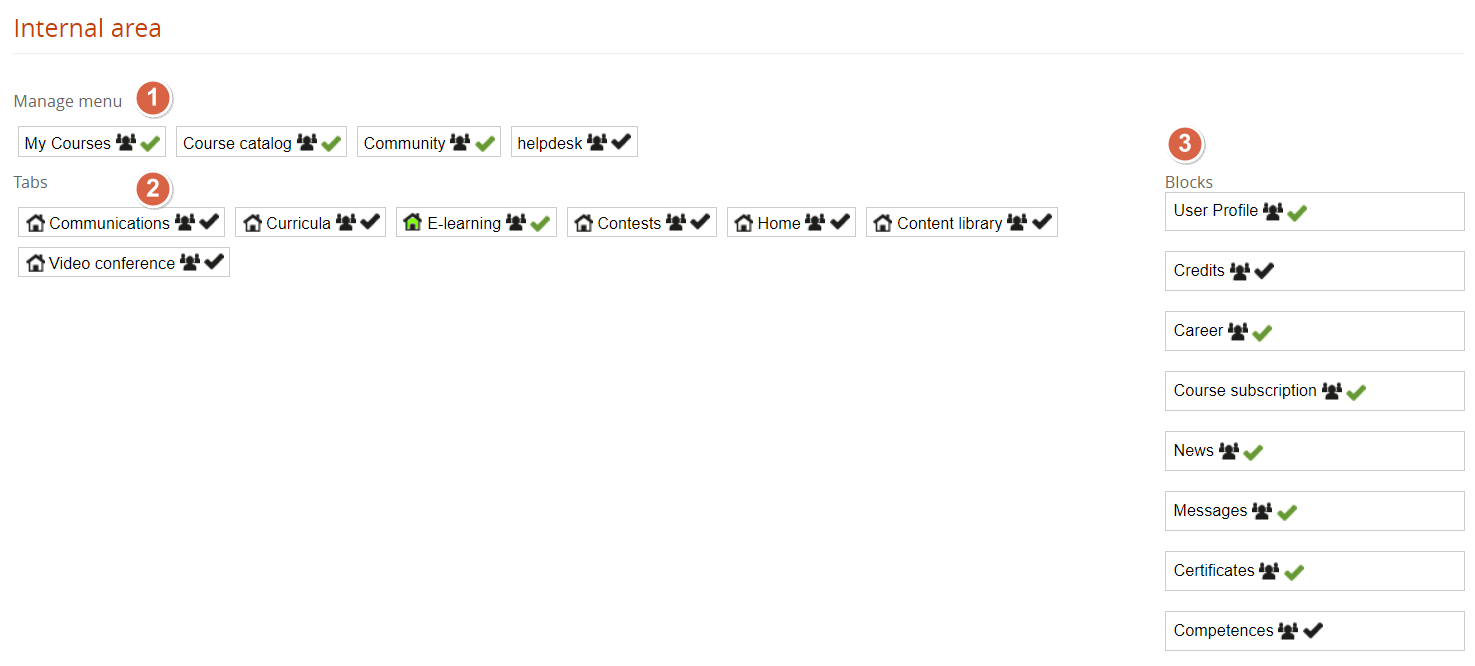
Main Menu Links
Activate / Deactivate the main menu items.
Click on the user icon to assign visibility on this item only to some users or groups.
MyCourses Tabs
Activate / Deactivate tabs for the MyCourses section
Click on the user icon to assign visibility for each tab only to some users or groups.
Click on the “Home” icon to define the default tab to be shown when opening “MyCourses”
User Panel Blocks
Activate / Deactivate blocks and buttons in the side user panel.
Click on the user icon to assign visibility on this item only to some users or groups.