User Management
Features for user creation and management: organization chart, groups, administrators, custom fields, roles, competences,...
Users and organization chart
Overview
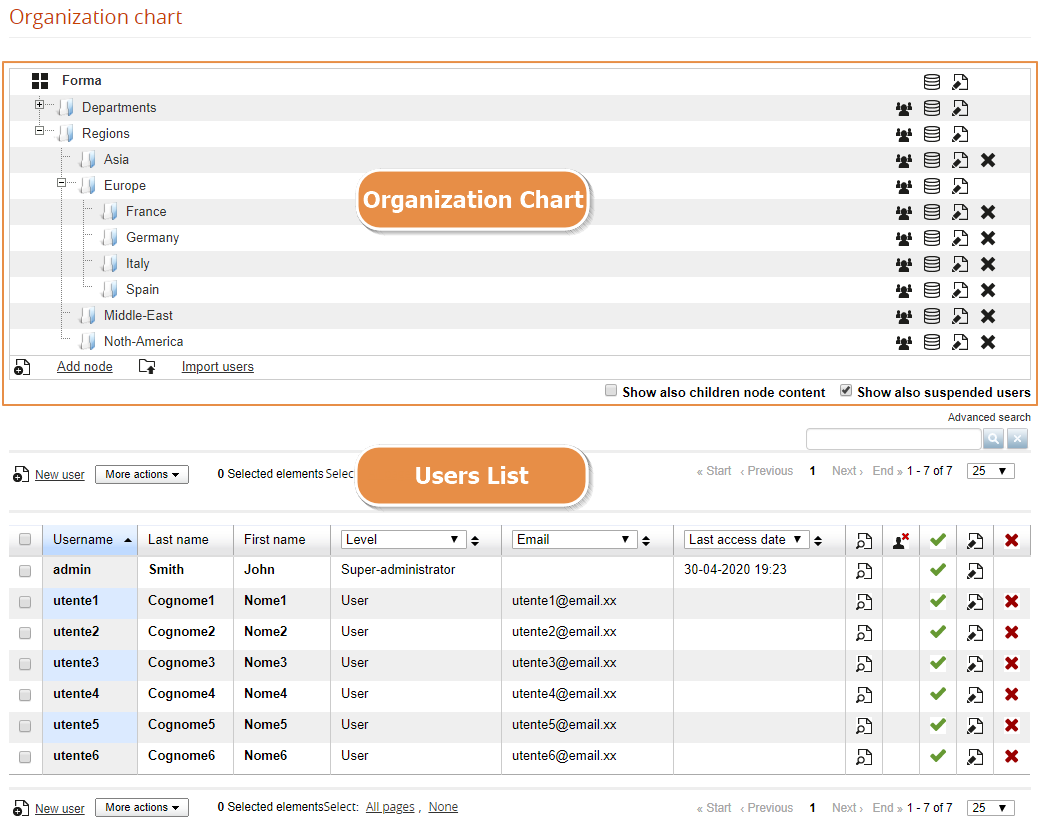
The user management page is split into two main parts:
- Organization Chart: this tree-like structure of folders (nodes) represents the core logic for user's organization, and will be used by most of the other features of the LMS. To simplify user's selection and automate massive operations.
- User List: this is the list of the users in the selected folder. Select the root folder to list all the registered users.
Organization Chart
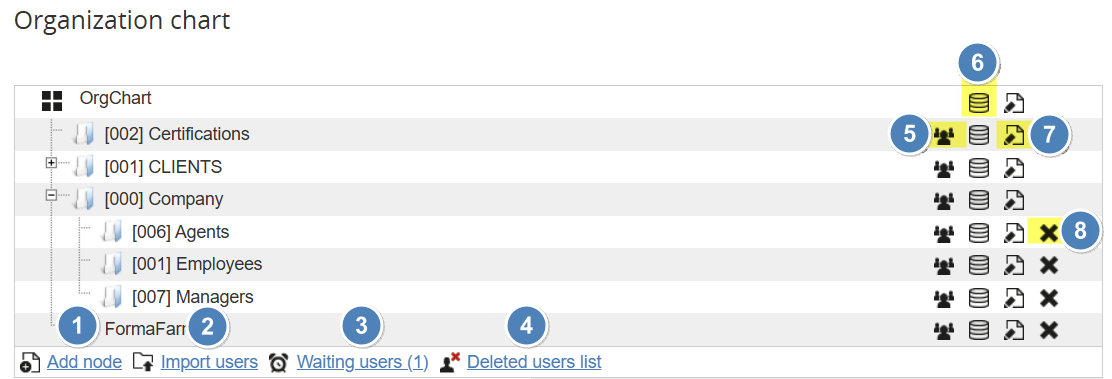
- Add node to the organization chart
- Import Users
- Waiting Users
- Deleted Users
- Assign Users
- Assign Fields
- Edit Node
- Delete Node
Add Node
Click on this link to add a new folder:
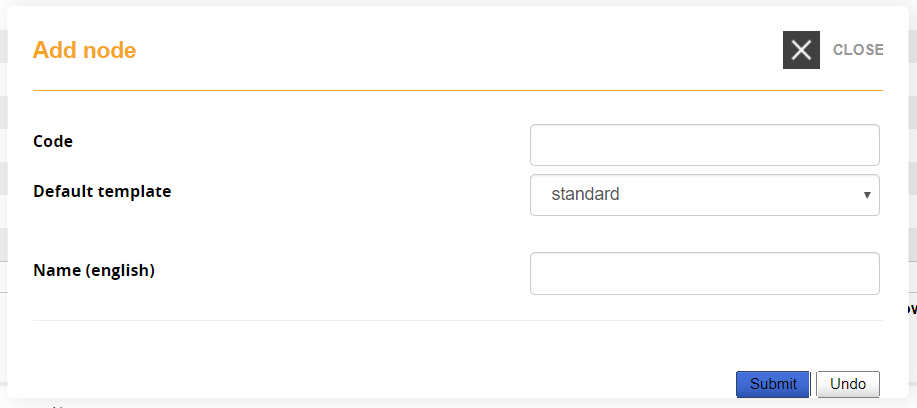
Code: Add an alphanumeric code that can be used by other features like registration with code or I/O task
Default Template: assign a specific template for the users in this node
Name (language): Name for this node, a different field for each language will be shown
Import Users
This feature lets you import a list of users from a .CSV file.
Check the user import guide page for details
Waiting Users
This link will be visible if platform registration is set as "Moderated Self Registration" or "Double Optin".
It will display a list of users that either:
- Are waiting for admin confirmation
- Have not yet clicked on the confirmation link
You will then be able to approve or delete the user

Deleted Users
Access a list of deleted users.
Forma < 4.1.x:
In Forma LMS until version 4.1.x, activate this feature to keep a list of deleted users, find this setting under:
[Settings > System Configuration > Settings > Security]
The list is just a plain log and it won't be possible to recover deleted user

In Forma 4.2 or later
In Forma 4.2 this feature have been completely refactored and acts as "Trash" area for the deleted users.

The system will automatically store deleted users as trashed, and it is now possible to:
- Restore a trashed user: this will keep all the user's trackings. Plus you can decide wether to restore user in active or suspended state
- Delete a trashed user: the user and all its trackings will be removed from the database. Can't be undone.
- Massive delete/restore users
If you are upgrading from a Forma version prior to 4.2 and the deleted user list was active, all the deleted users will be reported in the new "trash" area adding a ".deleted" suffix to the username, and it will be then possible to completely remove them from the database
Assign users to a node
Click this icon to select users that you want to assign to this node
By default, users can be assigned only to a single node. It is possible to assign users to multiple nodes, although this is strongly discouraged to avoid possible undesirable or unpredictable behaviors in other platform areas (i.e., reports, administrators assignments, or other). To enable multi-node user assignment, check the relative option under advanced configuration
Assign Field to node
This feature lets you define which custom fields must be assigned for users in this node:
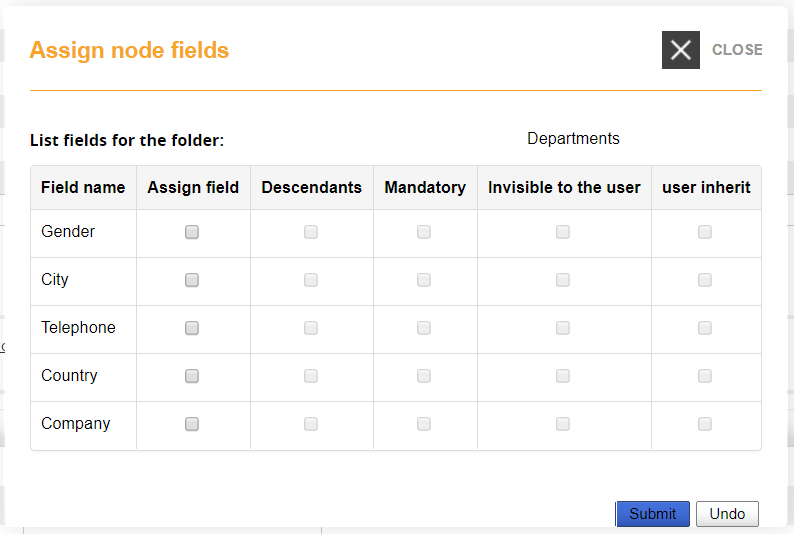
Assign Field: the selected fields will be available in the profile of users in this node
Descendants: the selected fields will be available in the profile of users in the subnodes of this folder
Mandatory: filling this field will be mandatory in the user registration form
Invisible to user: the selected field will be hidden on user registration form
User Inherit: all users of this node will get the same value. If you change the value for a user, it will be sett for all the others.
Users' List
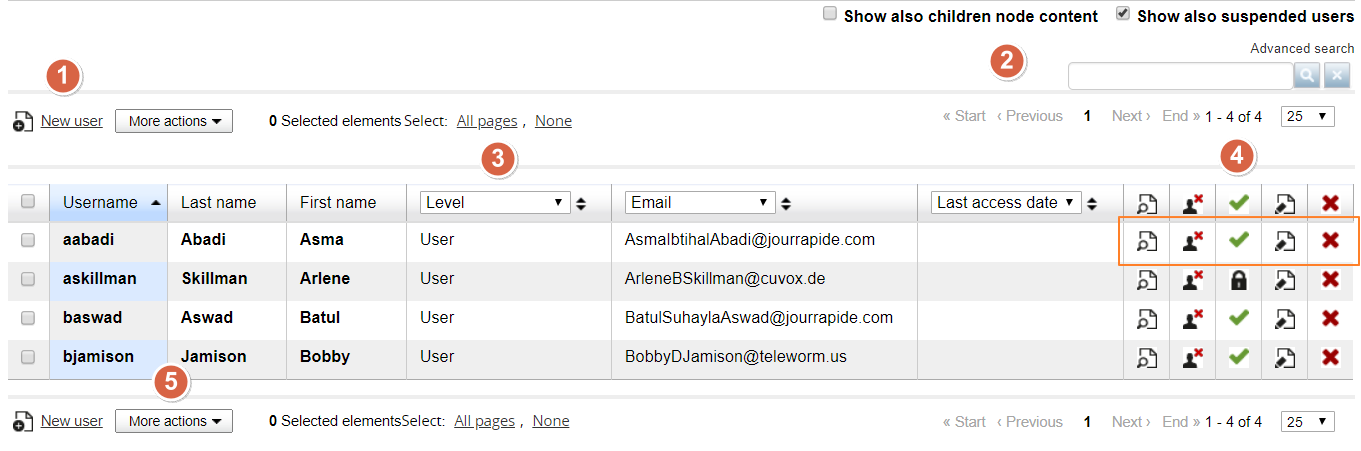
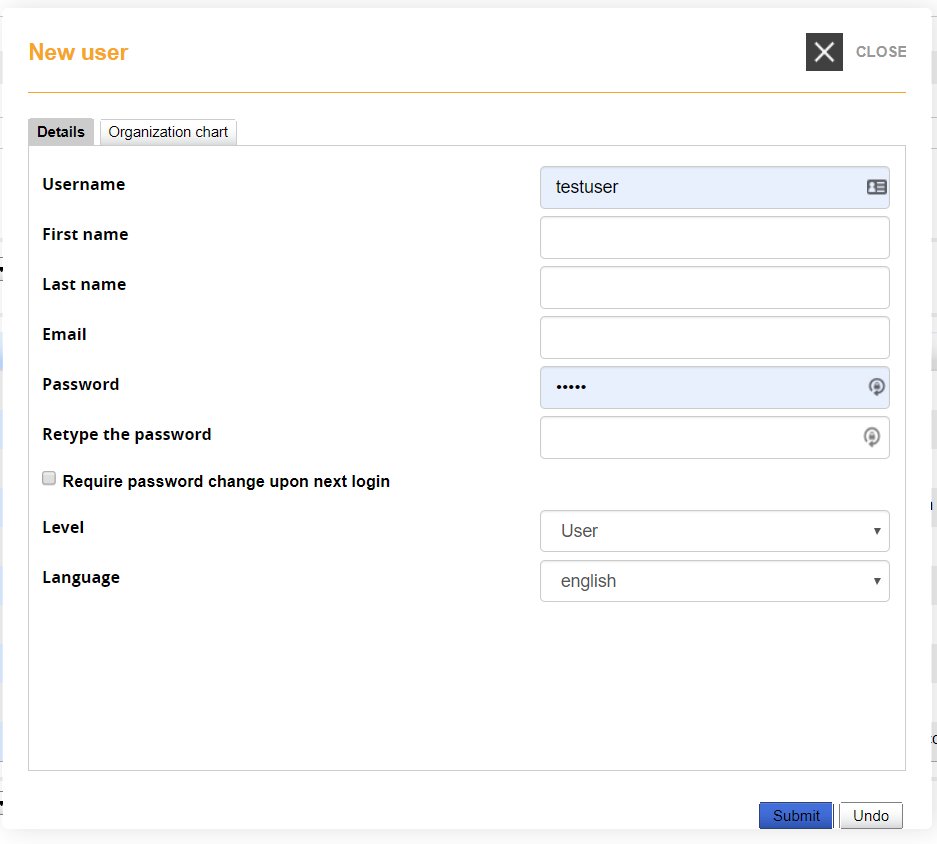
Add new user
Click to insert a new user in the selected node.
- Details Tab: fill user fields
- Organization chart Tab: select the nodes to assign the user to
Search Users
Show also child nodes content: the list will show also the users from subnodes of the selected node. If you are displaying the root node, all users will be displayed.
Show also suspended users: show or hide suspended users from the list
Search: will search on any of the visible field in the user list below
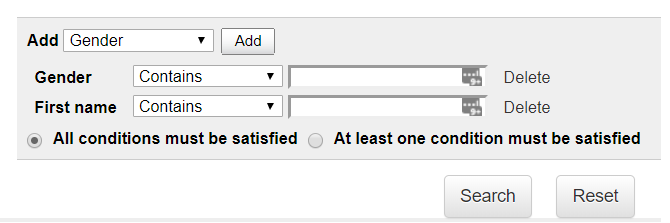
Advanced Search: will display an advanced search form with possibility to add search over specific fields and conditions:
Dynamic columns
Select from the dropdown which data field to show in the correspondent columns, and sort for the displayed data.
The search engine will search over the displayed data.
User Actions
Actions you can take over each user:
View user profile: opens a pop-up window with user information
Remove from node: user will be removed from the selected node, but remain registered to the platform
Activate/Suspend: lets you suspend or reactivate users. Suspended users will be still visible in reports if needed, but can't access the platform
Delete: user will be deleted from the platform. This action can't be recovered
Massive Actions
Lets you massively apply actions over all the users selected in the list.
- Export the selected users in a CSV file
- Massively suspend, activate, delete
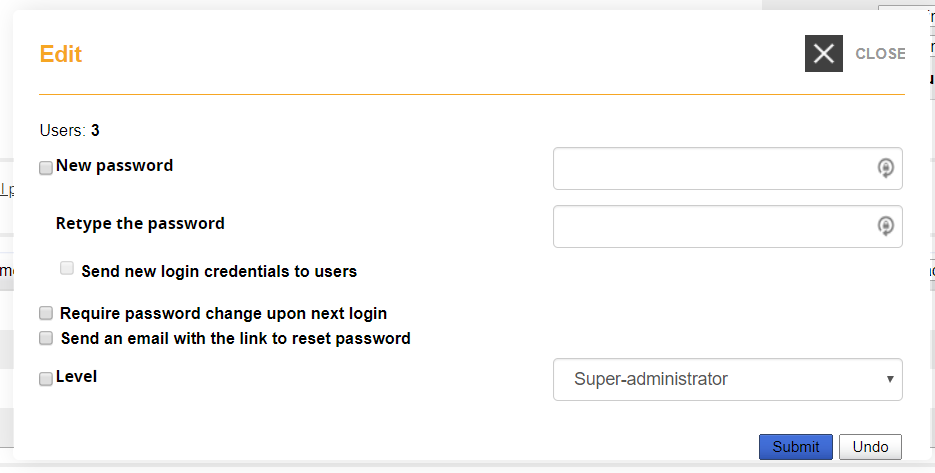
- Massively edit:
Import Users
Use this feature to easily import a list of users with custom fields from a CSV file.
The CSV file doesn't require a specific structure, the import schema can be set manually for each file upon import: you will match field with field upot the actual import.
Of course, just make sure you have all the fields that you need and that you have in your LMS.
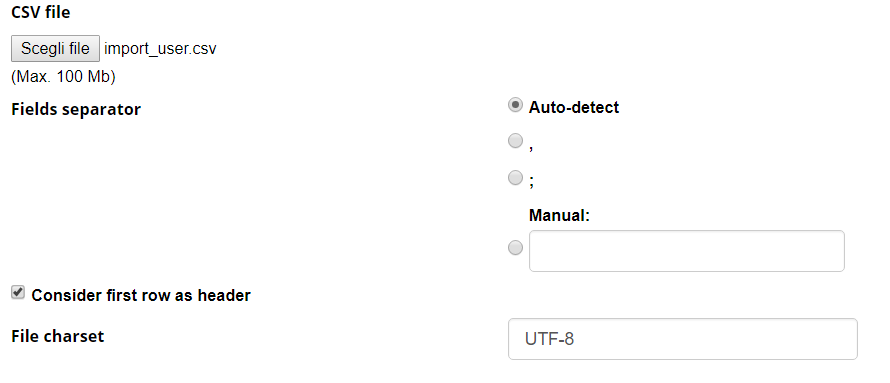
Below you can see the default options. The separator can be a comma or a semicolon: if you choose "auto-detect", the system will detect it for you. Additionally, select the "header" option only if your file really has a header :-). Finally, UTF-8 is the correct type of charset, but it has to match the charset on your server.
File Options
Import Options

Send new login credentials to users
If flagged, the registration email with user credentials is sent to each imported user
Node
All the imported users will be added to the selected node. You can still import users to different nodes at a time, check the schema options below.
Action on users
Define what to do if a user is already present or not: create new and update existing, just create new users ignoring existing ones, just update existing while ignoring the new ones.
Require password change upon next login
Define if the user should be prompted to change password on next login. They will need anyway to know a default password.
Set password
Choose if you want to load the password from the imported file, or set it with the following method (automatic or manual).
Note: If “load from file” is chosen and the password field in the imported file is left empty, the password creation method will be used instead
Password create
Automatically sets a different random password for each user,
Manual password: this will be the default password for all users
Import Schema
Select the forma field in which import each file column
Folder Name: you can use this value in the import schema to insert users in different org-chart nodes. Add a column to your import file to specify the folder wher you want the user to be inserted. Field values must correspond to existing org-chart node names
Language: You can set the language for each imported user by mapping a column to the Language field. The value must be the language name written in full (e.g., italian, english). Do not use language codes — only the plain language name is accepted
Groups
Groups are an alternative way to organize users, that can be used in example for cross-node grouping or temporary grouping to simplify some operation.
The groups feature can be managed from:
Admin > Users > Groups Management
Create Groups
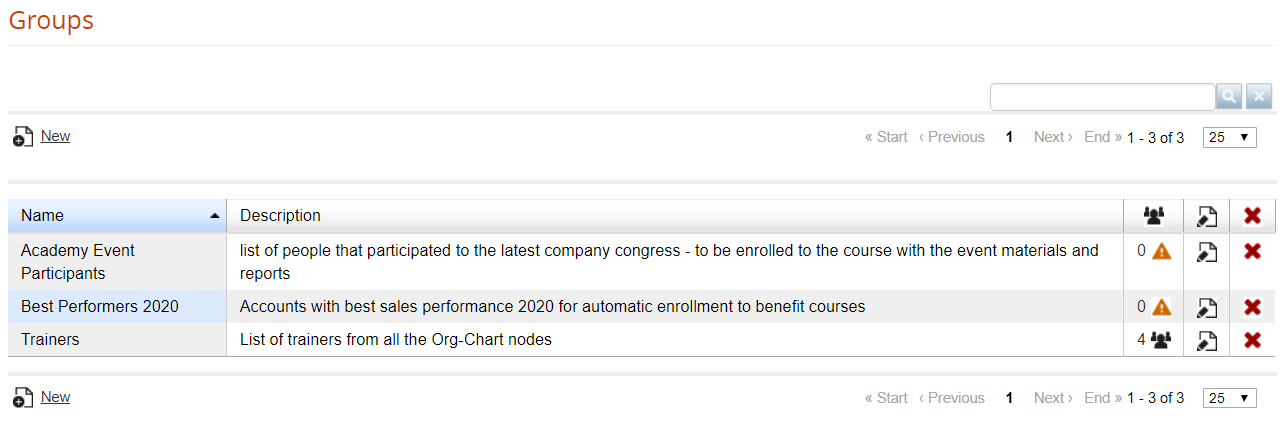
Add Users
Clicking on the icon in users column, you can:
- Select and add users to the group
- Import a list of existing users as a CSV file containing the usernames (users must already exist)

Administrators
An “administrator” is a user that can access the LMS backend with limited visibility and permissions over features, users and courses.
You can have an unlimited number of administrators.
Three basic steps to set up an administrator:
- Set some user with the level “administrator”
- Create or edit an administrator profile, with assignment of the respective permissions to each profile
- Assign to the user the desired administrator profile
- Associate the users and course to be managed by each administrator
Create an administrator
Any existing user can be configured as an administrator by setting this level in his personal user profile, from the global user management area.
Administrator Profile
From this page you can create and manage Administrator Profiles
A Profile is a settings template that can be assigned to multiple users. Changes to a profile will affect all the users assigned to that profile
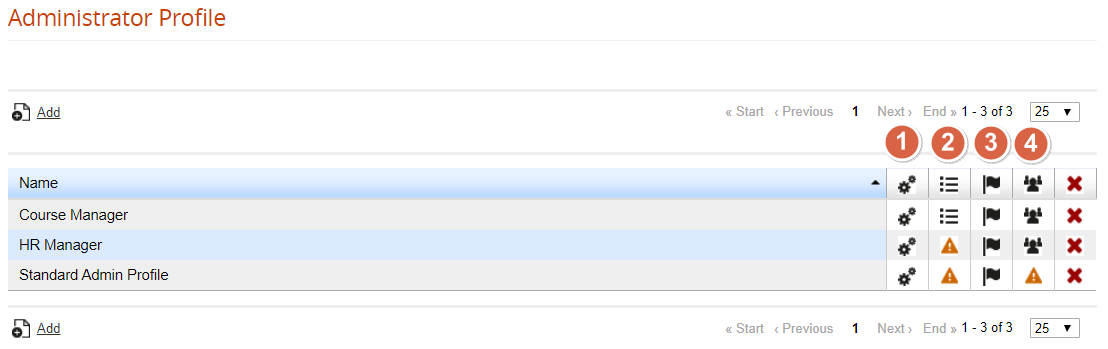
Special Settings
Click on the “Special Settings” icon to set some global configurations for this admin profile:
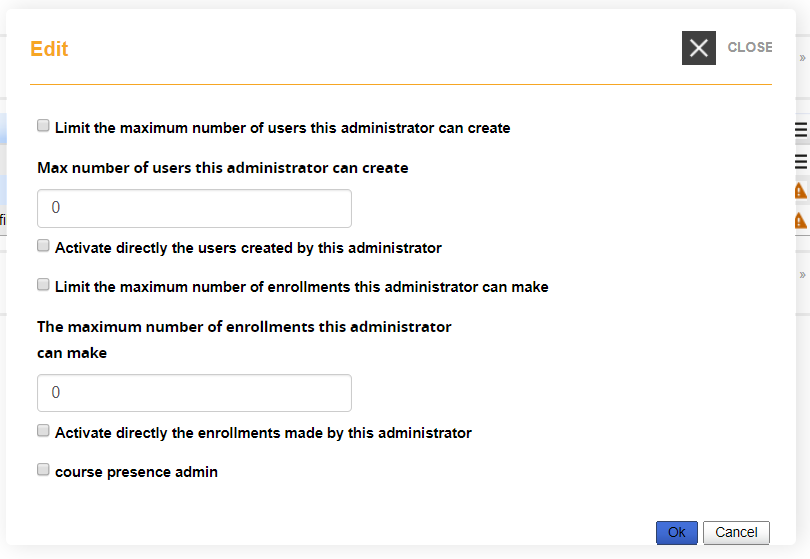
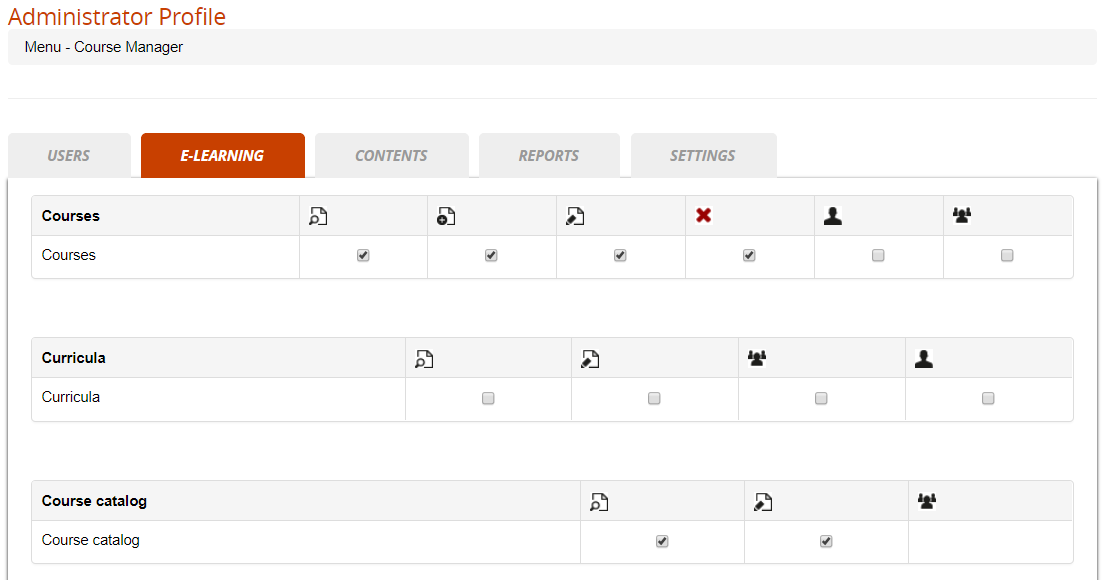
Edit Settings
From this page, you will be able to define the permissions on most of the backed features for the administrators assigned to this profile:
Language Settings
Give this user edit permissions on some specific languages in the language management area
Manage Subscriptions
See a list of the users assigned to this profile
Administrator Management
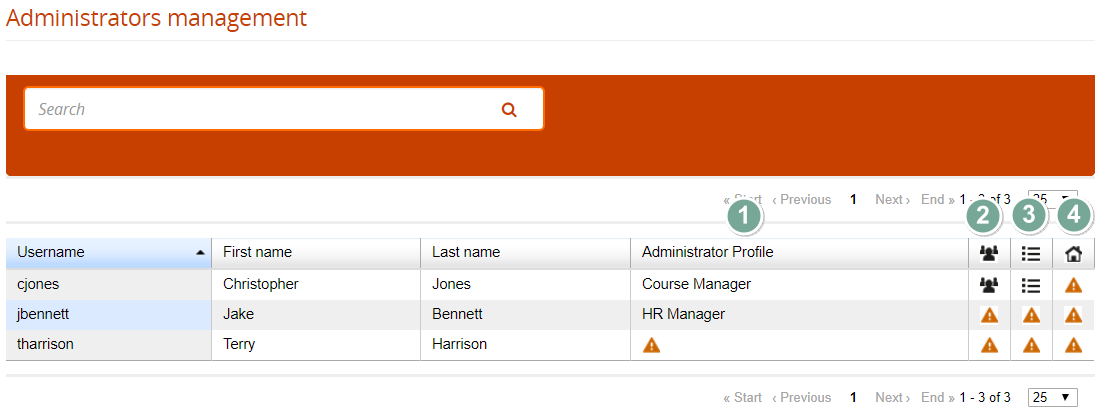
Assign Profile
Click to assign a profile to this administrator
Assign Users
Select which users this administrator will be able to view and managed, based on his profile settings. It's possible to assign:
- A list of single selected users
- One or more org-chart nodes
- All the users with some selected company role
- Users by group
Assign Courses
Select which courses this administrator will be able to view and managed, based on his profile settings.
There are three assignment options:
- All courses
- Some selected courses
- All the courses in a selected catalog
Assign Locations
Select if this administrator can manage some location configurations
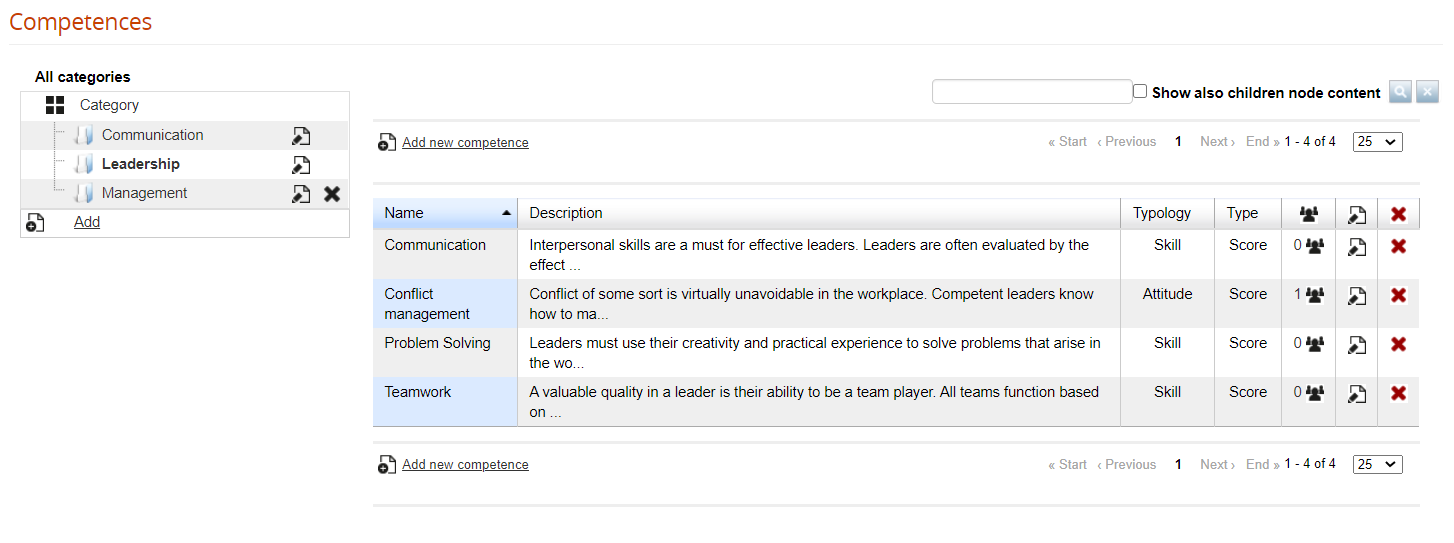
Competences
Manage Competences
Forma LMS lets you create and manage a list of skills and competences required by your company roles and assigned by course and test completion.
Find the competence management under:
Admin > Users > Competences
You can group competences in categories, and for each category you'll be able to set:
- Name
- Description
- Typology: choose whether you are defining a skill, knowledge, or attitude
- Type: the competence can be set by a score or a flag (yes/no)
Assign competences to users
Assign by course completion
Users can obtain a competence by completing a course. Each course can assign one or more competences, see the Course Management guide.
Assign by test completion
A user could get a competence score by completing a test. See feedback management in the test learning object guide.
Company Roles
Overview
Forma provides another method to organize and define users by their company role.
Company Roles can be defined in:
Admin > Users > Company Roles
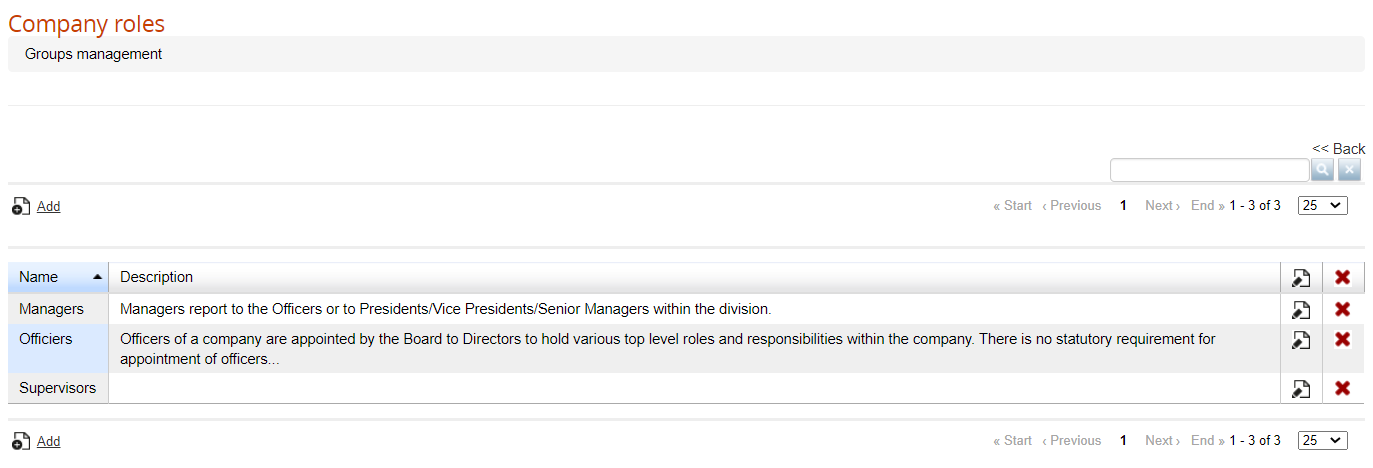
Role Groups
Company roles can be organized into groups of roles:
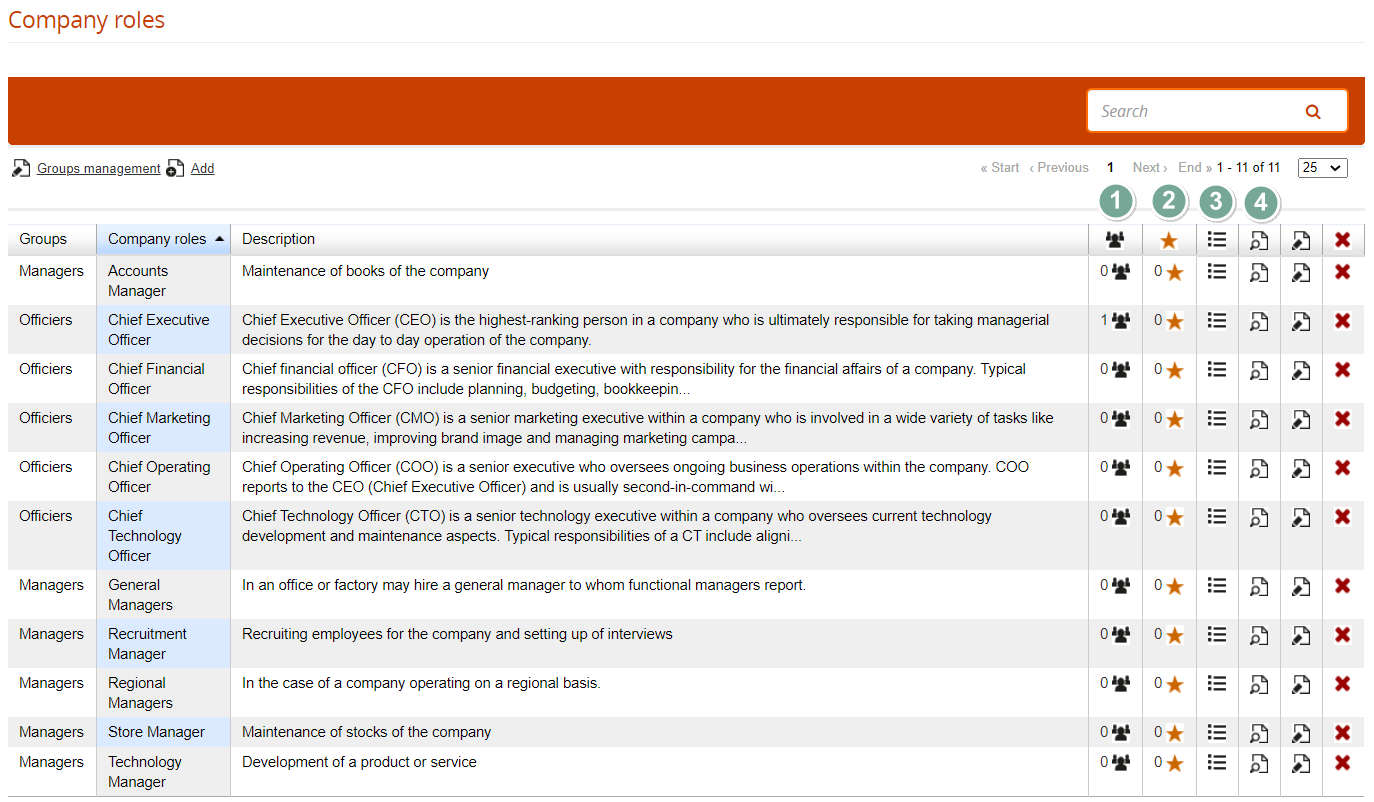
Company Roles
Each company role can be assigned to multiple users.
Users
This column shows the number of users assigned to this role.
Click on the user icon to see the list of assigned users.
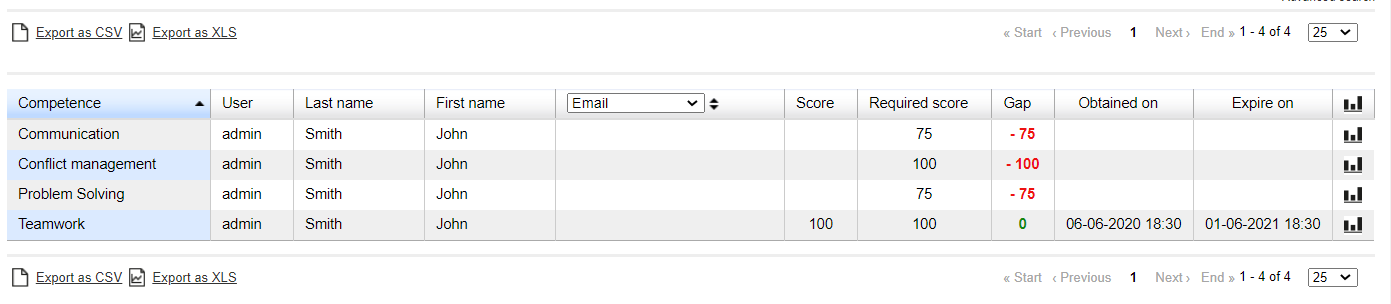
Click on the chart icon for each user to see his skill-gap analysis report:
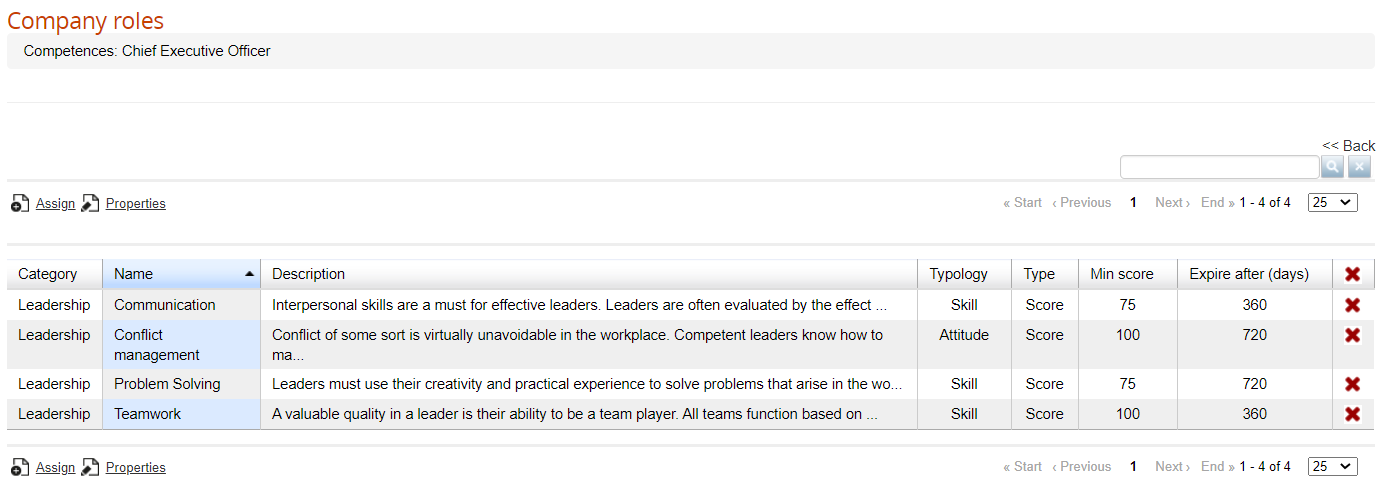
Competences
This column will display the number of competences required by this role.
Click on the icon to manage the competences required for a company role:
Assign: opens the list of available competences
Properties: set the minimum required score for this competence and the number of days of validity
Courses
This column will display the number of courses assigning the competences required by this role
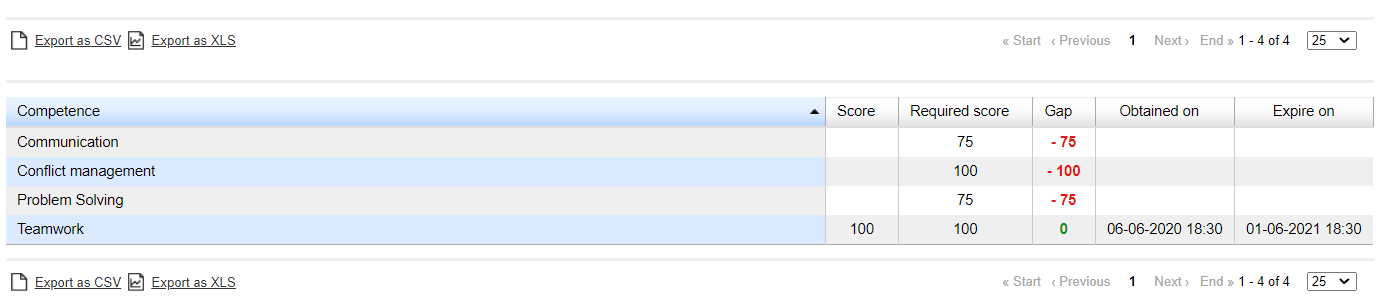
Gap Analysis
See the gap analysis report for all the users in this company role: