Course Administration (Backend)
Backend Course Administration features: subscriptions, courses, categories, catalogs, coursepaths, etc.
- Course Management
- Creating and editing a course
- Editions
- Subscription management
- Catalogs
- Certificates
- Enrolment Rules
- Reservations
Course Management
Overview
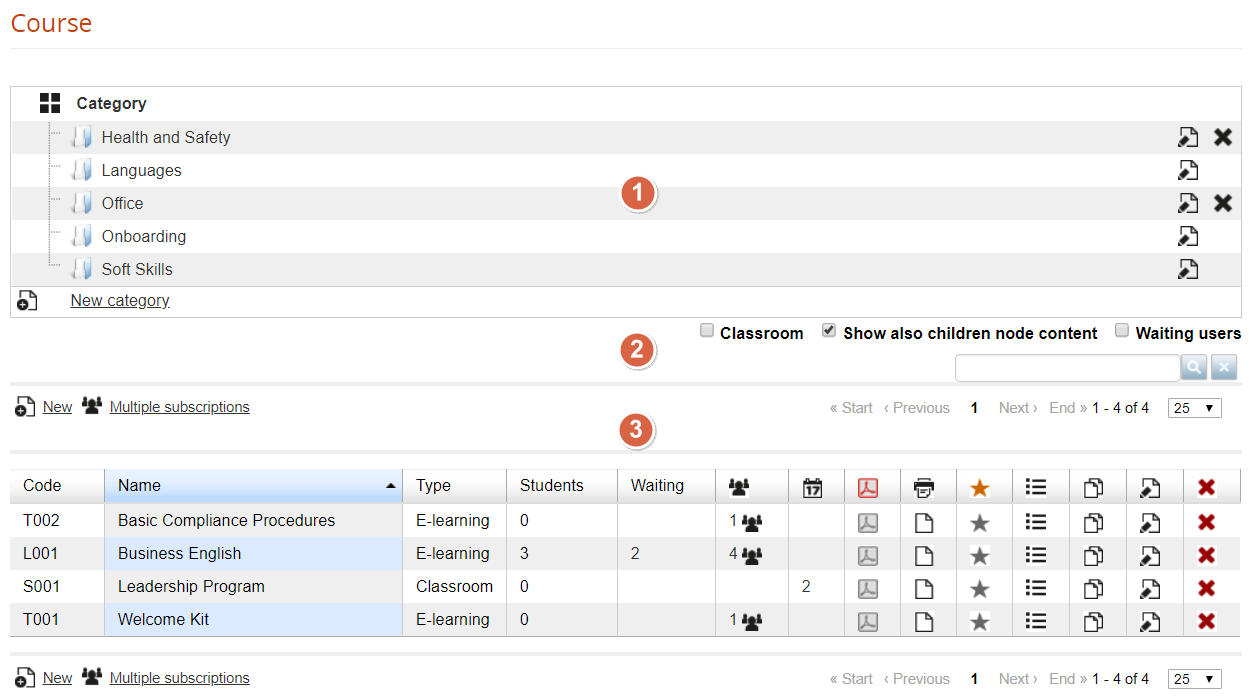
Course management is located under:
Admin > Elearning > Courses > Courses
The course management page is split in two main parts, as for the user management.
- Categories: a tree-like structure for content categories.
- Course list: a flat list of all the courses assigned to the selected category
What is a Category
A category is a container for courses, generally used to group courses by topics.
Categories will be shared among catalogs and other parts of the platform.
NOTE:
If you need a way to assign groups of courses to specific users, check the catalog feature
What is a course
A course is a logical container, you can manage administrative features from this backend section:
- Description and categorization
- Subscription modes and user enrollment
- Course scheduling
- Certificate assignment
Training features will be managed from the platform frontend instead:
- Learning Materials
- Course features
- Training stats
Categories
You can:
- Create an unlimited number of categories and nested categories
- Move a category under another category: click on its name and drag'n'drop the folder
- Delete a category only if it is empty
Filter and Search Courses
Options that apply to the course list below:
- Classroom: show only courses of type “classroom”
- Show also children content: list also courses from the child categories
- Waiting users: show only courses with users waiting to be approved
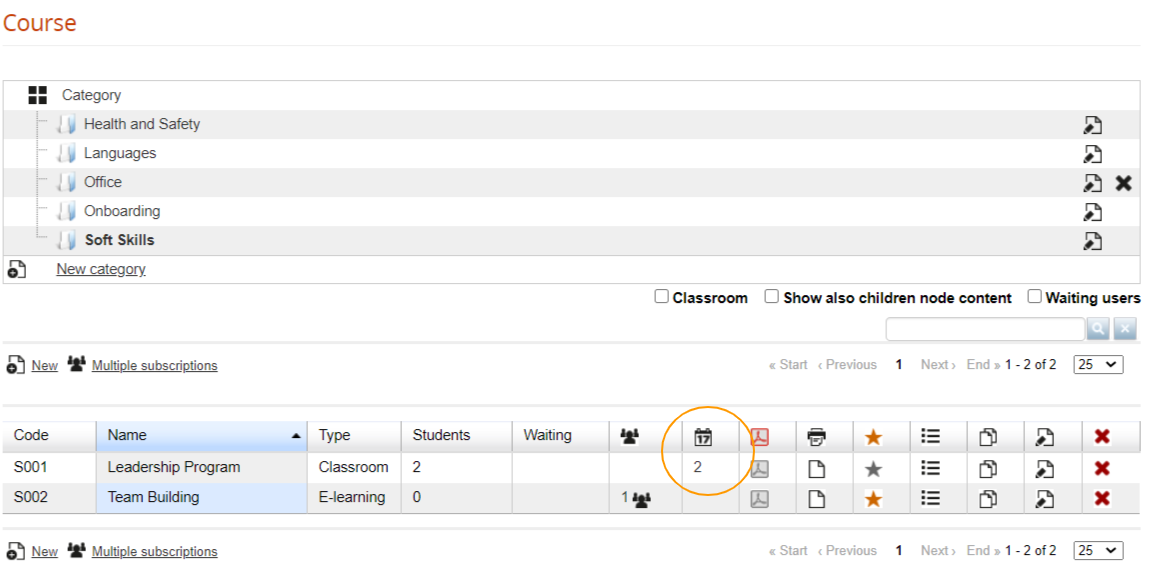
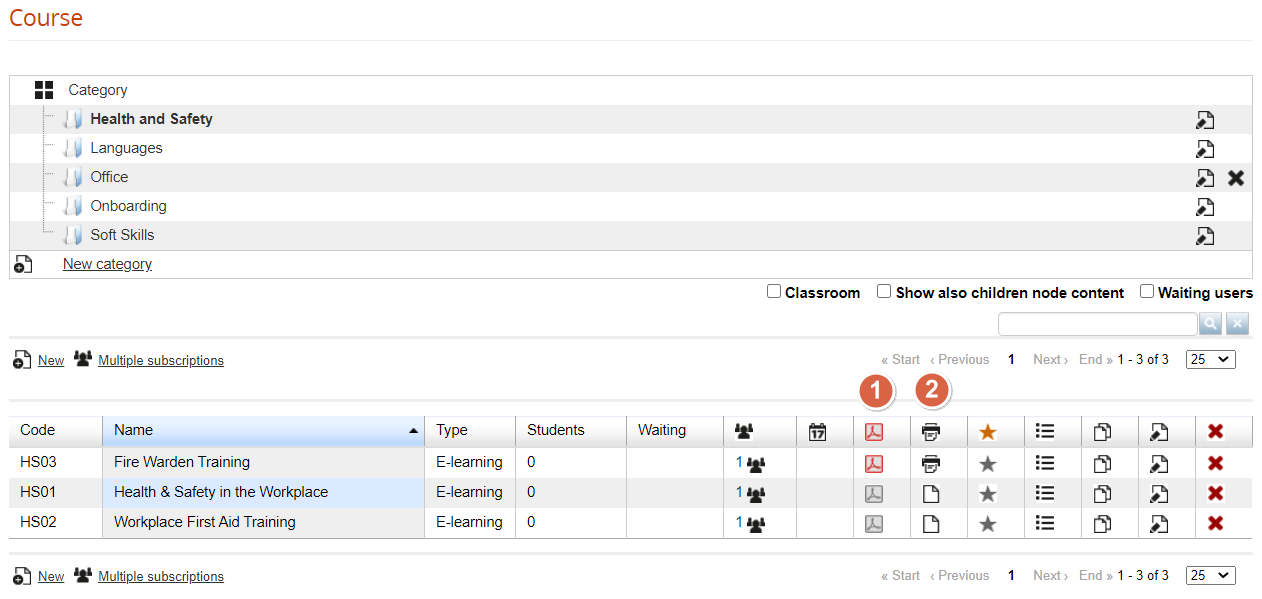
Courses
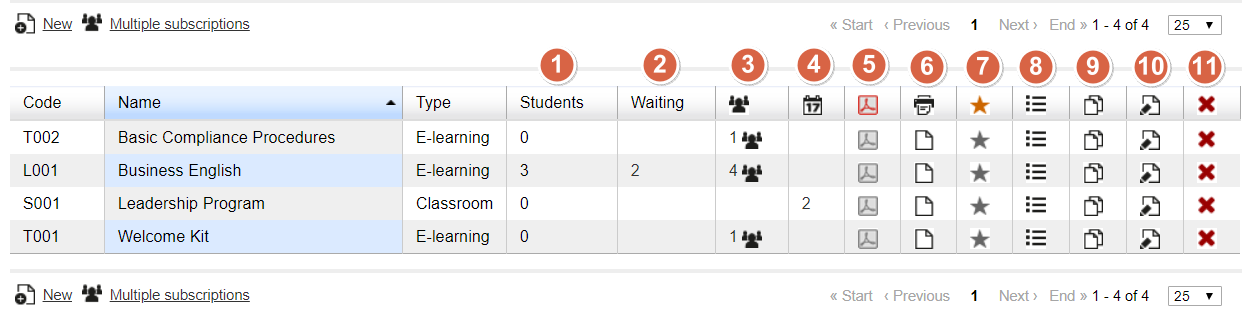
This list shows courses from the selected category, ordered by code, name or type. Here, you can control and manage the following features for each course:
Students
Simply shows the number of users enrolled to this course with level “student”
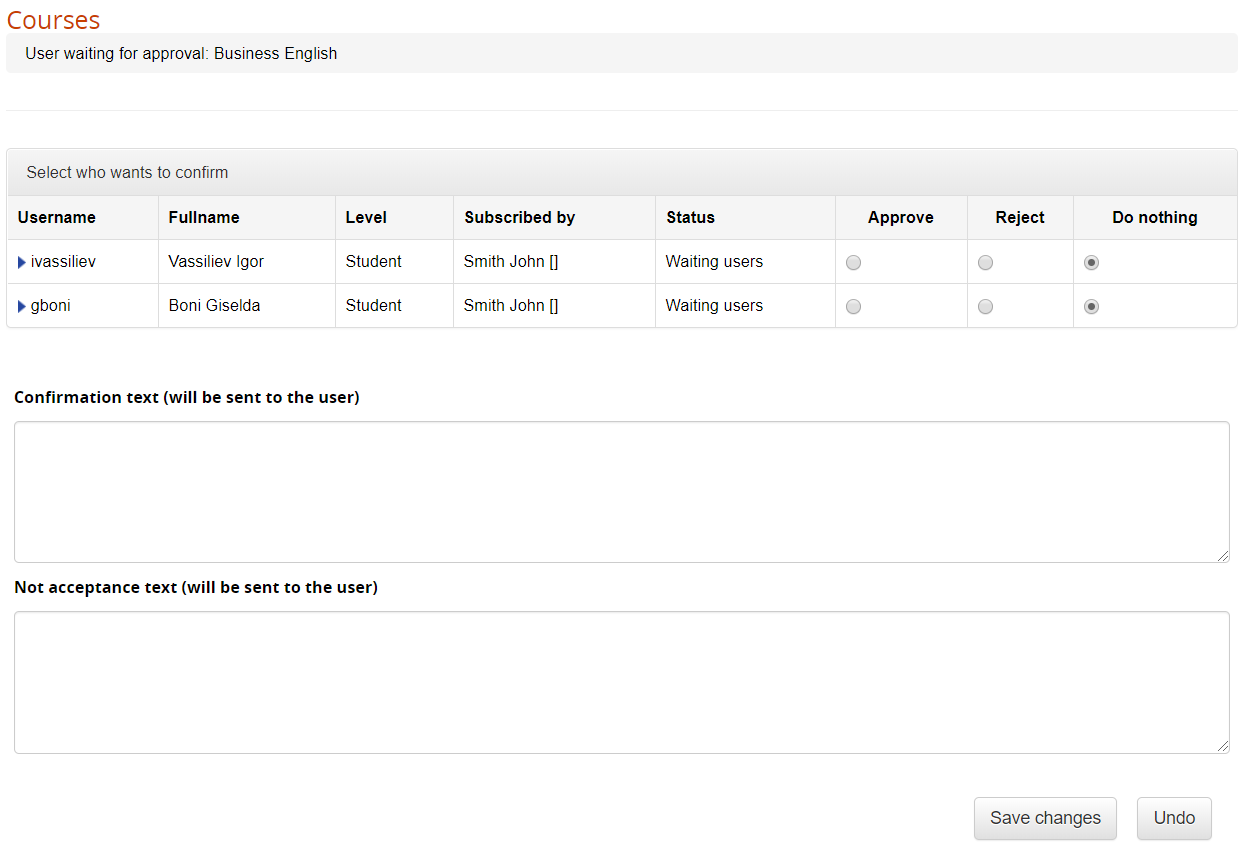
Waiting
Number of user subscriptions to be approved when “moderated” registration is active. Click on the number to manage the waiting users:
Subscriptions
Number of users subscribed to the course. Check the “subscription management” page of this guide for details
Editions
Number of editions available for a “classroom” or “elearning editions” course. Check the “editions management” page of this guide for details
Certificates Assign
Assign a certificate template to this course
Certificate Release
Check the list of available and released certificate for this course
Competences
Click this icon to set the competences assigned by the course. Each course can assign one or more competences, click on the icon to:
- Select the competences assigned by the course
- Edit the competence score assigned to the user when the course is completed
Manage Competences
Check the Competences Guide to learn how to create and manage competences in Forma LMS.
Menu
Assign a different menu template to this course
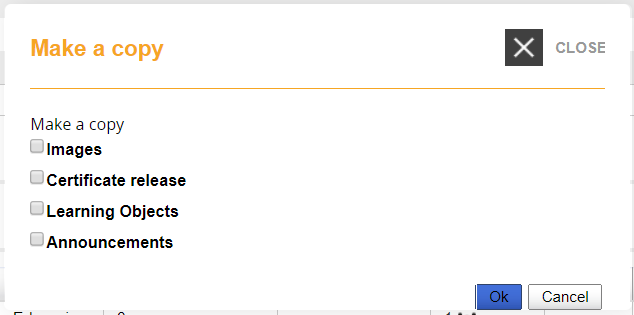
Copy
Duplicate this course. You will be able to select which elements of the course to copy:
Edit
Edit the selected course information and settings
Delete
Delete the course.
Caution!
This operation can't be undone!
Creating and editing a course
Here you can see all the configuration settings available for a course. This same configuration page is used for both creating a new course and editing an existing one.
Most of them are self-explaining, we will provide descriptions and details where needed:
Main course information
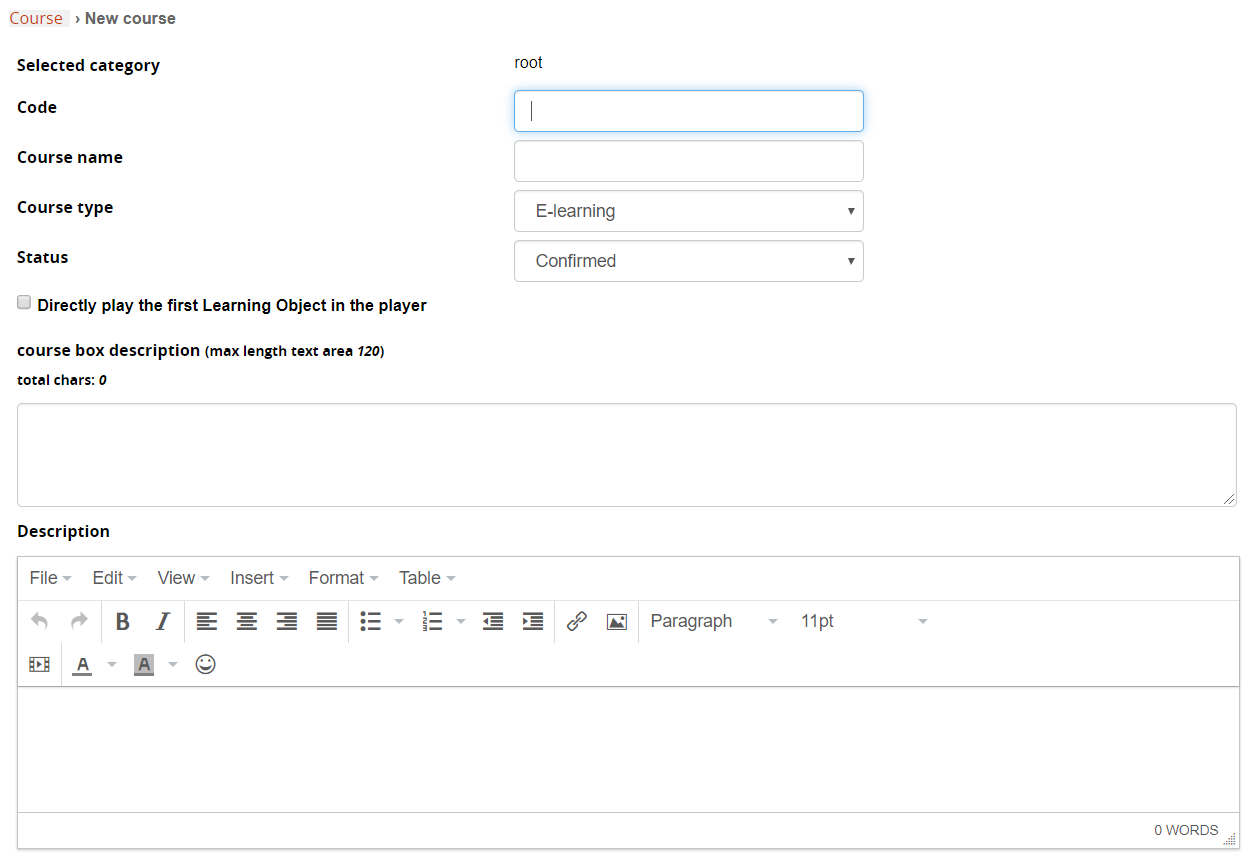
Selected Category: shows the selected category for the course. Can be changed upon course edit.
Code: enter an alphanumeric code that will help you identify different versions or releases of courses with similar titles, or to integrate course features with other applications.
Course Type: Select the course type:
- Elearning: standard elearning course
- Classroom: course with editions and classroom management
- Elearning with editions: course with edition management
Since Forma LMS 4.1.42 is not possible anymore to change the course type if users are already enrolled to the course. This and other conditions (subscriptions via API or import) led to some inconsistencies in previous versions, with "ghost" subscribed users on master courses converted from elearning to classroom or vice versa. Also, An automatic realignment algorithm ensures consistency between master course enrollments and classroom session enrollments by removing users enrolled only in the master course and adding those enrolled only in sessions. It operates on one or all classroom courses, respects overbooking rules, and safely handles repeated executions without side effects. It is also applied during upgrades to fix legacy inconsistencies. See the release article for details.
Course Status: Select the status for this course:
- Under Construction: the course is only accessible to the users responsible for preparing its content (normally teachers, tutors, mentors and/or administrators);
- Confirmed/ Available: the course is accessible to the users. Confirmed is meant to be used for classroom courses, available is meant for elearning courses
- Concluded: the course is finished and only those users who have concluded it have access;
- Cancelled: the course is no longer accessible, and registration from the course catalog is no longer possible.
Directly play the first object: when clicking on the course “enter” button, the first LO will be automatically opened. Don't use this option if you have more than one LO, because it would be impossible to play the following LO's
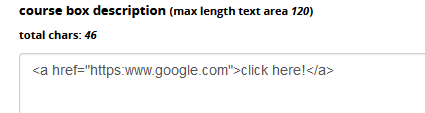
Course Box Description: enter the text to be displayed in the “my Courses” boxes. You can also insert a link, provided you write it with the appropriate HTML Code
The description will then be displayed on the My Courses page and in the Catalog

Description: full description that can be shown in the “course info” module, or inserted in certificate templates with a tag.
Details

Course Language: Define the language used for course materials. This option will be useful to filter or select courses by language in catalogs, enrollment policies, administrator assignments
Difficulty: label to describe course difficulty level
Credits: credits assigned by this course, to be shown in reports and calculated through the “time period” option
Labels: assign a label to group courses with the “label” feature
Course Subscription
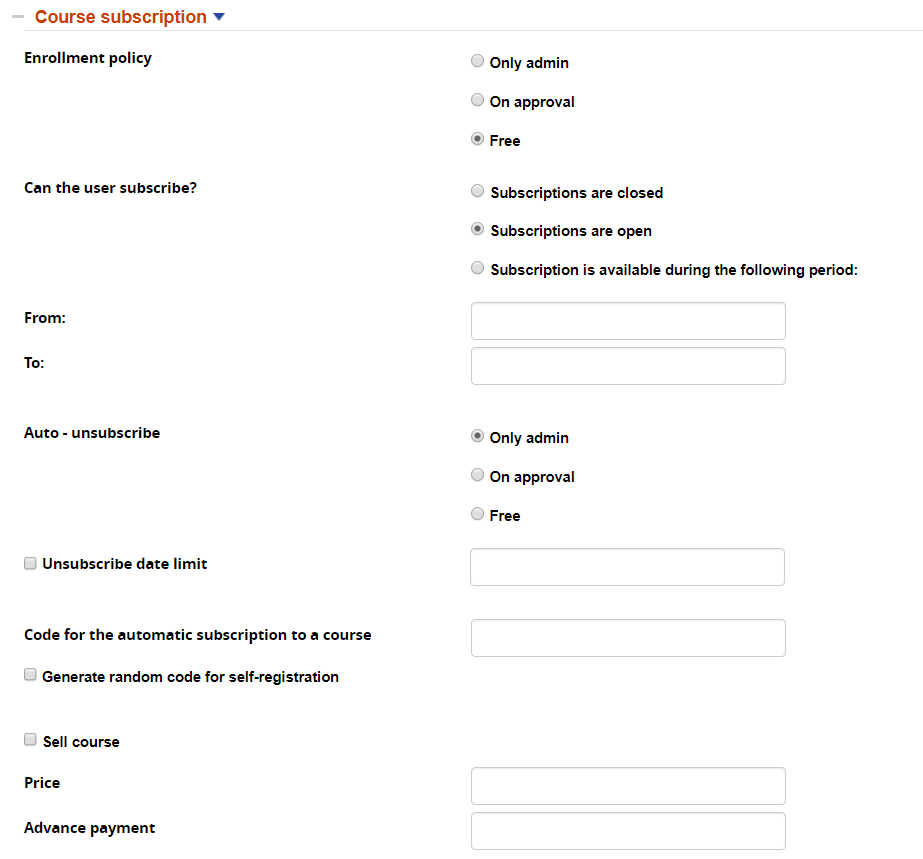
Free: the course will be displayed on the “catalog” page, and the user will have the possibility of self-enrolling
On approval: the course will be displayed on the “catalog” page, and the user will have the possibility of self-enrolling. The request will have to be approved by a manager (an admin)
Only admin: the course will be displayed on the “catalog” page, but only admins will have the possibility of enrolling users.
It might make sense to describe those options in the course description, for instance, writing “ask your manager to enroll you”.
Code for automatic subscription: lets users self register to this course, entering this code upon registration or through the code field in the userpanel
Sell course: enable this course for ecommerce features
Display mode options
The following options will let you define some aspects related to course visualization and layout elements:
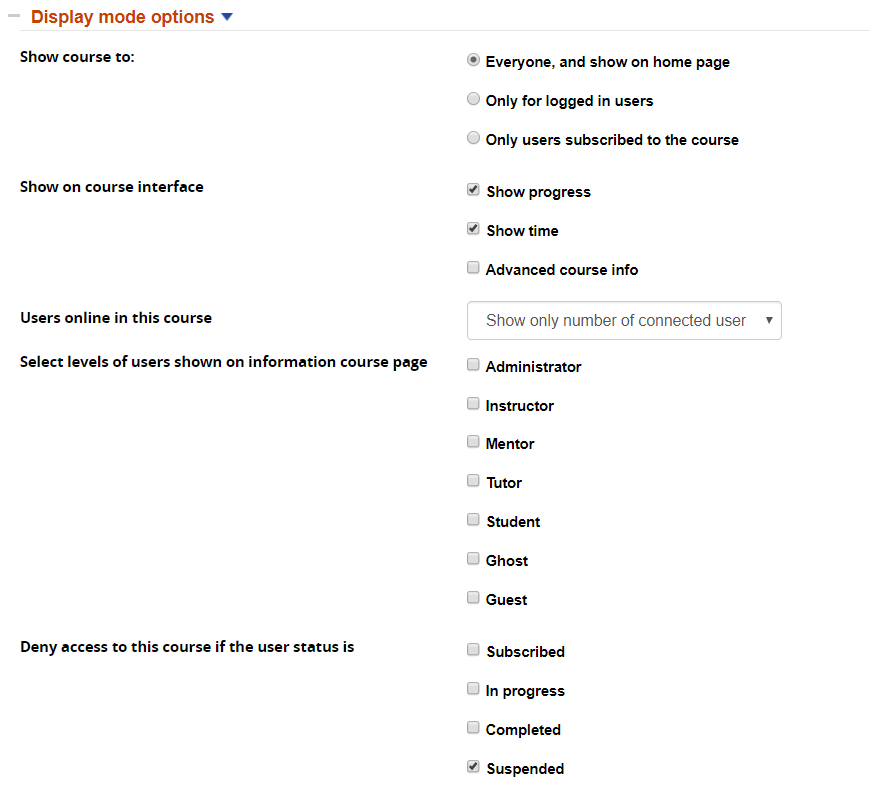
Show Course To: The above section describes the course visibility options. Any course can be displayed or not to users who are not yet enrolled. Please also see the reference guide on Catalogs to learn how you can use catalogs, combining them with the displaying options.
Show on Course interface: choose elements to display or hide inside the course
Users Online in this course [Deprecated]: choose whether and how to display the instant messenger.
Deprecated: the IM has been removed since version 4.1, and the options has been removed in forma 4.2
Users to show on Course Information module: you can choose by level wich users to display in the course info module inside a course
Deny Access to this course: Block access to the course for users in a specific status
Time options
In this section, you can configure options related to course scheduling and duration

Days of validity: course will be available to user only for the number of days defined in these fields. Time is calculated based on the date of user first access to the course.
Note: When “days of validity”is set, the course closing date shown in the course boxes on the “My Courses” page will be dynamically calculated based on each user's first access date . If closing date is set and is prior than the user calculated end date, it will be displayed instead.
Average time for course: Estimated time for course fruition. It doesn't affect the user's stats, but can be used in course info and in reports. Decimal values are supported using a comma as the decimal separator (e.g., 1,50 to indicate 1 hour and 30 minutes).
Special Options
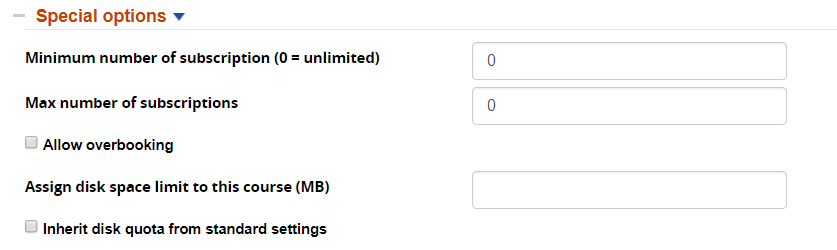
Max number of subscriptions: once the limit is reached, course subscriptions by users will be blocked
Allow overbooking: once the max-subscription limit is reached, users will still be able to enroll to the course and put in a waiting list
Documents Upload
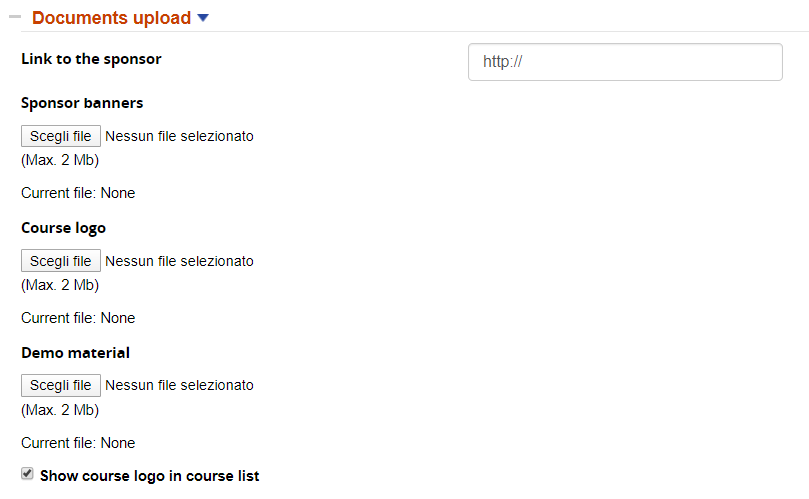
Demo material can be anything you want, and it will be displayed in the My Courses page as well as in the Catalog, like this

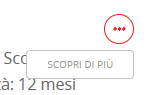
When you click on the three dots, you will see a clickable link allowing you to download whatever demo material you have uploaded.
Editions
Overview
In Forma, the idea behind editions is to have many separate issues of the same master course, with different start/end date and subscription groups.
All the editions of a course will inherit and share some features from the Master course:
To create a course with editions, you can select the desired course type upon course creation.
IMPORTANT:
Do not convert an existing elearning course to editions: it won't be possible to manage the original subscribers that weren't associated to any edition
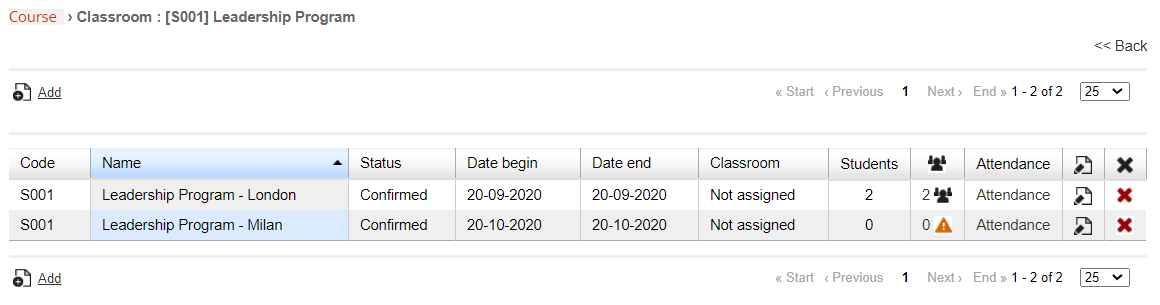
Add and Manage Editions
Click on the “editions” column in course management to add and configure your editions
A list of the available editions will be displayed:
Elearning Editions
You can use Elearning Editions to manage recurrent elearning or assessment courses requiring a start/end date and separate subscription
All the editions will share the same course materials, configuration, and certificate template.
Classroom Courses
Classroom courses extend the elearning courses with the ability so define for each edition:
- Different dates and classroom schedule
- locations
- attendance
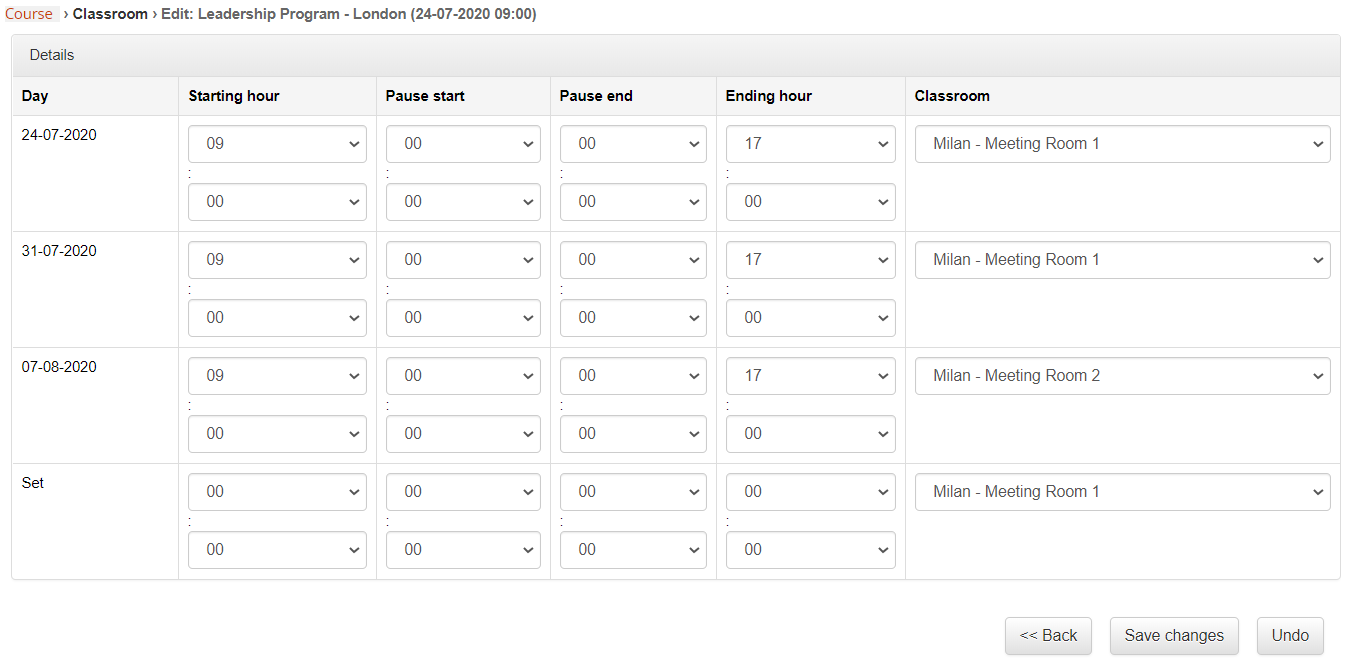
Dates Settings
First, in the edition configuration, select one or multiple dates for the classroom lessons:
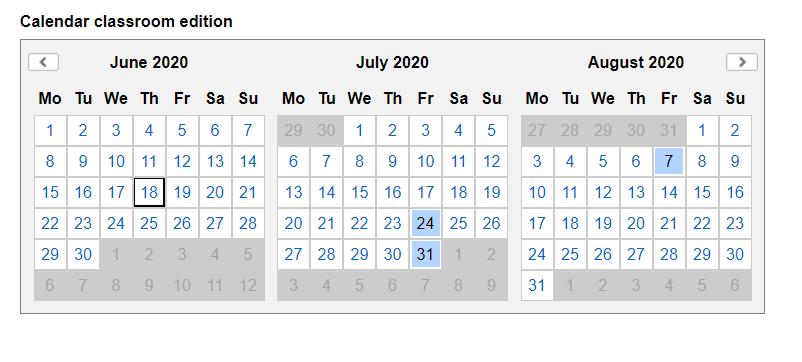
Then in following page you will be asked to set for each date:
- Lesson hours
- Classroom Location
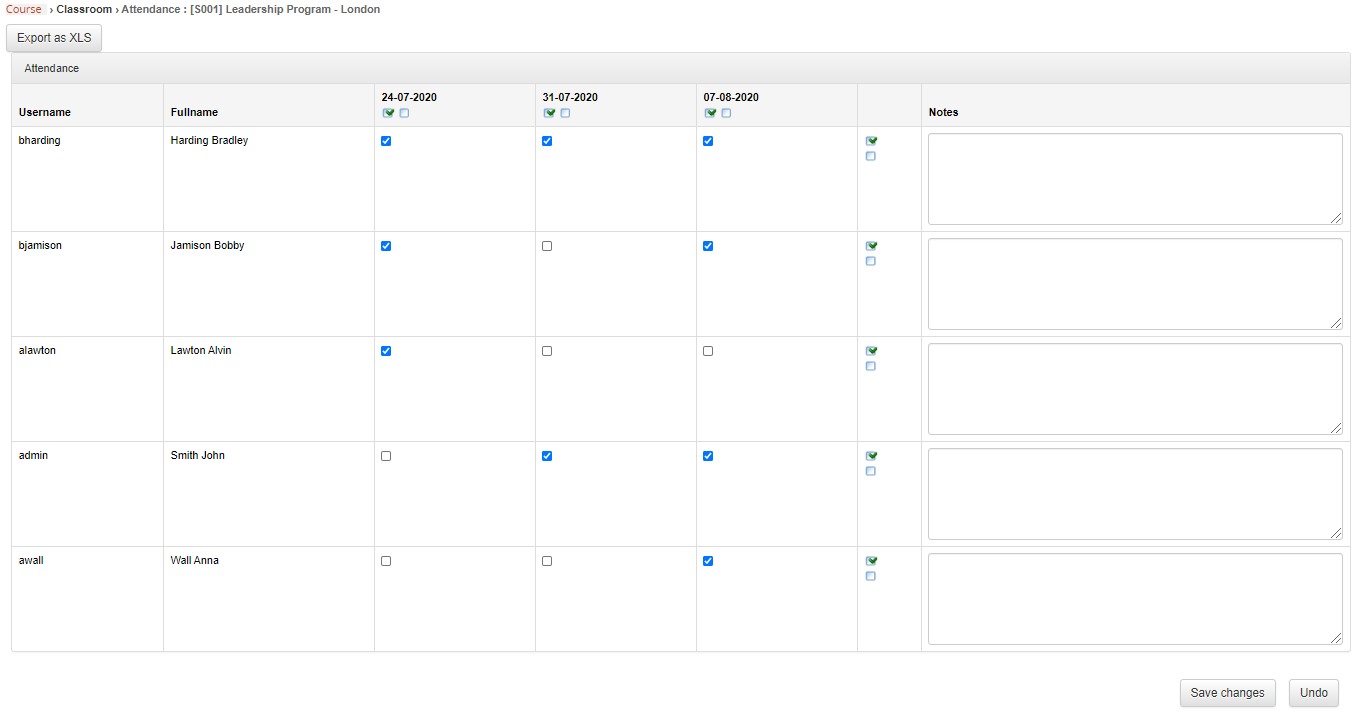
Attendance
Use the “attendance” feature to flag the student that were actually present at each lesson day:
Subscription management
You can access subscriptions management from the course management page:

Standard Subscription Management
Fast Subscribing of a Single user
Use the “fast subscribe” field to easily add a single user to the course.
Select the “Send Alert” checkbox if you want the user to be notified for the subscription
Subscribing multiple users
Click on the “Add” button if you want to add multiple users at once:
1. Select users: the system will open the user selection page, letting you select either:
- Multiple single users
- Massive select all users from some org-chart nodes
- Massive select all users in a group
- Massive select all users by company role
On the same page, you can select whether to notify the selected users for the subscription
2. Select users' role in course:
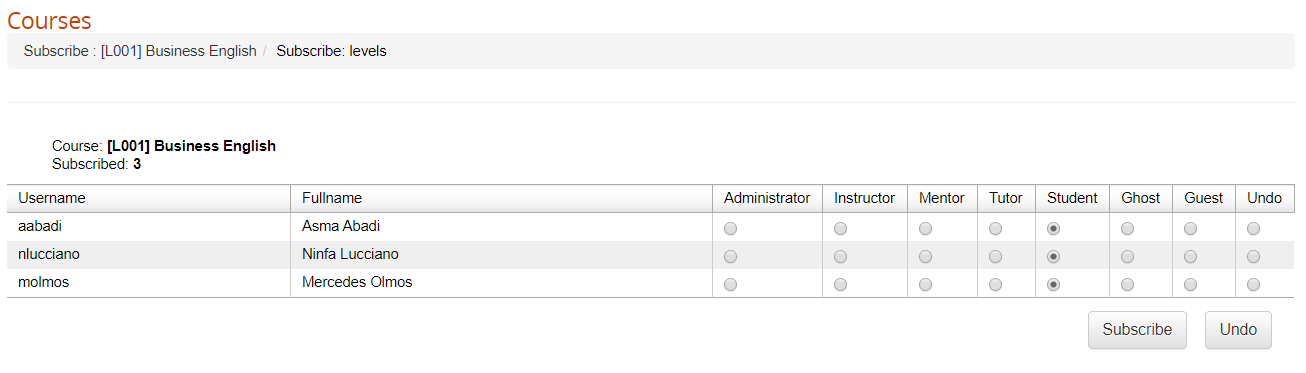
User Roles
Users can be enrolled to a course with 7 different roles, that can give different privileges in course frontend access and management depending on the course menu settings.
Available roles are:
- Administrator: usually a god admin with full permissions on all the course management feature
- Instructor: usually used for teacher, can upload learning materials and access course stats, but not configuration features (i.e., menu management, intro page edit, etc.)
- Mentor
- Tutor
- Student
- Guest
- Ghost: doesn't appear in some stats
Other Options
- Edit/Delete selected
- Import from course: let you import all the users subscribed to another course
- Import: import subscriptions as a CSV file containing a list of existing usernames
- Copy: copy the list of users subscribed to another course, leaving them subscribed also to this one
- Move: move subscriptions from this course to another one, removing them from the present one.
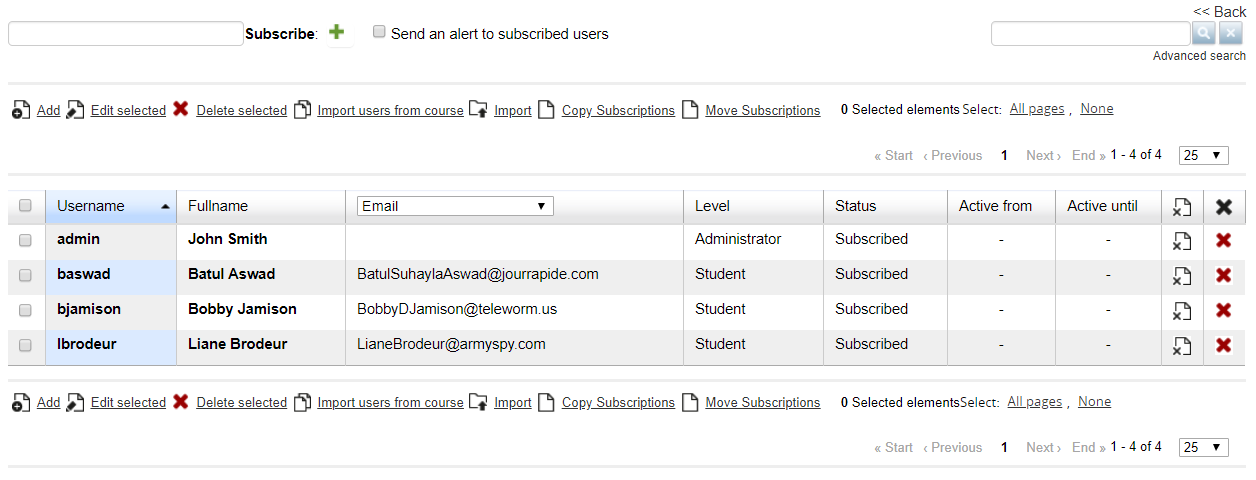
Subscribed users list features
The list of subscribed users lets you:
- Sort by username, full name, or set any desired field in the dynamic column
- Level: set the role for each user in the course, just click on the role to change it
- Status: change the user status in the course:
- Subscribed
- In Progress
- Completed
- Suspended
- Overbooking
- Subscription to confirm
- Waiting user
- Active from/to: set a range of dates for the course to be available to this user. Before and after these dates the user won't be able to enter the course.
- Remove the above validity dates
- Delete subscription
Multiple Subscriptions
With this feature, you will be able to:
1. Select users to be enrolled:
- Single or multiple single users
- Massive select all users from some org-chart nodes
- Massive select all users in a group
- Massive select all users by company role
2. Select one or more courses to enroll the selected users to
3. Set the role for all the selected users on all the selected courses
Catalogs
Global Catalog
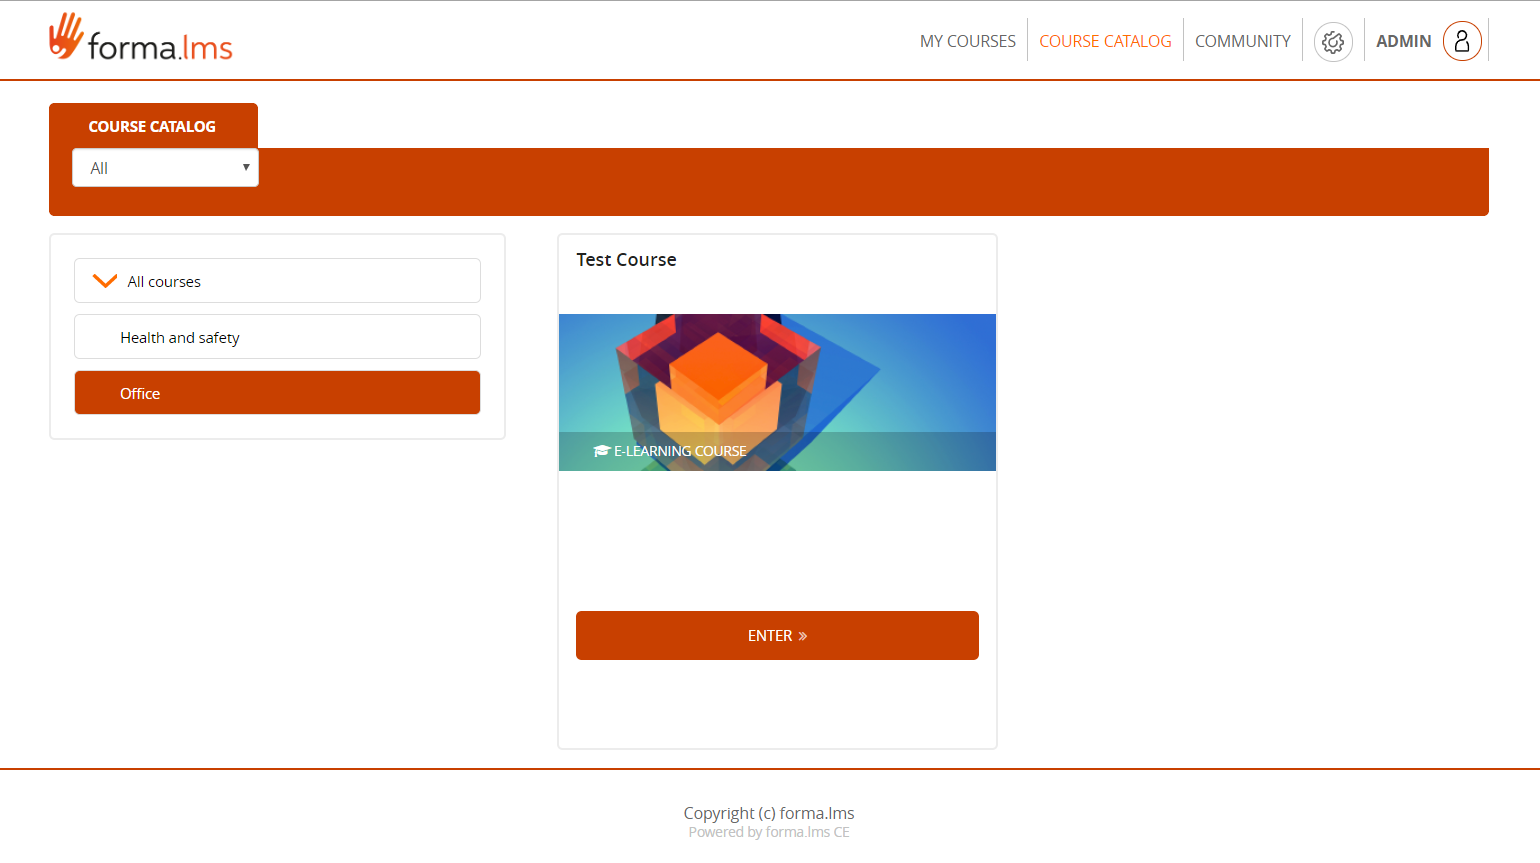
By default, the catalog module will display a frontend list of all the available courses, and users will be able to self-subscribe or buy courses, depending on each course status and settings.
Activate the catalog
You can activate the catalog view by enabling the “Course Catalog” label in:
Admin > Settings > Elearning Configuration > User Area LMS
Catalog Settings
The behavior of the catalog module can be configured in
Admin > Settings > System Configuration> Settings > Elearning
Frontend View
Multiple Catalogs Management
Multiple catalogs Management features are located under:
Admin > Elearning > Courses > Catalogs
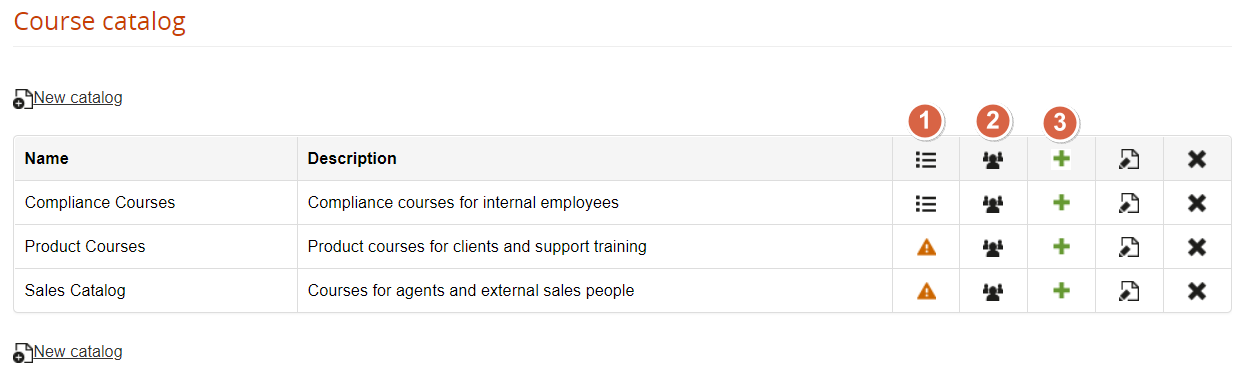
Add Courses
Use this feature to assign courses to this catalog
Assign users
Use this feature to assign users that will be able to view this catalog. You can select:
- Multiple individual users
- Orgchart nodes
- Company roles
Subscribe users
Select users to be automatically assigned to all the courses in the selected catalog
Frontend View
If you use multiple catalogs, each assigned to a node or branch, each user will be displayed the catalog related to the node he is assigned to.
Certificates
Certificate Management
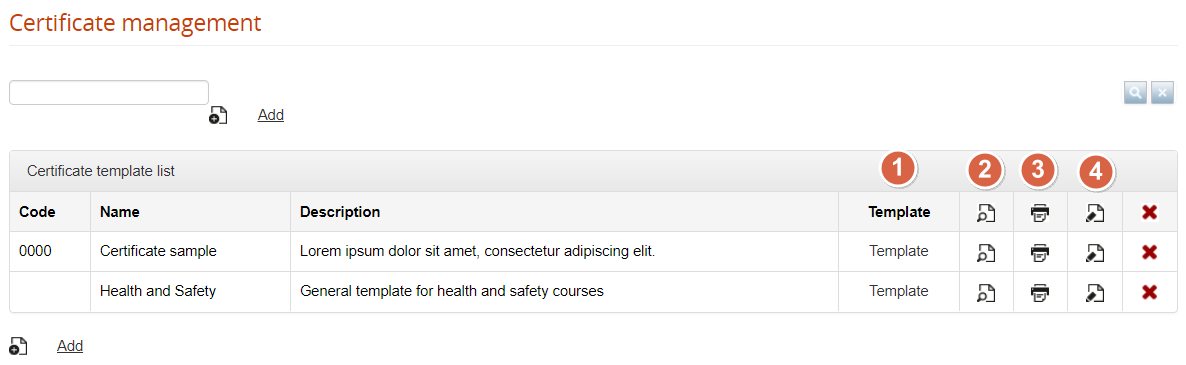
The general certificate management features are available under:
Elearning > Certificates Management > Certificates
Here you can create certificate templates and manage and release certificates for all the courses
Certificate Template
It is possible to create an unlimited number of templates, each of those can be assigned to multiple courses.
Certificate content can be easily created with a text editor, using placeholder “tags” where dynamic content should appear based on user and course information.
It is recommended to place the text inside a table: this will help you correctly place your text, your images, and your text in the correct positions.
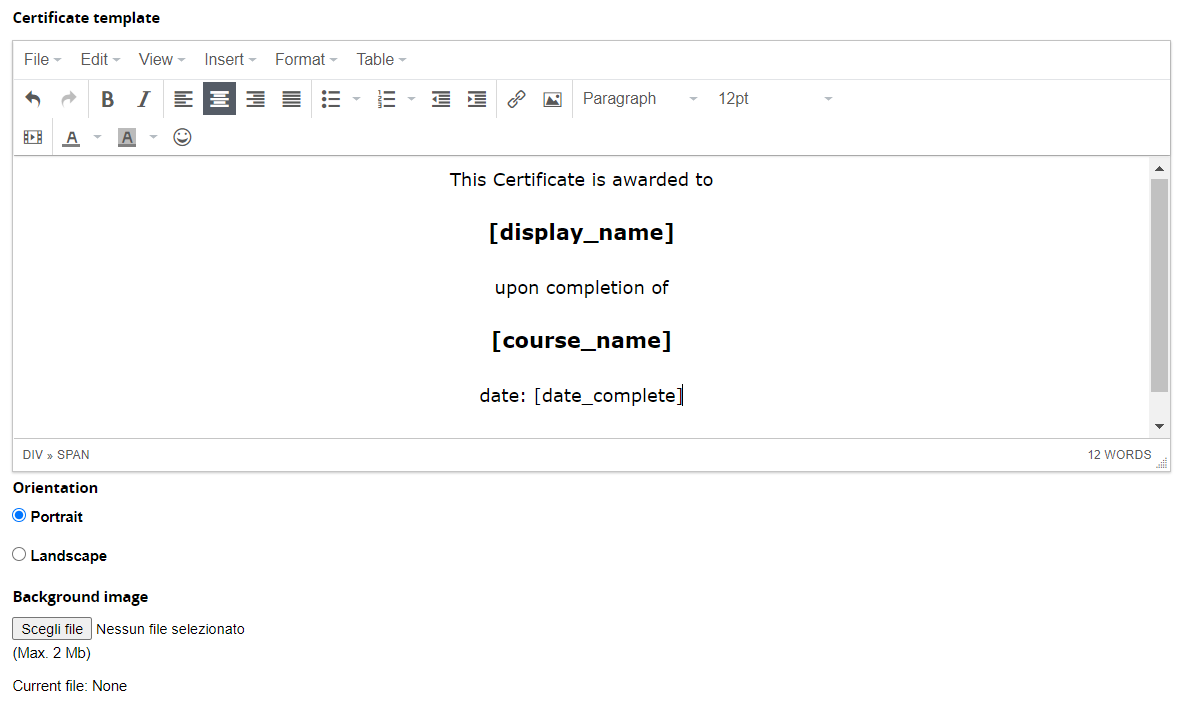
Tags - dynamic fields
The certificate can include dynamic fields. The list of available tags can be found under the text editor: every field has its own description on the right.
If you have added additional user fields, they will be listed as [userfield_1] etc. , always with the description on the right.
Multipage Certificates
You can create multipage certificates by adding a page break, when you want the certificate to be split.
Insert > PageBreak
The background image will be repeated on each page.
Background image
The background image should be an A4. In pixels, it can be 595 × 842 with a low image resolution, or up to 2480 px * 3508 px with a 300 dpi resolution.
Preview
Click this icon for a preview of your template
Release
Click this icon for a list of all the courses using this certificate:
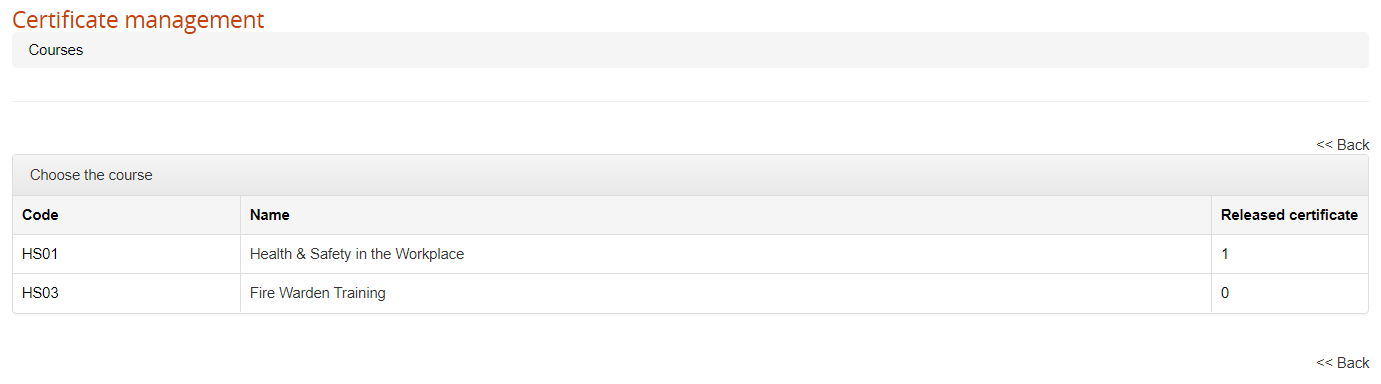
Click on the course title for a list of the users and their release status in each course:
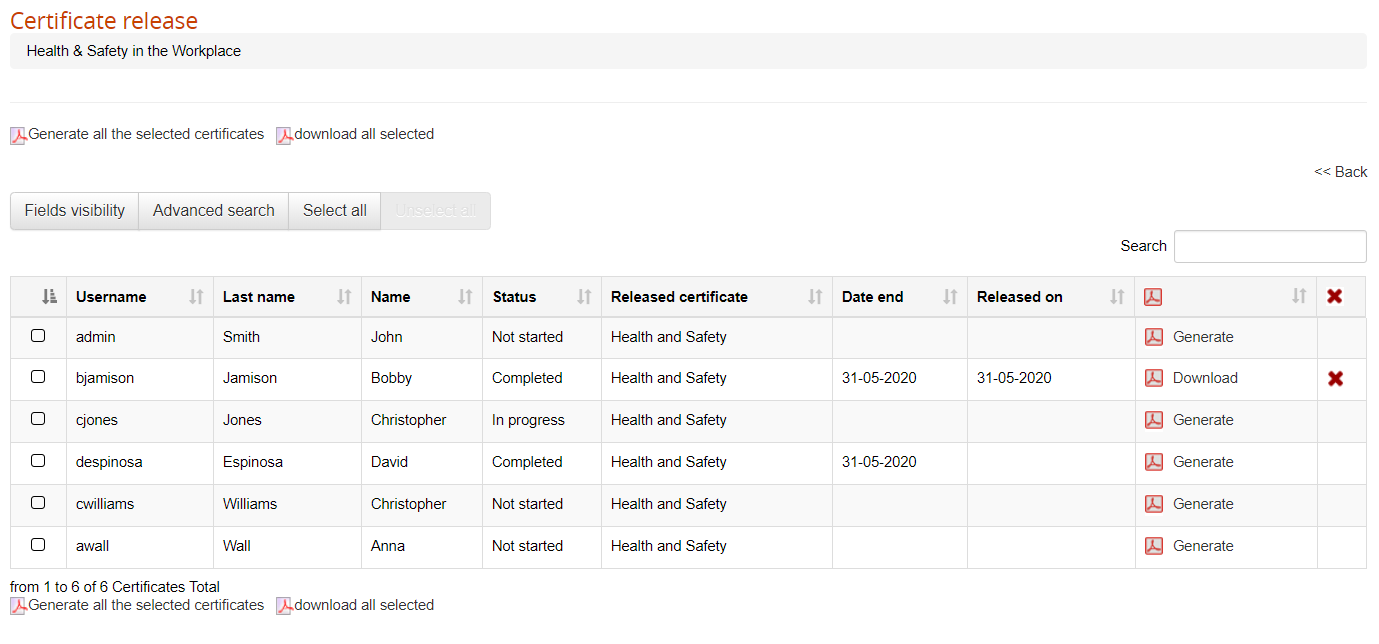
Available options:
Field visibility: add other columns to the table
Advanced Search: add advanced search filters to table header
Generate all the selected certificates, to make them available for download
Download all the selected certificates in a single zip file
Delete a certificate and generate it again
Direct Course Access:
Please note this same user list is available from the course management for easier consultation(see below)
Administrator View:
This users list is automatically filtered on administrator assignements: each administrator will see only its assigned users
Edit
Change the name, code, and description of the template
Course Certificate Management
From the course management area, you can:
- Assign one or more certificates to a course
- Check and manage released certificates
Administrators:
you can assign to an administrator profile both features, or just the certificate release management. Check the administrator guide page for details
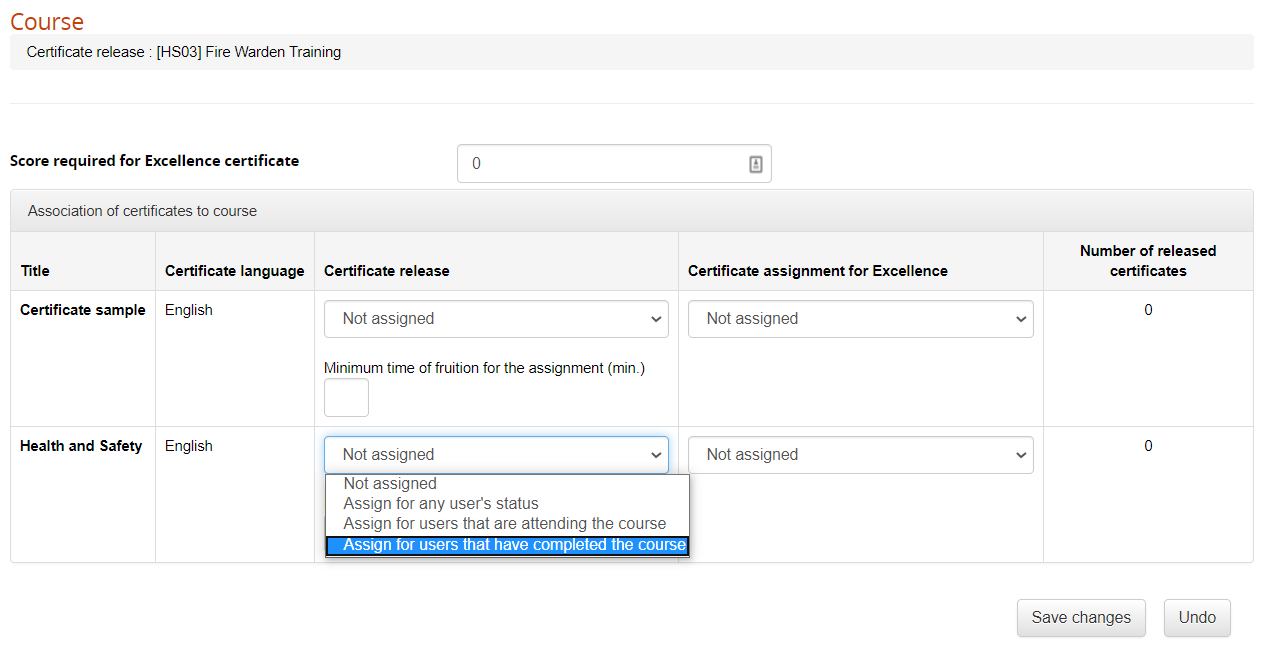
Assign Certificate to a course
Click this icon to assign a certificate template to a course
You can assign different certificate templates for different user status.
Click on the “number of released certificates” to see the list of subscribed users and their status:
Release
Click on this icon to see a list of the users and their release status in each course.
(See above: Certificate Management > Release)
Enrolment Rules
Overview
With the enroll rules feature, it is possible to create automatic subscription rules based on different criteria.
You can set the enroll rules from:
Admin > Elearning > Enroll Rules
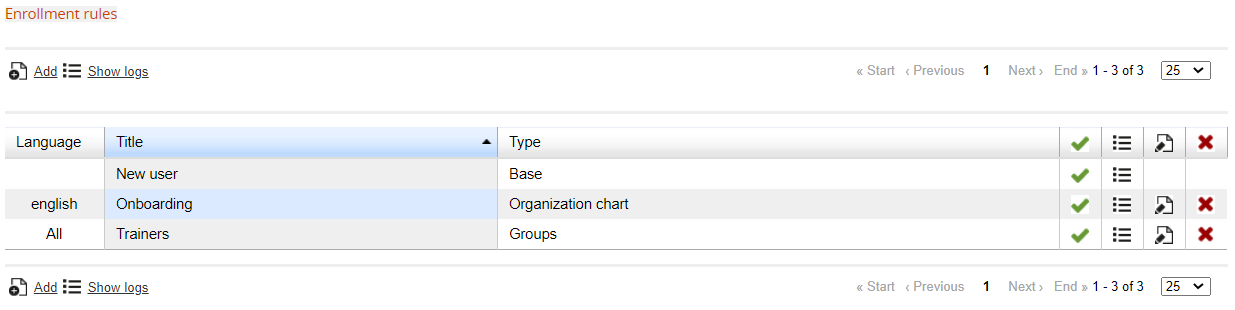
Adding Rules
When you add a new rule, you can set:
Title: a name for the rule
Language: the rule will apply only for users with the same language set for their profile, or for all users
Type: set the main criteria for selecting the users to apply this rule to. It won't be possible to change the rule type once it is saved. You can select users based on their:
- Orgchart Node
- Group
- Company Role
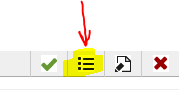
Managing Rules
Click on this icon to manage the rule:
Selecting Users
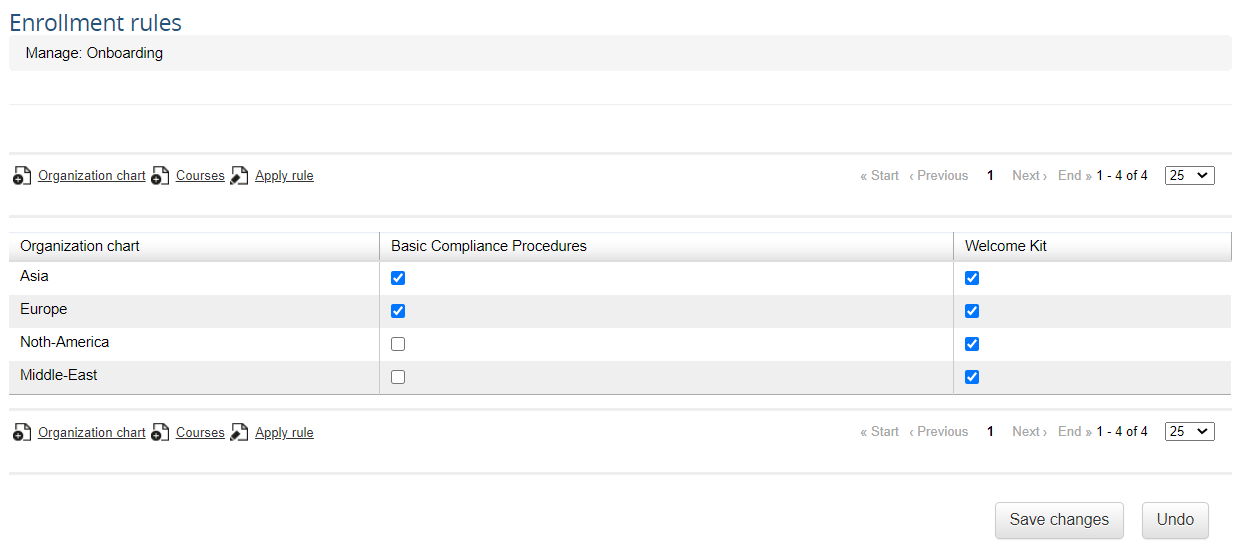
You will be able to select the nodes, groups, or company roles to apply this rule to, based on the type of rule chosen upon creation.
When the rule is active, all the users added to the selected node, group, or role will be automatically subscribed to some course.
Note:
Rules will automatically apply automatically only to users added to the selected nodes/groups/roles after its creation. To apply the rule also to users already within the selected criteria, see the "apply rule" button below
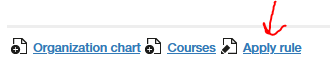
Selecting Courses
Here, you can select the courses to automatically enroll users. You can set different courses for each of the nodes, groups, or roles you selected
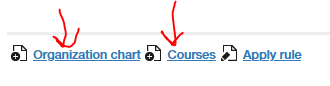
Applying the Rule
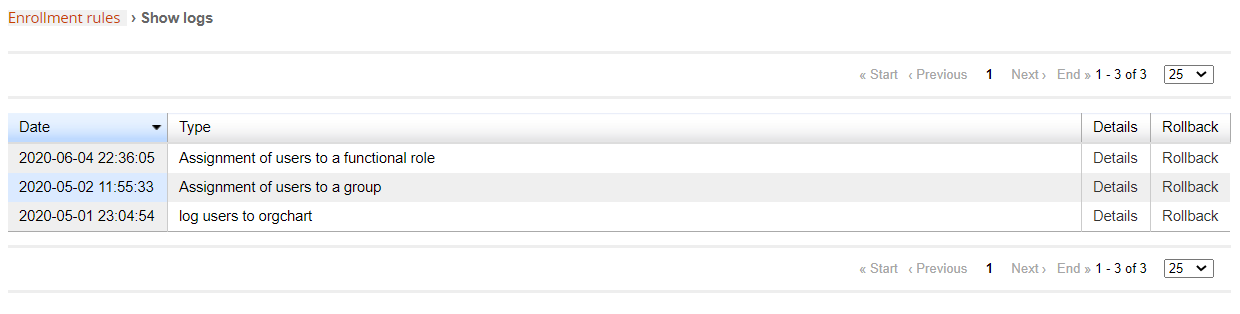
Logs
In this page you will see a list of all the applied rules. It will be possible to:
- Check a list of all the users subscribed through the rule
- Rollback the subscription, in case the rule was applied by mistake
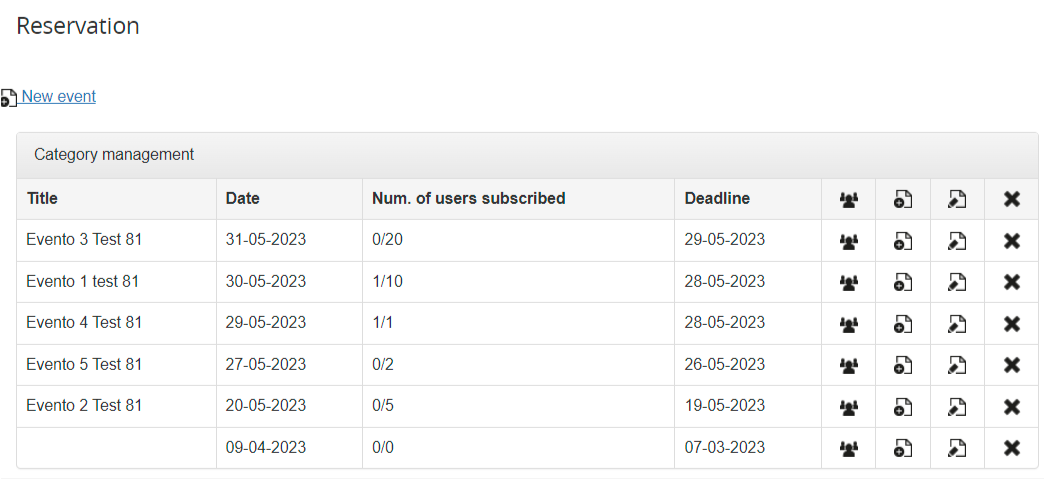
Reservations
The reservation module allows the creation of subscription events (i.e., in presence seminars, meetings, exams, etc.), where users can subscribe from within a course. Events can be created and managed in two ways:
- by course administrators having the edit permission set for their subscription level (I. Teacher, tutor, etc.). The “Reservation” item must be added to the course menu
- by platform administrators, from the forma admin section
Administration > Elearning > Reservation Management
Event Categories
Administration > Elearning > Reservation Management > Category
A category is a general classification for events, like “Exams”, “Seminars”, “Meetings”, etc.
Categories can be created only from the administration panel, and will be available for all events in any course on the same platform. For each category, you can set:
- Name: the name of the category
- Max event for category: limit the number of events a user can subscribe to in this category
Events
Administration > Elearning > Reservation Management > Events
This section will let platform administrators add and manage events for all courses